Contracts
This chapter will discuss the key processes related to the configuration of contract management.
Contract Transaction Parameters
Section titled “Contract Transaction Parameters”In Step 8, described in the “First Steps of Configuration” chapter, you conducted initial settings for contract management. You can review and change them if necessary.
- Go to the “Admin -> Contracts -> Settings” menu, verify the values in the fields, make changes and save them with each edited form.
The meaning of the fields on this list is as follows:
-
Working time: Number of hours in a working day Set the number of working hours per day for an employee in accordance with company policy and legal regulations.
-
Unit used for calculating working time: Determine whether project estimates should be billed according to standard hours or working days. If your company mainly carries out small orders, you may want to change this option to hours.
-
Default project manager assistant: Choose the appropriate “Contact” from the list or allow the field to be automatically filled with the data of the person creating the document.
-
Default foreman, default project manager, default estimator: Settings equivalent to the default project manager assistant.
-
Default department carrying out the project: Choose a specific “Department” from the list or leave the field blank with the option to select it during the creation of an estimate in the system.
-
Default margin markup: Define the default markup for new projects or estimates.
-
Default status for a new project: Choose the default status for a new project depending on how your company acquires orders.
-
Default type of work for a new project: Choose the “Type of work” from the list for each new estimate, or leave the field blank with the option to select it later.
-
Daily weather report (active projects): Determine whether weather reports should be generated for work started each day.
-
Project stages: Default advance payment/deposit percentage for a new stage: Set the default advance payment/deposit value for newly created project stages.
-
Project stages: Require a receipt protocol scan when changing status to “Received” or “Conditional Receipt”: Assess whether it is necessary to add a scan of the receipt protocol before changing the stage status.
-
Project stages: Enable conditional receipt and related statuses: Determine whether conditional receipts and intermediate stages are provided for in the implementation process.
-
Invoicing: Invoice autonumbering: Set up automatic numbering for subsequent invoices issued in the system.
-
Invoicing: Default project invoicing method: Choose the form of billing with the contractor - by stages or accumulated on the contract amount.
-
Invoicing: Default VAT rate: Specify the default VAT rate based on applicable tax regulations.
-
Invoicing: Default footer text: Add payment information and bank transfer details.
-
Invoicing: Default due date: Determine the default due date for the buyer’s financial obligation.
-
Invoicing: Default invoice type: Choose the method of accounting for work stages.
-
Invoicing: Last automatically generated invoice number: If you use auto-numbering and have previously used a different invoicing system, enter the last invoice number issued in the other system to continue the numbering.
-
Features: Show fields related to material samples: Display fields related to the verification of materials intended for the project.
-
Features: Show the “Project Accounting Identifier” field: Display a field allowing the entry of an accounting number for the project.
-
Features: Show fields and statuses in the project related to pre-construction documentation: Determine whether the statuses of the pre-construction documentation stage should be visible until the contract is signed.
-
Features: Show fields in the project related to insurance: Display fields allowing the determination of the required insurance coverage.
-
Features: Show in the project fields related to the general contractor: Display the entity responsible for the comprehensive execution of the project.
-
Features: Show in the project the field for “time and material” project type
-
Features: Show in the project the field for the date of the pre-construction audit: Display a field allowing the entry of the date for the verification of the actual state before starting the project.
-
Features: Show in the project the field for the date of receiving drawings: Display a field allowing the completion of the date when the documentation was provided by the client.
-
Features: Show in the project the field related to the safety data sheet of hazardous substances: Display fields related to hazardous substances to be used in the project.
-
Features: Show in the project the field related to material verification: Display fields allowing confirmation of material compliance with the project.
-
Features: Allow setting a project manager assistant: Display a field that allows entering a project manager assistant.
-
Features: Allow setting a project manager: Display a field that allows entering a project manager.
-
Follow-up (reminders): Default settings for pre-construction documentation sent to the client: Determine whether the system should send reminders about the continuation of ongoing activities, who should see them, and how many days in advance they should be displayed.
-
Follow-up (reminders): Default settings for: suspended quotations, prepared contracts, requests for additional information, verification requests, requests for scope of work changes, sent offers, sent estimates: Determine whether the system should send reminders about the continuation of activities at selected quotation stages to ensure continuity of the quotation process and prevent matters from being “stuck” at any of the key stages. Select who should receive them and how many days in advance.
-
Offer numbering: Choose the method of numbering offers, e.g., auto-numbering, prefix, and the type of numbering that will generate offers according to the selected settings.
Types of Projects
Section titled “Types of Projects”The areas defining the company’s activity are otherwise known as the types of projects in which the company specializes. In Step 10, described in the “First Steps of Configuration” chapter, you made the initial system settings. Depending on the nature of the company, the types of projects can vary, e.g., roof assembly, plumbing and electrical installations, interior finishing works, renovations, etc.
Adding new types of projects to the list is done according to the following scheme:
-
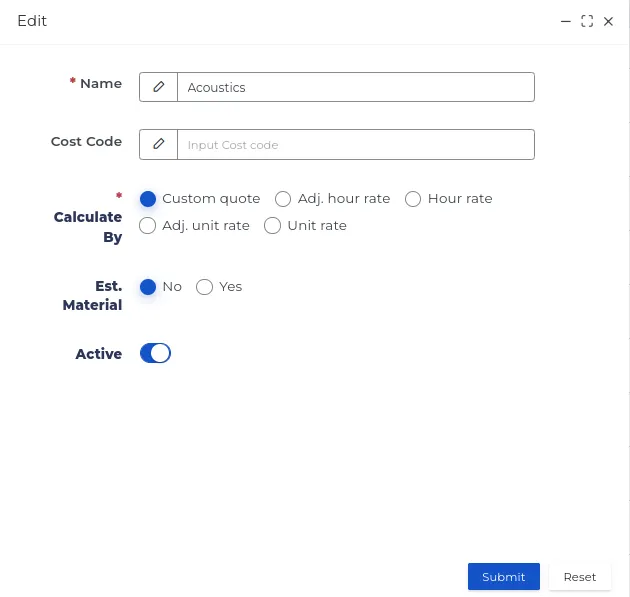
Select the “Admin -> Contracts -> Types of Projects” section, verify the types of work visible on the list and add another name using the “New” button.
-
Fill in the form and save with “Confirm”.
NOTE: If the type of project is to be visible in the project settings, set the switch to “Active”. You can always deactivate it by moving it in the opposite direction.
![]()
Work Scopes
Section titled “Work Scopes”Work scopes are used when estimating projects. In Step 11, described in the “First Steps of Configuration” chapter, you made their initial settings. Depending on the company’s profile, the work scopes can be as follows:
-
Roof assembly: Roof structure, sheathing, membrane covering, felt covering, tile laying, gutter and downpipe installation.
-
Plumbing and electrical installations: Laying water and sewage systems, electrical installation assembly, cable laying, electrical distribution board execution.
-
Interior finishing works: Painting walls, installing floor panels, internal door installation.
NOTE: The work scopes will determine the way they are priced for the service performed. According to these settings, the proposed costs for the estimate will be calculated.
Adding new work scopes to the list is done according to the following scheme:
-
Select the “Admin -> Contracts -> Work Scopes” section, verify the work scopes visible on the list, and add another name using the “New” button.
-
Define the pricing method for it by choosing one from the list available. More about the pricing available in the system can be found here.
NOTE: If the client usually provides materials for the construction on their own or you want to price it individually, set the switch to “No” for the “Estimated cost of materials” field.
REMEMBER: The selected work scope along with the pricing conditions will be available during its entry into the system, as long as the switch in the “Active” field is turned on.
- Save the form with the “Confirm” button.
If you are interested in the process of creating a quote in the system and the possibility of later modifying the settings, familiarize yourself with the detailed description available here.
Work Planner Settings
Section titled “Work Planner Settings”Effective time management of work includes issues related to precise calculation of employee salaries. In Step 9, described in the “First Steps of Configuration” chapter, you made initial settings, which you can now change if necessary.
-
Go to the “Admin -> Contracts -> Planner Settings” menu, verify the values in the fields, make changes and save them with each edited form.
-
The meaning of the fields on this list is as follows:
- Automatic creation of employee schedule entries: Allows assigning employees to tasks in advance by the number of days specified on the list.
REMEMBER: If you do not need automatic creation of assignments in the schedule, select the “Do not create” option on the list.
- Time of free breakfast break: This is the time deducted from the working time designated for a breakfast break.
NOTE: In Poland, employees are entitled to a paid breakfast break, so enter the value “0” in this field. For countries where the breakfast break is not paid, specify the contractual number of minutes of the break for which no remuneration is due.
- Time of sending notifications: Determines the hour at which the employee receives information about the upcoming work assignment, i.e., the place and time to report to the project.
REMEMBER: For the employee to receive notifications about work assignments, it is necessary to install the Contractors.es mobile application on the employee’s mobile phone.
- Default working hours: The range of working hours on different days of the week.
NOTE: If an employee is entitled to a free breakfast break, add it here.
-
Salary calculation: Determinations regarding compensation for time worked during the week, taking into account the basic hourly rate and overtime.
NOTE: You can apply individual rates for a specific employee by editing the employee’s contact - HR tab.
-
Meeting points - always allowed addresses for field employees to register work: A list of permitted addresses from which a field employee can start work. After logging in to the mobile application, working time is counted from the moment of departure from one of these locations, e.g., when the team leaves together from the company headquarters to the project.
-
Warning of being late or leaving early: Time margin (in minutes), after which the system marks such an entry warning of the situation that has occurred.
-
Warning of being too far from the project: Specifies the distance, beyond which the work assignment record will be marked as logging in outside the project area.
REMEMBER: Limits informing the supervisor about being late, leaving early, and moving away from the project site are recorded through the employee’s mobile application during their logging in and out of work. This data is helpful in assessing the employee’s reliability.
-
Allow foremen to confirm employee attendance: Enables foremen to confirm the attendance of field employees in the mobile application and add a group photo as proof.
NOTE: Disabling the foreman control function results in no access to the “Attendance” section in their mobile application.
- Calendar hour range: Includes the range of hours visible on the calendar, giving the possibility to assign work within this time frame.
Types of Issues
Section titled “Types of Issues”Reporting issues on projects is a key element affecting their effective management. Thanks to the quick identification of potential difficulties, it will be possible to take the necessary corrective actions. Defining the types of issues in the system will allow for their efficient segregation. Employees, when reporting an issue, choose the appropriate category from the list, which enables the supervisor to determine what problems are most common, and what may require change.
Construction issues (not related to weather) may include, among others:
-
Delays in material deliveries.
-
Non-compliance with building regulations.
-
Employment of workers.
-
Equipment failures.
-
Conflicts within the team.
-
Poor project management.
You can add contractual issue categories in the following way:
- Select the “Admin -> Contracts -> Types of Issues” section, verify the names of issues visible on the list, and add more using the “New” button.
NOTE: If the issue category is to be visible in other system sections, set the toggle to “Active”. You can always deactivate it by sliding it the other way.
![]()
- Save the form with the “Submit” button.
NOTE: Reporting weather-related issues by employees is possible through the mobile application. Weather data is automatically retrieved, which further simplifies and authenticates the report.
REMEMBER: Precisely defining potential construction problems that are beyond our control can be useful in case of disputes with the client. It constitutes significant evidence in the event of failure to meet deadlines, which could result in a penalty.
Categories of Inspections on Projects
Section titled “Categories of Inspections on Projects”Conducting control visits is within the competence of selected employees, and the purpose of their designation can vary.
Types of control visits may include:
-
Building Inspections: Allow for checking the compliance of the execution with the building design and applicable regulations. Inspections can cover different stages of construction.
-
Technical Visits: Are focused on technical aspects and project specifications. They enable a coordinated analysis of the technical team’s actions.
-
Safety Visits: Focus on the safety aspects of employees and compliance with OHS standards. They include risk assessment and the effectiveness of preventive measures.
-
Problem Visits: Serve to analyze and solve problems encountered during project implementation. They allow for a quick response to potential complications.
-
Control Visits: Serve for regular monitoring of construction progress. During control visits, timeliness, quality of work, and adherence to the planned schedule can be assessed.
You can edit or add the types of visits available in the system according to the scheme:
- Select the “Admin -> Contracts -> Types of Site Visits” section, verify the names visible on the list, and add more using the “New” button.
NOTE: If you want the employee to fill out the “Estimation Accuracy and Work Progress” form during the inspection visit, set the switch to “Active”.

REMEMBER: The selected inspection category will be available during its entry into the system as long as the switch in the “Active” field is turned on.
![]()
- Save the form with the “Confirm” button.
NOTE: The visit to the project will be visible on the employee’s CRM calendar.
Inquiry Sources
Section titled “Inquiry Sources”Tagging inquiry sources in project records helps better understand which communication channels are most effective, allowing you to focus resources on the most efficient methods of acquiring clients.
The available types of inquiry sources in the system can be edited or added as follows:
-
Go to Admin → Contracts → Referrers, review the list of existing names, and add new ones by clicking “New”, or edit existing names using “Quick Edit”.
-
Save the creation or modification form by clicking “Confirm”.
NOTE: The system automatically sets the default inquiry sources as: “Advertising”, “Social Media”, “Website”, and “Referral”.
REMEMBER: A selected category will remain available for use in the system as long as the “Active” toggle is enabled.

To check which inquiry source is the most effective, follow these steps:
- Go to the “Contracts → Projects” section, reset the filters by clicking the “Undo changes” button, and then display all records in the list.
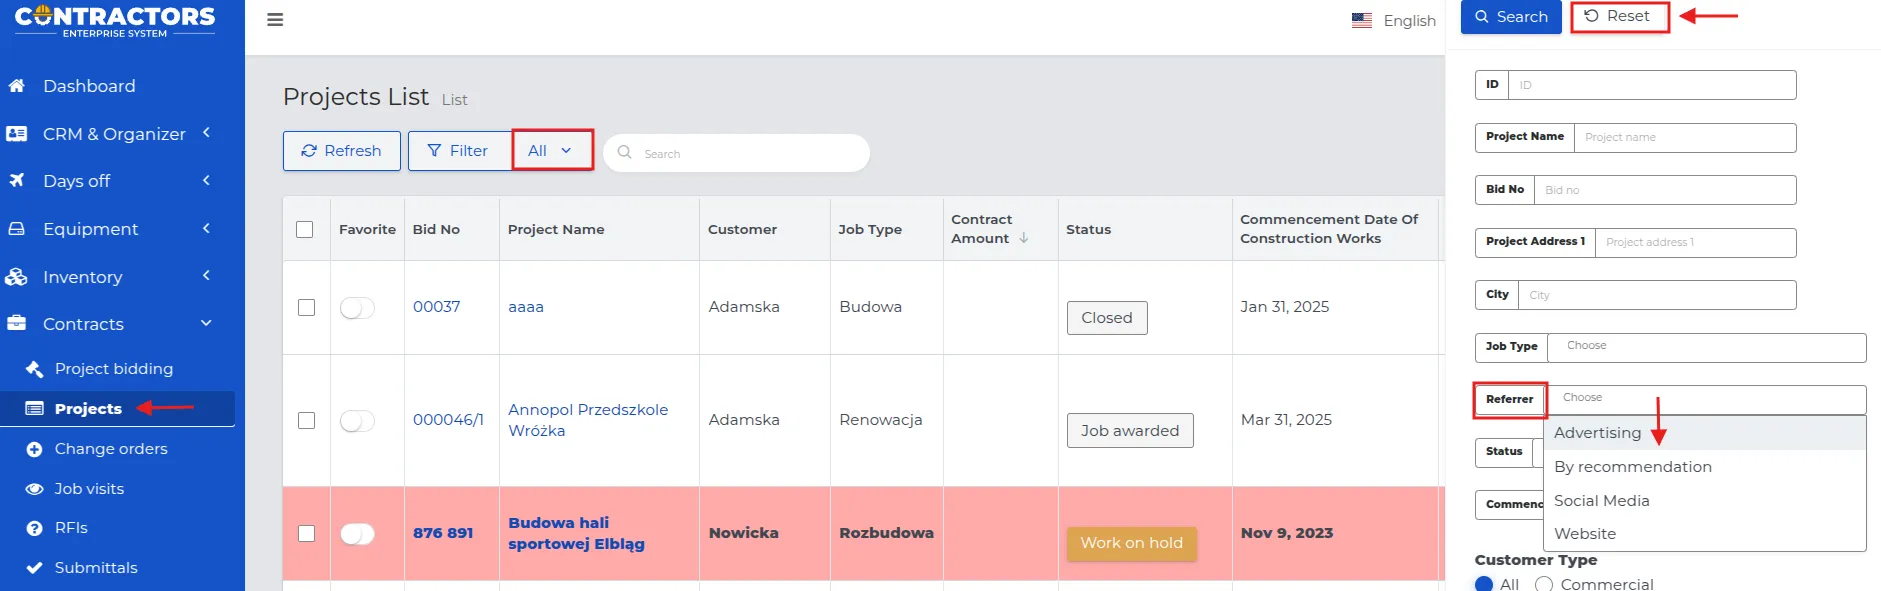
-
In the “Inquiry Source” field, select the communication channel you are interested in and click the “Search” button.
NOTE: You can select more than one inquiry source for analysis, but the results will not display individual data for each source.
-
Only the selected entries will remain in the list, and their total count will be displayed at the bottom of the list.
REMEMBER: With detailed filtering, you can further narrow down the list, for example, by date range, project type, or groups of people related to a specific contract.
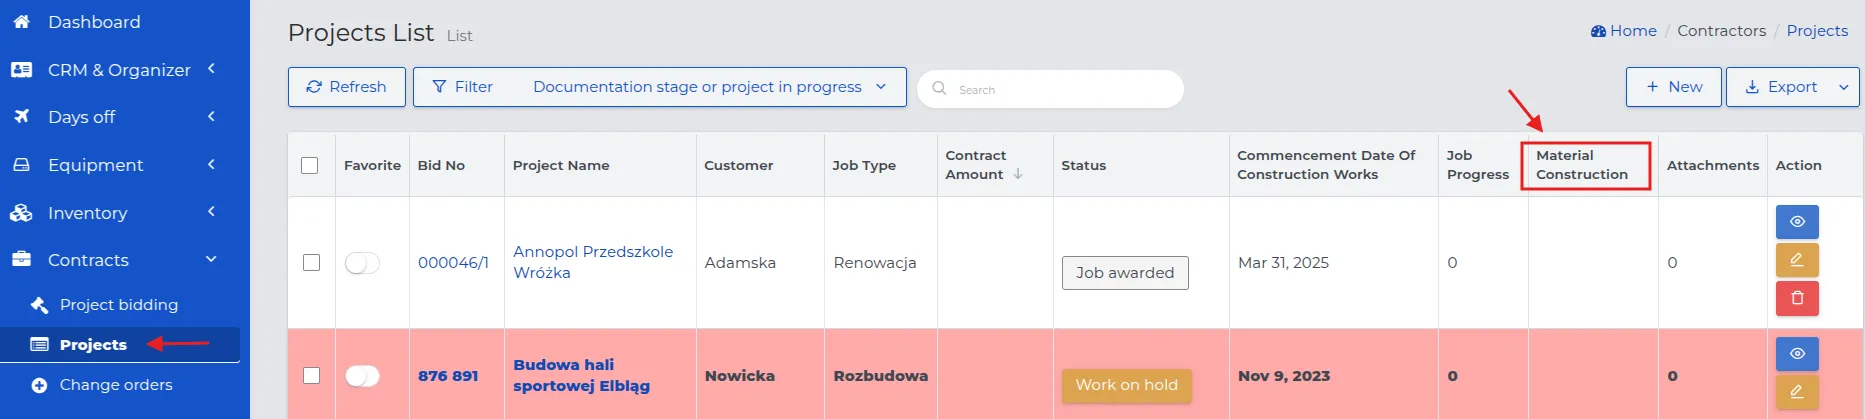
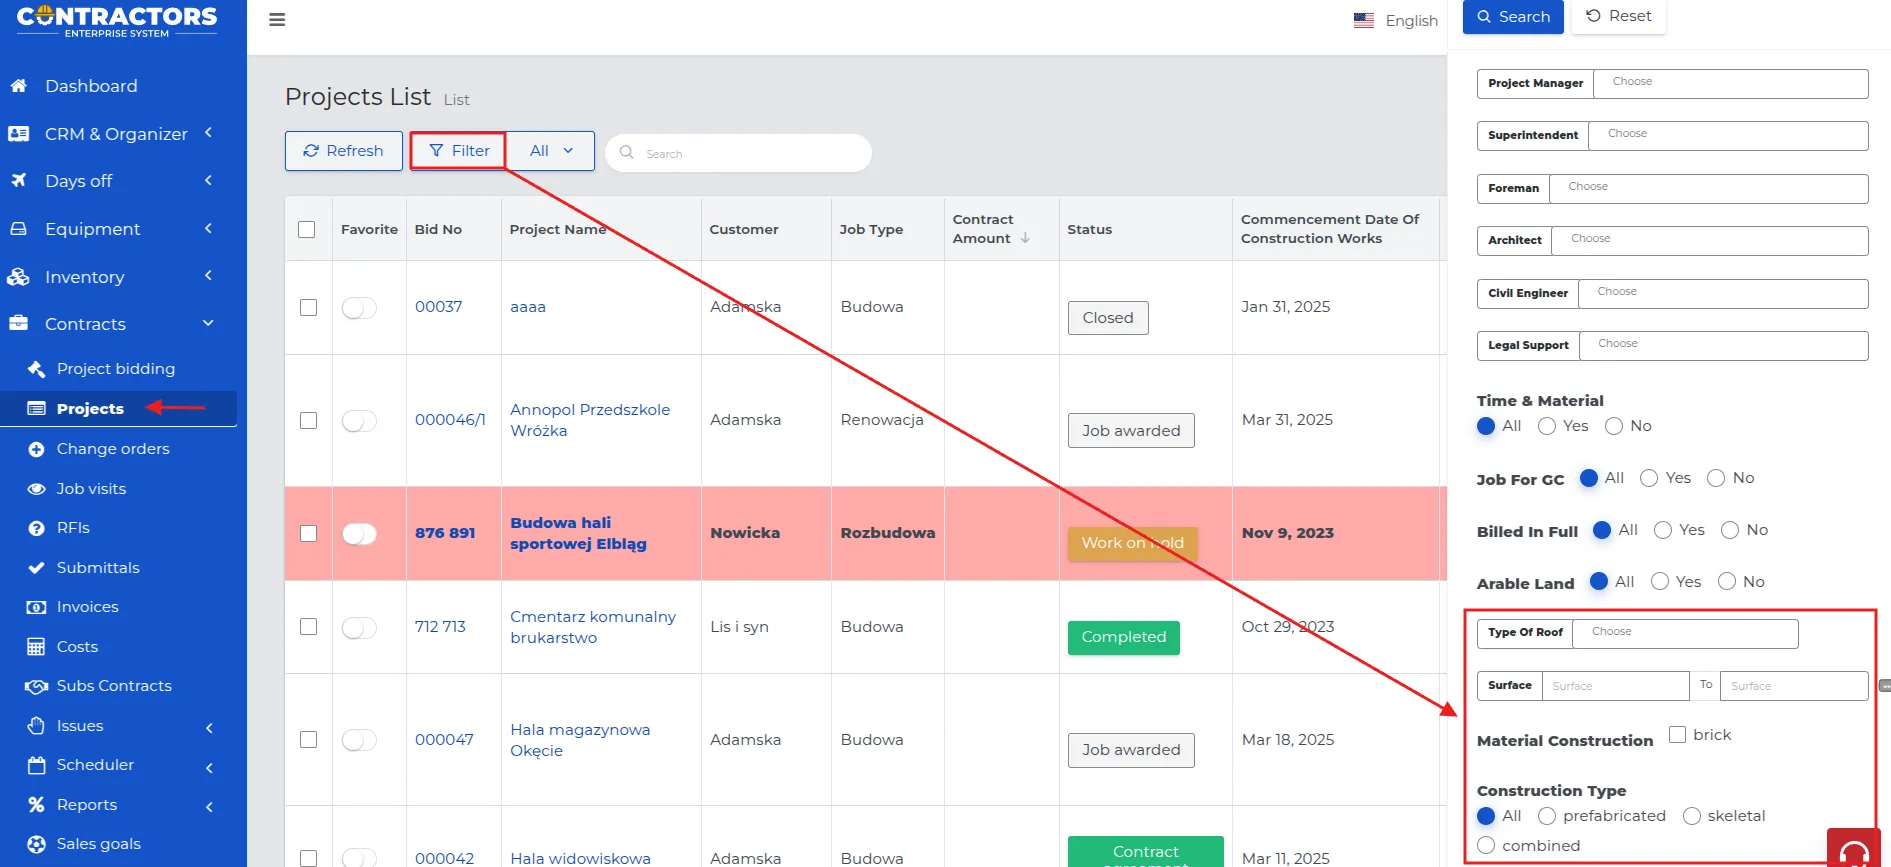
Additional project fieldsections
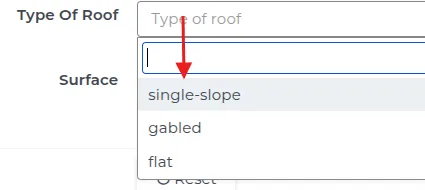
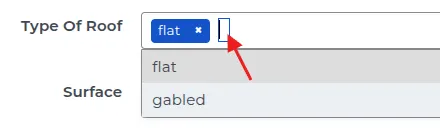
Section titled “Additional project fieldsections”Additional fields in projects allow you to customize the system to the specific needs of various implementations. They serve to store important data, facilitate searching, filtering, and analyzing information, ensuring better organization and control over the project.
Among the available settings for each field, there are the following options:
-
Editable (required) – the user must enter a value in order to proceed.
-
Editable – the field can be edited, but it is not mandatory.
-
Visible, non-editable – the field is displayed but cannot be modified.
-
Hidden – the field is not visible to the user.
NOTE: Additional project fields are visible in the “Details” tab. Depending on the configuration, they may be mandatory or optional to complete.
To create “Additional project fields,” follow these steps:
-
Go to the “Admin -> Contracts -> Additional Project Fields” menu and click the “New” button.
-
Complete the form, where the meaning of the fields is as follows:
-
Name: Example title of the field with variables, e.g. Roof type, Infrastructure, Access road.
-
Type: Method of entering data by the logged-in user.
-
Text – any entry in the field, which can be marked as “Unique value” to prevent duplication of names or document numbers in concurrently ongoing projects.

NOTE: If “Unique value” is not enabled, entries in the “Short text” field may repeat across different projects.
- Number - the range of values within which the variable must fall.
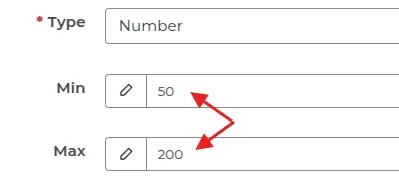
NOTE: If the data entered by the user exceeds the allowed range, the system will display an appropriate message.

- Decimal - a value in the decimal system, functioning analogously to the “Integer number”.
- Boolean - a choice between two available options Yes/No.
REMEMBER: With this setting, the user will select one of the options using the activity slider.
![]()
- Date – selection of a date from the calendar, allowing it to be associated with the project.
- Date and Time – selection of a date from the calendar along with the associated time.
REMEMBER: The user can select both a date and a time using the clock icon located beneath the calendar.
- Textarea – a field allowing the entry of a detailed input containing multiple lines of text.
- Select – the ability to select one option from those specified in the “Possible options” field.
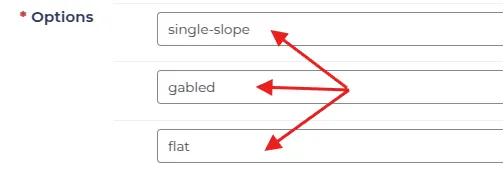
REMEMBER: With this setting, the user will be able to select one of the “Possible options” from the list.
- Multiple select - the ability to select more than one option from the options specified in the “Possible options” field.
REMEMBER: After selecting one option, the user will be able to select another from the list or remove the currently selected option using the “X” button.
- Radio and Checkbox - these work similarly to “Select Lists,” but the way they are selected differs.
REMEMBER: In this case, the user selects one or more options by clicking on them without expanding the list.

-
Reference: Specifies where the created custom fields will be visible within the system.
-
Project Offering & Project – fields available both at the offering stage and during project execution.
-
Project Offer & Project – fields visible in the offer and later during the execution stage.
-
Project Only – fields will only appear in the project view.
NOTE: Depending on the assigned location, custom fields will be available at different offering, offer, and project statuses.
- Check all available statuses and define their level of availability.
NOTE: If the first status of the offer or project remains visible, it will not be possible to hide the subsequent statuses.
REMEMBER: The custom project field will only become visible once the corresponding status of the project offer or project is reached, and the preceding statuses have been hidden.
- Set the activity of the created custom field in the selected reference by toggling the switch to “Yes.”
NOTE: If you want the name of the added custom field to appear in the record list column, enable the “Show in list” option.
NOTE: A custom field cannot be removed from the list if it has been linked to at least one record in the system.
REMEMBER: If an option has been selected in at least one project, changing its name will make the old name available in the projects where it was previously used.
REMEMBER: Any update to the names of custom fields, for which their activity has been set, will be available in references, regardless of when the record was added in the system.
- Save changes using the “Confirm” button.
REMEMBER: The created additional fields will be available in the “Detailed Filtering” list, allowing for easy searching of desired records by marking a specific variable.
Project Stage Templates
Section titled “Project Stage Templates”Task billing in a project is easier when the work is divided into stages. In the “Project Stages” section, you can define the main phases, such as Preparatory Work, Flooring, Ground Floor, Foundations, or Roof. Stages are also linked with billing (in the case of stage-based billing).
To automate stage creation, you need to define templates in the administrative settings.
To create a new “Project Stage Template,” follow these steps:
-
Go to the “Admin -> Contracts -> Project Stage Templates” menu and select the “New” button.
-
Fill out the form, paying attention to the significance of each field:
-
Stage Name: Enter a recognizable name, e.g., a specific stage (“Flooring”) or an ordinal number.
-
Active: Leave the toggle on if the stage should be visible on the list.
-
Depends On: Indicate the stage whose completion is required to start this task.
-
Dependent: Indicate the stage whose start depends on the completion of the current task.
-
Assignment Rules: Add a new “Scope of Work” from those available on the list. These scopes will always be assigned to this stage.
-
Keywords in Scope of Work Descriptions: Enter names that the system will search for in the scope of work descriptions when creating a price list.
-
NOTE: Scopes containing the specified keywords will be automatically assigned to this stage when preparing the contract.
REMEMBER: If you do not enter any keywords, the stage will match all work whose scopes align with the added rules.
Example: Scopes of work assigned to the Foundations stage.
In the settings for this type of scope of work, the following keywords were entered: preparatory work, excavation, reinforcement, concreting, insulation.
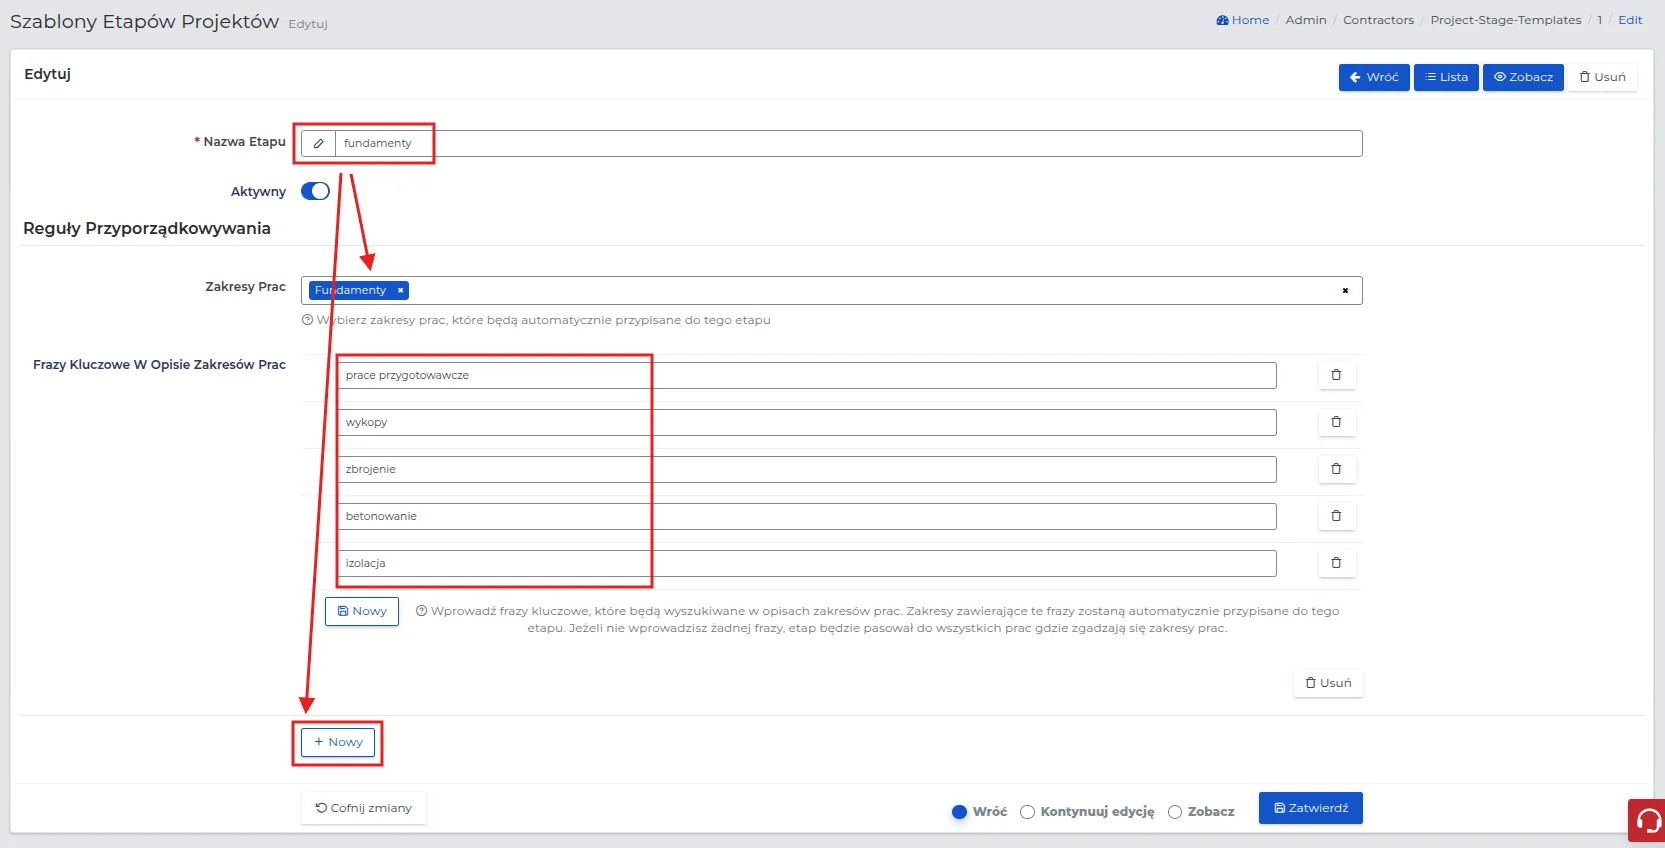
NOTE: The Foundation stage can be divided into two or more work scopes with the same name, but by entering separate keywords for each. This way, the system will automatically assign the appropriate tasks to the correct sub-stage.
REMEMBER: If the user does not enter all the required keywords when creating work stages, the stage will not appear on the list or the work scope will not be assigned to the stage.
Stages can be dependent on each other to maintain the correct order while being able to execute two stages simultaneously. This function is analogous and related to the function of creating sequential tasks in a given stage in the project schedule.
Types of Tasks in Project Schedules
Section titled “Types of Tasks in Project Schedules”In project schedules, tasks can have different types and dependencies that determine the order of work execution.
In the system, you can set tasks divided into:
-
Sequential tasks – some tasks must be completed before the next work can begin. Example: foundations must be completed before the ground floor construction can start.
-
Parallel tasks – some work can be conducted simultaneously if there are no dependencies between them. Example: simultaneous installation work in different parts of the building.
Creating tasks allows during the creation of the work schedule to:
-
easily see which tasks are in progress, completed, or ready to start,
-
monitor project progress and avoid conflicts between stages,
-
precisely plan work and settle projects.
REMEMBER: Task type dependencies in the schedule operate within a single project stage.
NOTE: For projects divided into several stages, the system limits the ability to assign work scopes according to a given stage, e.g., you cannot assign tile laying to the foundation stage.
To create “Types of Project Schedule Tasks,” follow the sequence:
-
Go to the “Admin -> Contracts -> Types of Project Schedule Tasks” menu and select the “New” button.
-
Fill out the form, paying attention to the significance of each field:
-
Task type name: Specify the type of task for which a dependency on other project work is to be set.
-
Color: Choose the color in which the task will be displayed in the planner.
-
Depends on: Indicate the task whose completion is required to start this task.
-
Dependent: Indicate the task whose start depends on the completion of the current task.
-
Delays dependent tasks (days): Specify the number of days that should pass after the completion of the preceding task before the dependent task can start.
-
Active: Set to “Yes” if the dependency for this task is to be active.
- Save the changes using the “Confirm” button.
Example: Below is shown how the set task types with dependencies appear on the list in the system and how these dependencies translate into the work schedule in practice.
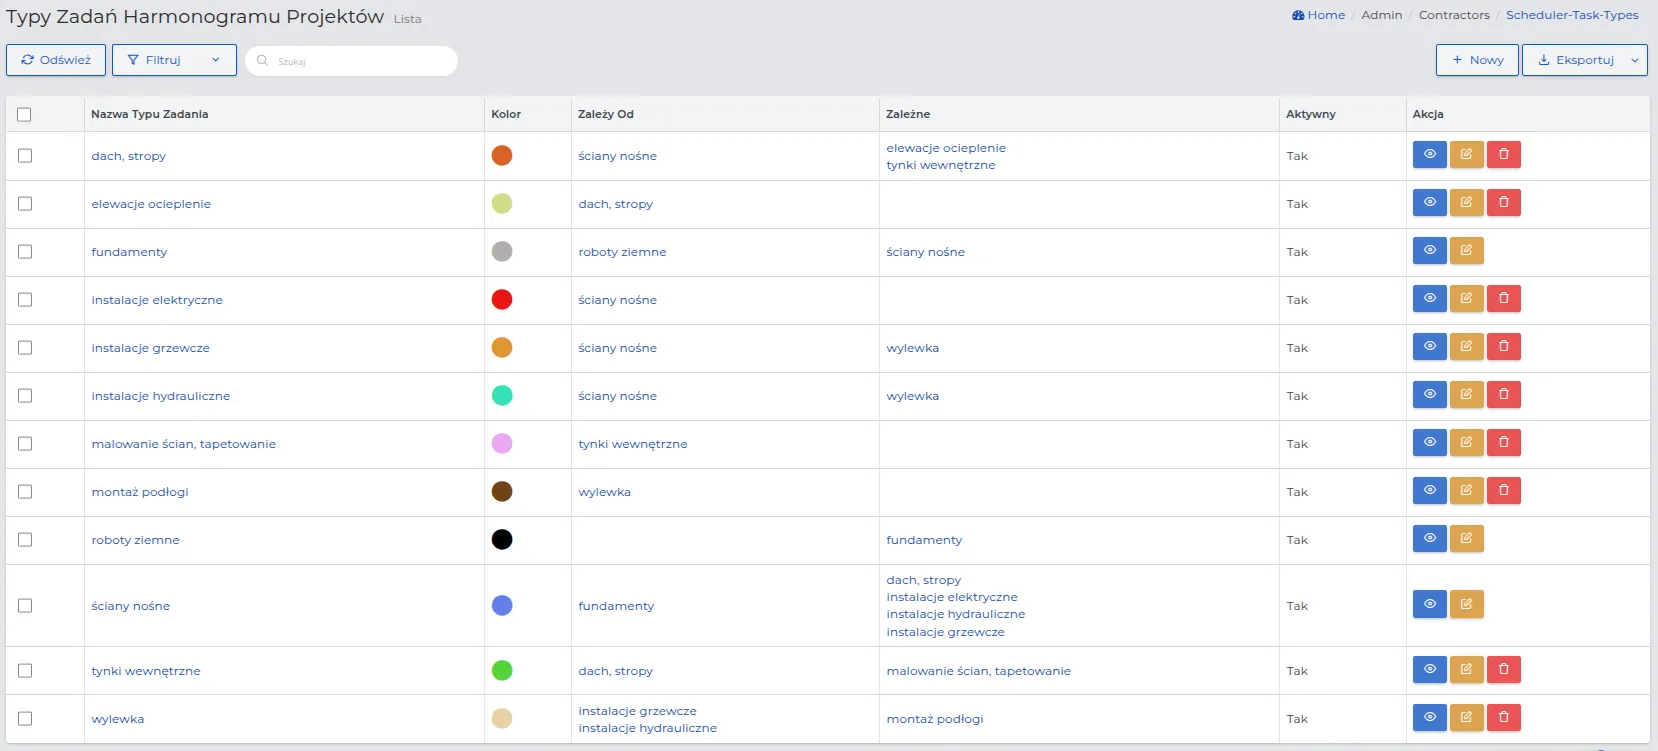
In practice in the schedule:
-
Earthworks start first – they do not depend on any task.
- After the completion of earthworks, it is possible to start foundations.
-
Foundations start after the completion of earthworks.
- After their completion, the system allows the start of: load-bearing walls.
-
Load-bearing walls start after foundations.
-
After their completion, it is possible to start:
-
roof and ceilings,
-
electrical installations,
-
plumbing installations,
-
heating installations.
-
-
-
Roof and ceilings start after load-bearing walls.
- After their completion, you can start: insulation facades and internal plasters.
-
Heating installations, plumbing installations, and electrical installations can start after load-bearing walls.
-
Insulation facades start after the completion of the roof and ceilings.
-
Internal plasters start after the roof and ceilings.
- After the completion of plasters, it is possible to start: wall painting and wallpapering.
-
Painting walls and wallpapering starts after the completion of internal plastering.
- After their completion, floor installation is possible.
-
Screed starts after the completion of heating and plumbing installations.
-
Floor installation begins after the screed is done.
REMEMBER: For these types of tasks where it is necessary to specify the number of days delaying the start of the next related task or stage, set the appropriate number of days. This way, the user creating the work schedule will see after how much time the next tasks/stages can start at the earliest.
REMEMBER: Not all tasks require a time delay. How you set these dependencies depends on the specifics and needs of the company.
Project Document Templates
Section titled “Project Document Templates”This system feature allows you to create and manage project document templates used in the process of preparing offers, contracts, and change documents in projects.
With this feature, it is possible to predefine the document structure and select fields from the available list that should be automatically included in generated documents. These fields may include customer data, project information, scope of work, financial values, deadlines, or execution conditions.
The system enables creating separate templates for different document types:
- Offers – for quickly generating consistent business proposals,
- Contracts – for standardizing contractual clauses within the company,
- Project Changes – for documenting scope, cost, or schedule modifications.
Using templates ensures uniform documentation standards in the company, reduces the risk of missing critical information, and significantly accelerates the document preparation process.
REMEMBER: The number of templates in a given subgroup will be visible when choosing to download a PDF. The user then selects the document format, so it is important that templates are appropriately named and distinguishable—this facilitates selection of the correct version and prevents export errors.
NOTE: The system has preset templates for project changes and project offers. For each of these, variants are available: with scope and prices, with scope without prices, and summary.
To create a new template for a project contract, follow these steps:
-
Select the “Admin → Contracts → Project Contract Templates” section and click the “New” button in the upper right corner of the screen.
-
Provide a template name, for example: Preliminary Contract, Contract with Scope, Contract with Scope and Prices, Contract without Prices, Contract Amendment.
-
Set the “Active” toggle to “Yes” if the template should be available on the list when generating a PDF document.
-
In the “Content” field, define the document layout and locations where the system should automatically insert data from records (e.g., project data, customer information, scope, prices).
-
Save the data using the “Confirm” button.
Example: Template Preliminary Contract.
The “Content” field contains a fixed preliminary contract template that is repeated in all documents. Data is automatically populated from the selected project record in the system.
The completion method is based on the standard Office format, making template creation simple and intuitive.
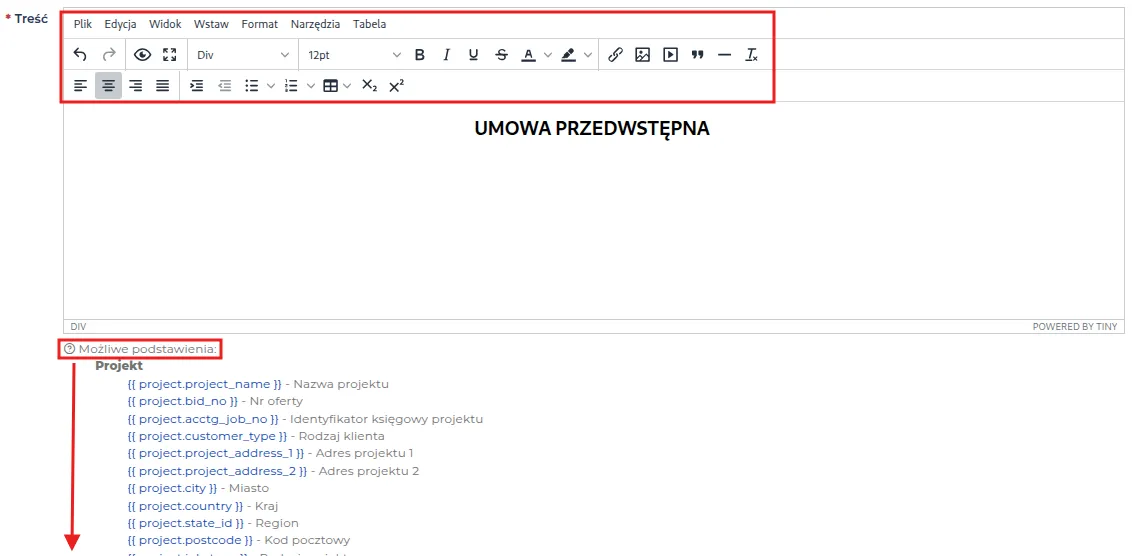
To add available substitutions to the template, drag them with the mouse into the document content or copy the selected field and paste it using the Ctrl/Cmd + V shortcut.
REMEMBER: After saving the template, a preview is available in the preview view along with the ability to copy it for further editing without needing to create a new template from scratch.
This solution eliminates the need to create templates in Excel and manually control document numbering.
REMEMBER: If a numbering scheme is defined in the system settings, each newly generated document is automatically assigned the next available number according to the established order.
This feature ensures documentation consistency in the company, eliminates the risk of number duplication, and accelerates document creation and archiving.