

Contact and Company Database
Sections related to the menu item named “Contacts, Companies, and Employees” are places in the system where information about business contacts, companies, and employees is stored. Effective management of relationships with customers, partners, and staff enables efficient actions that translate into smooth business operations.
Company Directory
Section titled “Company Directory”In the “Companies” section, users have the ability to manage information about business partners, clients, and contractors. Here you can add new company entries, edit existing ones, and possibly delete unnecessary records. Below is the sequence of steps for each of the mentioned possibilities.
Adding a new company to the system follows this scheme:
-
Open the “CRM -> Companies” section in the menu and click the “New” button.
-
Fill out the form, paying attention to the fields:
-
Company name: The name by which the company can be searched for in the records.
-
Groups: Assigning the company to one of the groups defining the nature of the business e.g., Supplier, Client, Subcontractor. Groups are defined by the administrator according to the description here.
-
Permissions: Access to the created “Companies” entry e.g., Public, Public read-only, and Private. You can find more about permissions [here]/en/crm/1/#permissions).
- Save the data using the “Confirm” button.
Contacts associated with the added company are entered into the system according to the established sequence:
-
Select the company from the list visible in the “CRM -> Companies” menu to which you want to add a contact.
-
Click the “Contacts” tab and select the appropriate contact group e.g., “Contacts”, “Former Contacts”, for which the definition is as follows:
-
Contacts: Employees currently employed at this company, performing a specific role.
-
Former Contacts: Data of people who were previously employed at the company. Their data remains in the system, which facilitates further communication or potential cooperation.
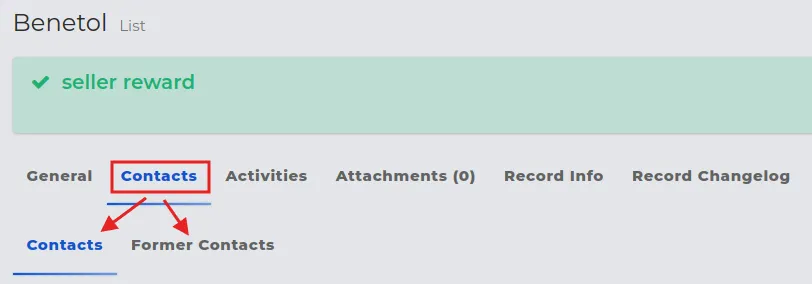
- Add contact details in one of the selected tabs, paying attention to the fields:
-
Title: The name of the position held, e.g., Accountant, Production Manager.
-
Former employers: You can optionally select a company where the “Contact” previously worked. However, the company must already exist in your database of companies.
-
Groups: This pertains to selecting from a list only when the “Contact” belongs to a specific group among the available options. Groups are defined by the administrator as described here.
-
Permissions: Access to the created “Contact” entry e.g., Public, Public read-only, and Private. You can find more about permissions [here]/en/crm/1/#uprawnienia).
NOTE: If the contact was previously employed at another company that is already in our database, you can select it from the list in the “Former employers” field. The link will also be included in the “Former Contacts” tab for that company.
REMEMBER: When editing or removing an employee from a company, it will automatically be added to former employers. You do not need to manually add such a company.
- Save the form by clicking the “Confirm” button.
NOTE: If the company in your database operates as an employment agency, you can add a “Contact” to it and mark them as an employee of your company, following the description available here.
Editing company data in the list of records can be done in two ways:
Method I:
-
Select the company from the list whose data you want to edit.
-
Use the “Edit” action button, enter changes, and save using “Confirm”.
Method II:
-
Go to the preview of the selected company’s entry in the list using the “View” action button.
-
Click on the “Edit” button, then enter and save the form with changes using “Confirm”.
REMEMBER: Clicking the company name on the list is equivalent to using the “View” action button.
Removing a company from the list is only possible when the “Delete” action button is visible in the record, which means there are no links of this company with other important records in the system.
NOTE: Data in records that have been deleted may be available again after being restored from the trash by the System Administrator.
Restoring deleted records is done in the following order:
- On the list of companies, apply a filter with the option “Trash”.
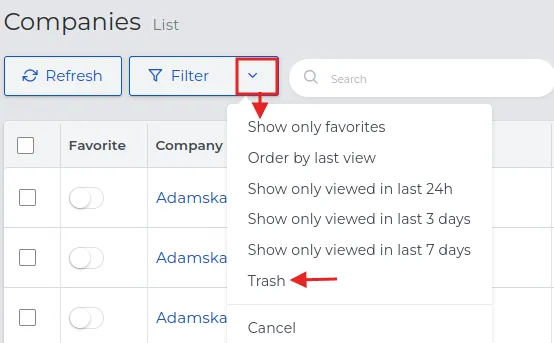
-
Click the “Restore” action button on the record you want to restore.
-
The selected Company will reappear on the list in the “CRM -> Companies” menu.
Contact Directory
Section titled “Contact Directory”The “Contacts” section stores information about people who cooperate with us, are employed, or are not associated with our activity. To add new contacts, assign them to companies, or edit and delete existing records, follow the instructions below.
Adding a new contact to the system is done according to the scheme:
-
Open the “CRM -> Contacts” section in the menu and click the “New” button.
-
Fill out the form, paying attention to the fields:
-
First Name, Last Name: Personal data by which it will be possible to search for the contact in the records.
-
Groups: Assigning the contact to one of the groups defining their position, e.g., Estimator, Accountant, Foreman.
-
Permissions: Access to the created “Contact” entry, e.g., Public, Public read-only, and Private. You can find more about permissions [here]/en/crm/1/#uprawnienia).
- Save the data using the “Confirm” button.
NOTE: The employee adding the Contact can also assign them to the Employees group if they have the appropriate permissions (the “HR” role). For this purpose, use the “HR” tab and enter the employment.
Companies associated with the added Contact are set in the following order:
-
Select the contact from the list visible in the “CRM -> Contacts” menu to which you want to add a company.
-
In the record preview for the “Company” field, select the company name available on the list.
NOTE: Only companies entered into the system will be visible on the list, whose addresses can be copied according to the data provided during the creation of the company record in the system. To do this, use the “Copy address” button after selecting the company you are interested in.
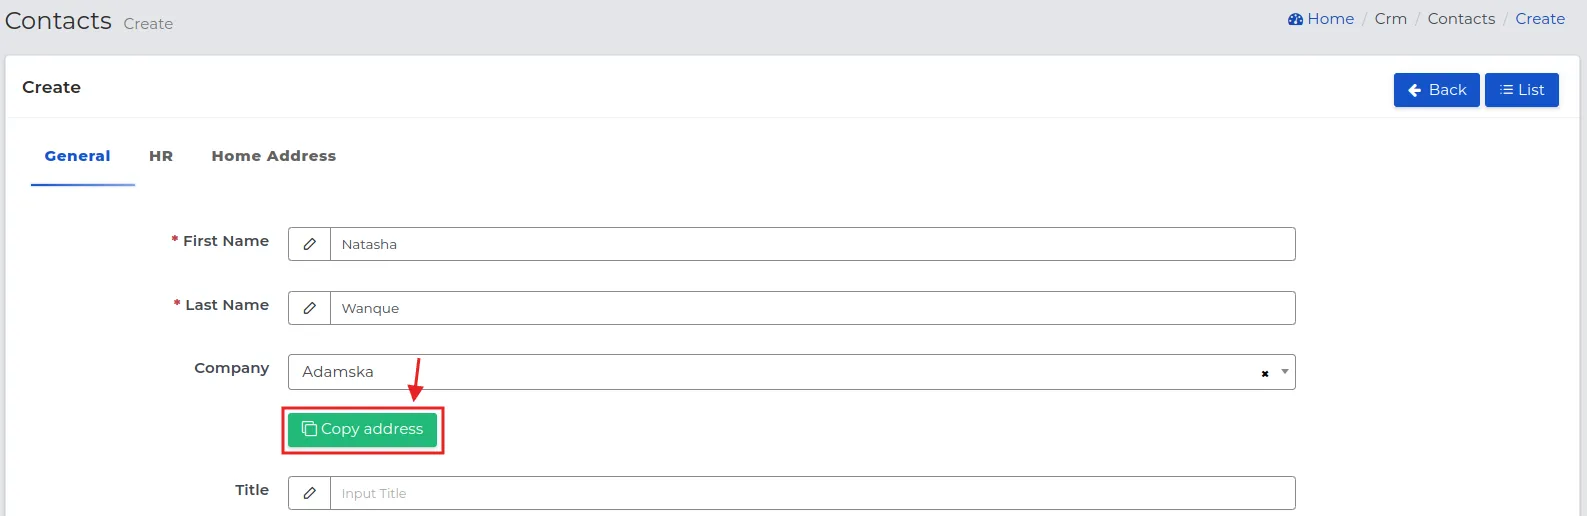
- Save the form by clicking the “Confirm” button.
Editing contact information on the record list is done in the same way as editing company data.
REMEMBER: Clicking on a contact’s name on the list is equivalent to using the “View” action button.
Deleting a contact from the list is only possible when the “Delete” action button is visible on the record, which means there are no associations with other important records in the system.
NOTE: Data in records that have been deleted are again available in the trash - an administrator can restore such a record to the contact list.
Restoring deleted records with contact information is done in the same way as restoring company data.
Employee Data
Section titled “Employee Data”The Employees section stores information about individuals who were or are currently employed by the company, even if they do not have an account in the system. Managing the employee database is identical to managing the “Contacts” section.
REMEMBER: An employee is any contact in the database whose status is marked as “Employed” in the “HR” tab.
Other fields when creating a new record on the “Employees” list include:
-
Employee status: Date in the calendar marking employment or dismissal.
-
Department: Belonging to a specific employee group, whose names are set by the system administrator, e.g., Office, Warehouse, Installations.
-
Subdivision/Brigade: Optionally, if the department has work brigades, e.g., Installations → water-sewage, electrical.
-
Default substitutes in case of employee absence: Select an employee from the list who will serve as the substitute during the absence.
REMEMBER: The substitute will be granted access rights to the CRM calendar and projects during the absence. They will take over the responsibilities of the absent employee.
NOTE: Substitutes can only be assigned to employees with the same or higher system permissions. If no substitute person is indicated in the HR form, the system will, during each absence, display a list of employees with appropriate permissions, from which it will be possible to select a substitute.
REMEMBER: Changes made by the substitute will appear in the absent employee’s calendar but will only be visible until the end of their absence.
-
Tax ID, Personal ID number, Date of birth: Personal data of the employee.
-
Standard gross hourly rate: Estimated cost of employment for one hour of work. The value should be calculated by dividing the full salary by 30 calendar days, and then by the number of working day hours (e.g., 8 hours).
-
Non-standard hourly rates: Work scopes for which the gross hourly rate differs from the standard. Usually this is a higher amount, calculated analogously - by the number of days in the month and daily working hours.
-
Non-standard percentage salary rates: Set only if the employee has an agreed contractual rate for overtime.
NOTE: Values for non-standard percentage rates are set by the administrator, but can be modified individually for each employee. The field is editable.
-
Benefits, Obligations, Marital status: Individual information concerning, among others, pensions, benefits, loans, bailiffs, and marital status.
-
Leaves and days off: Settings in accordance with the provisions of the Labor Code, covering the number of paid leave days, sick leave, and on-demand days.
REMEMBER: If an employee is hired in the middle of a calendar year, the number of vacation days due will be proportionally smaller than in a full year. This should be taken into account at the time of signing the contract.
Unused days from the previous settlement period should be included in the fields at the end of the form, entering their remaining number. They will be added to the current limit. This applies to employees employed for at least one year.
- Address and home phone: Individual contact data needed to contact the employee.
NOTE: Access to the employee list is restricted to system users with permissions to view the “Employees” directory.
Leaves and Days Off
Section titled “Leaves and Days Off”Depending on permissions and system roles, employees can register leave requests through:
-
Mobile application - applies only to foremen and field employees.
-
Web system - available to all system users.
Registering a leave request via the mobile application has been described here. Creating a request in the web version of the system proceeds according to the following steps:
-
Go to the section “Days off → Leaves and days off”.
-
Select the “New” button in the upper right corner and fill in the form:
-
Start, end: Date range for the planned leave.
-
Type: Select the type of absence from the available: planned leave, on-demand, sick, unpaid.
-
Substitute: The person who will serve as the substitute during the absence. The system will enable them access to the calendar and projects in which the requesting person is involved during this time.
REMEMBER: If no substitute has been specified in the “HR” data, the system will allow you to select a person from the list of employees with the same or higher permissions.
-
Note: Optional remarks or additional information.
-
Percentage salary rate: Leave the default value set by the system if the days are to be deducted from the leave pool.
NOTE: In the case of unpaid leave, the value is 0%, while for training or individual contracts it may be different - according to company policy.
- Save the data with the “Confirm” button.
REMEMBER: It is recommended to create a “Leave and days off requests” applet on the dashboard to have an ongoing preview of the statuses of submitted requests.
Only users with appropriate permissions can change request statuses. On the record list in the “Days off → Leaves and days off” section, they can set the status: Approved, No consent or Cancelled.
NOTE: The system automatically calculates the number of leave days, subtracting weekends and holidays from the selected range.
This means that if the request covers 10 calendar days, and during this time there are two weekend days (Saturday and Sunday), then 8 days of leave will be accepted for settlement. The same applies to holidays set by the administrator - they are automatically excluded from the leave days pool.
NOTE: Cancelling a leave request does not automatically assign the employee to a project. After changing the status from “Approved” to “Cancelled”, the task must be manually assigned to the employee in the work schedule.
Notifications about status changes of submitted requests are received by employees using the mobile application (running in the background).

Users of the web application are recommended to create an applet on the dashboard, and then mark the record as “Favorite”. Thanks to this, each change in this record will be visible in the top panel of the system, without the need to manually browse the record list.
