

Settlements
In the settlements department, we focus on monitoring and documenting all financial transactions related to projects. Every invoice, cost, or subcontractor agreement entered into the system is considered in the reports concerning the project budget. This allows us to track and control expenses, identify potential discrepancies, and take appropriate corrective actions.
In the “Contracts → Invoices” section, you can:
- View invoices issued for ongoing projects.
- Export the invoice list to CSV/XLSX format.
REMEMBER: By default, only the administrator can export the invoice file. To change this, you need to edit role permissions (e.g., add the export capability to the accountant role).
NOTE: You can create a user account for the Accountant role, which will allow access to the invoice list without the need to export and send files.
The invoice list only shows those invoices that have been issued by the Contractors.es software or have been entered into the system during the settlement of a selected project after the invoice was issued in another program.
NOTE: By default, full access to the invoice list and the ability to make changes is granted only to the Accountant. The Manager can view all invoices but cannot add or edit them. The Project Manager and Cost Estimator have access only to invoices added under their projects.
REMEMBER: If an invoice on the list is linked to a change in the project, it will be marked in the appropriate column as shown in the screenshot below.

Types of Settlement Invoices
Section titled “Types of Settlement Invoices”Settlement invoices are documents used for financial settlement between two parties of a contract for completed services or delivered products. They are used to settle payments and reflect project or contract execution progress.
Partial or full invoice applies when:
-
A selected stage or scope of work has been completed - previously issued invoices reduce contractual liability with each next settlement.
-
The project is billed on a “Time and Material” basis - based on work completed so far.

NOTE: In contracts billed by stages, the system automatically suggests the advance amount for the selected stage and the total value for the full stage.
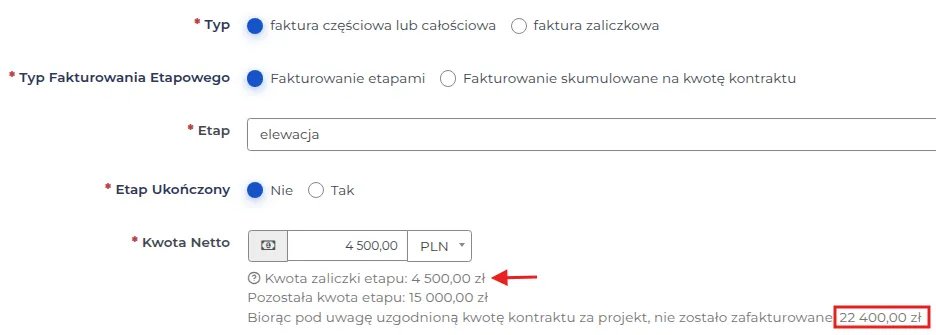
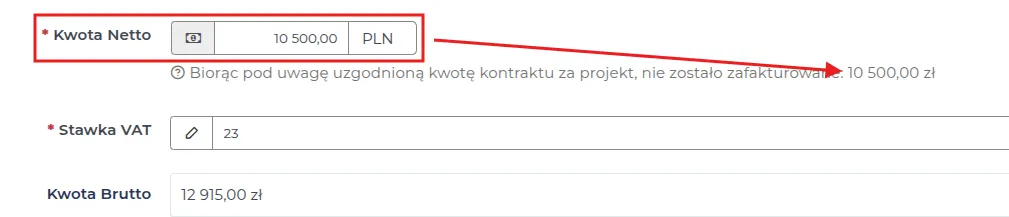
REMEMBER: If you enter a value in the “Net amount” field different from the suggested advance value or the full stage value, the difference will be added to the uninvoiced contract amount.
Advance invoice is used when:
- You settle with advance invoices before and during work, and with a final invoice after project completion.
- The final invoice value is reduced by the amount of previously paid advances.
The system automatically fills “Net amount” with the advance value for the selected stage. If you want to increase the invoice value without submitting project changes, after entering a new value in “Net order amount” you can use the button shown in the screenshot below. Then, in the next invoice, the “Net amount” field will be set to the amount remaining to settle. Each further overwrite of settlement values will show this button again, and the system will suggest the current amount still due.
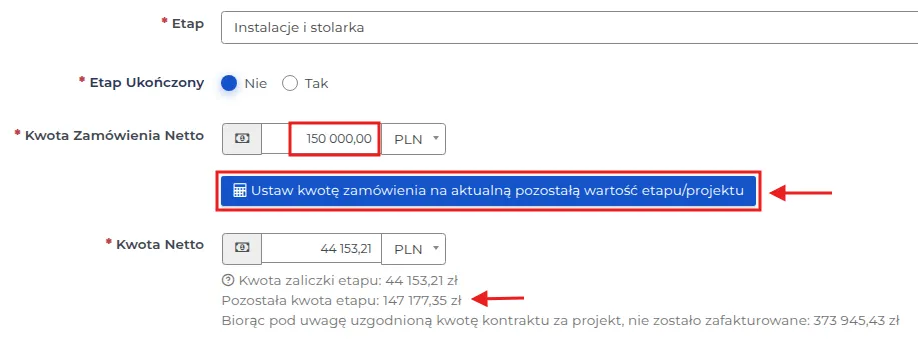
REMEMBER: This option works only for advance or final invoices when the value in “Net order amount” is higher than the value defined in the estimate.
Stage invoicing is used when:
-
the project consists of several stages or parts that can be billed separately,
-
we want to maintain financial liquidity instead of waiting for the entire project to be completed.
REMEMBER: First, enter the advance or deposit calculated when creating the stages, and after completing the stage, issue an invoice for the remaining amount assigned to that stage.

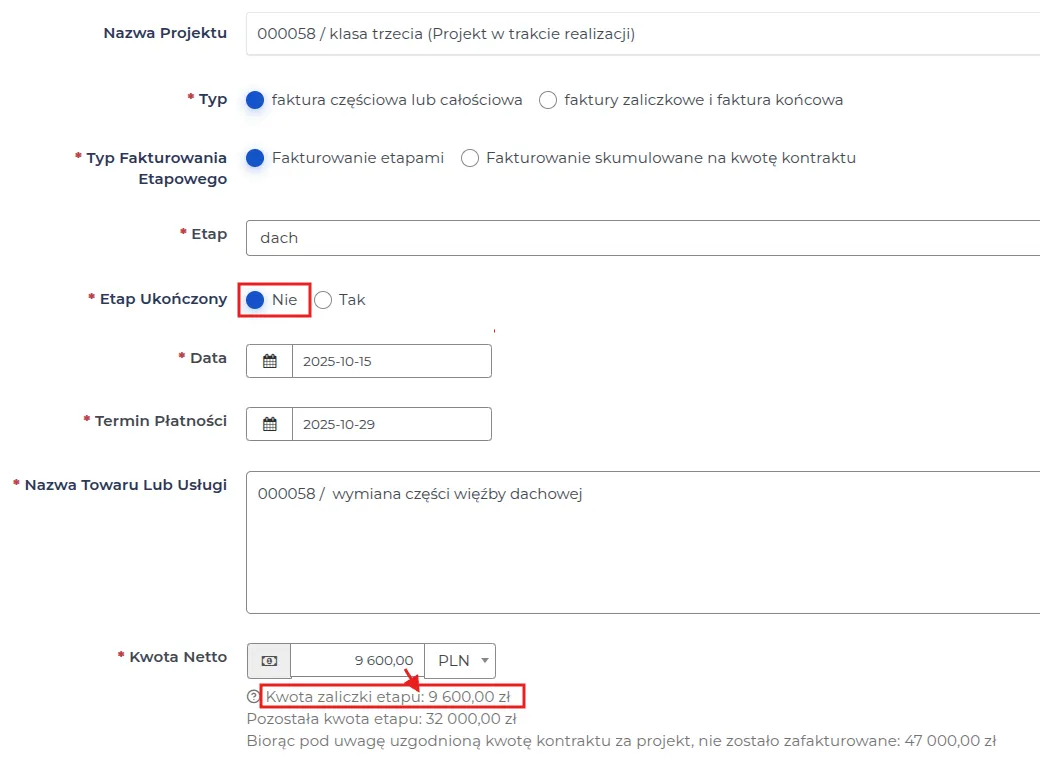
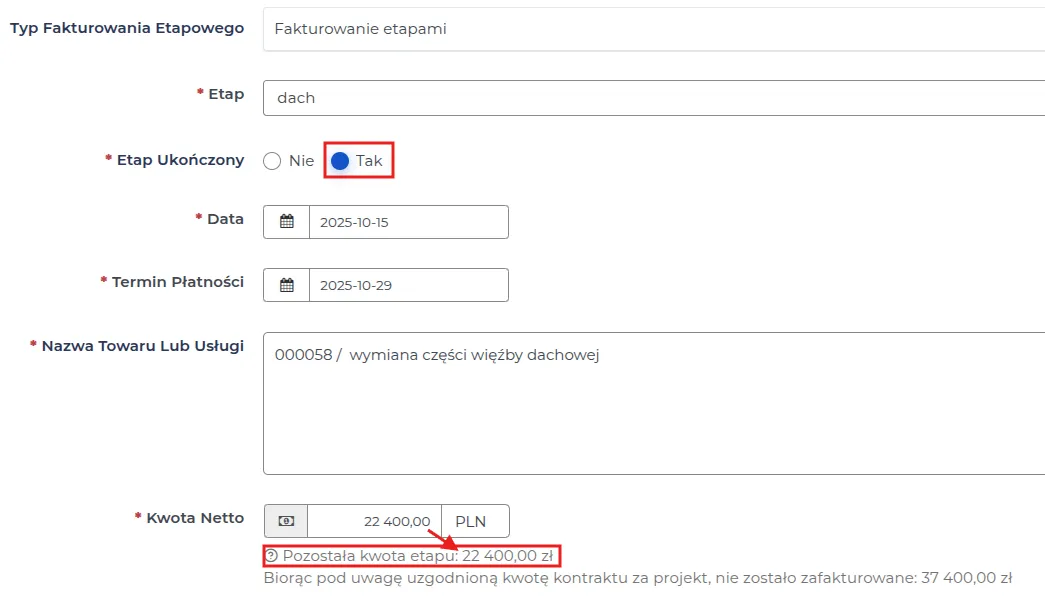
Cumulative invoicing for the contract amount means that:
-
the project is not divided into stages or does not require partial billing,
-
invoices are issued in a way other than by stages.
Final invoice is the document that fully settles a stage or the entire project. It can include previous advance invoices, but it can also be issued without earlier stage advances, showing the full order value. In Contractors.es, the final invoice is generated after selecting related invoices or without them, allowing correct closing of stage settlements.
Issuing/adding an invoice for a client to the project
Section titled “Issuing/adding an invoice for a client to the project”To issue an invoice for a stage or service related to the ongoing project, follow the sequence:
- Go to the “Contracts → Projects” menu and select the project you want to bill by clicking on its name.
NOTE: Invoices can only be issued/added by users with the appropriate permissions, which are modified and set by the administrator. By default, only accounting can issue/add invoices.
NOTE: Projects carried out on a “Time and Material” basis are always settled with partial invoices and a final invoice marked as “Cumulative billing for the contract amount,” so the “Update work progress” button remains active.
REMEMBER: The “Update work progress” field is used when project visit reports and daily foreman reports in your company are created only occasionally.
-
In the preview, select the “More → Invoices” tab, and then click the “New” button.
-
Fill out the form, where the meaning of the fields is as follows:
-
Type: When creating the first invoice for a project, choose the type of invoice settlement from the available options:
-
partial or full invoice,
-
advance invoice.
-
-
Stage billing type: Choose the method of project settlement considering the division into work stages:
-
stage-by-stage billing,
-
cumulative billing for the contract amount.
-
NOTE: For projects without stages, select “cumulative billing for the contract amount” to settle the project as a whole without stage division.
REMEMBER: When billing by stages, select the stage to settle, then set its status, net amount, and tax rate.
NOTE: The system suggests in “Net amount” the value that has not yet been invoiced.
-
Paid in full: Indicates whether the invoice has been fully paid.
-
Selecting “Yes” - invoice is fully paid.
-
Selecting “No” - invoice is not fully paid. In this case, enter the amount already paid, not the remaining amount.
-
-
Paid amount: Fill in this field if the client paid an advance or a partial amount.
REMEMBER: When issuing the first invoice, leave “Paid amount” empty. After each client payment, the system will automatically suggest in this place the amount remaining to be paid.
-
Date: Invoice issue date.
-
Payment deadline: Specify the client payment due date.
NOTE: This field is automatically filled with a default value set by the administrator. If the deadline is set to 14 days, the “Payment deadline” field will show a date matching that setting.
-
Cashflow entry: Select the inflow entry to which the invoice should be assigned if there are multiple inflow plans.
-
Name of goods or services: Describe the scope included in the invoice settlement.
-
Invoice footer: Optional additional content shown at the bottom of each issued invoice.
REMEMBER: If the administrator sets invoice footer content, this field is filled automatically by the system.
Two options are available depending on the estimate type defined in the project.
Option I: For projects with a specified contractual amount.
-
Net amount includes either the remaining contractual amount for the entire contract or the amount assigned to the selected stage from the list.
-
You can modify this value, and the remaining difference will stay for subsequent invoices.

Option II: For projects billed according to the “Time and Material” scheme.
-
Net amount contains:
-
“Current labor cost” - list of employee hours for a selected period, collected from mobile app logins or manually entered records.
-
“Work and materials summary” - amount representing total costs related to a specific stage, including: “Current material costs,” “Other labor,” and “Current other costs.”
-
REMEMBER: Ensure you have verified the employees’ working hours for any incorrect start/end times before issuing the invoice for the given period.
NOTE: Unsettled employee working hours will be considered in subsequent settlements.
NOTE: After a project change is approved, its cost is assigned to the selected stage or to the full project scope and settled proportionally together with current project costs.
- Save changes using the “Confirm” button.
NOTE: The fields “Paid in full” and “Amount paid” indicate the settlement amount with the client.
REMEMBER: To send the saved invoice to the client via email, use the “Send email” button and specify the recipient. By default, this is the client - the contact/company must have an email address entered.
Example: Invoicing a project with work stages that includes a project change. Non-advance invoice.
In ongoing projects, stage-based settlement is commonly used. This is a secure approach where the client settles costs after each stage is completed, or pays an advance before stage work starts, while approved project changes are automatically included in settlements.
First stage to be settled – “Earthworks” contains the following data:
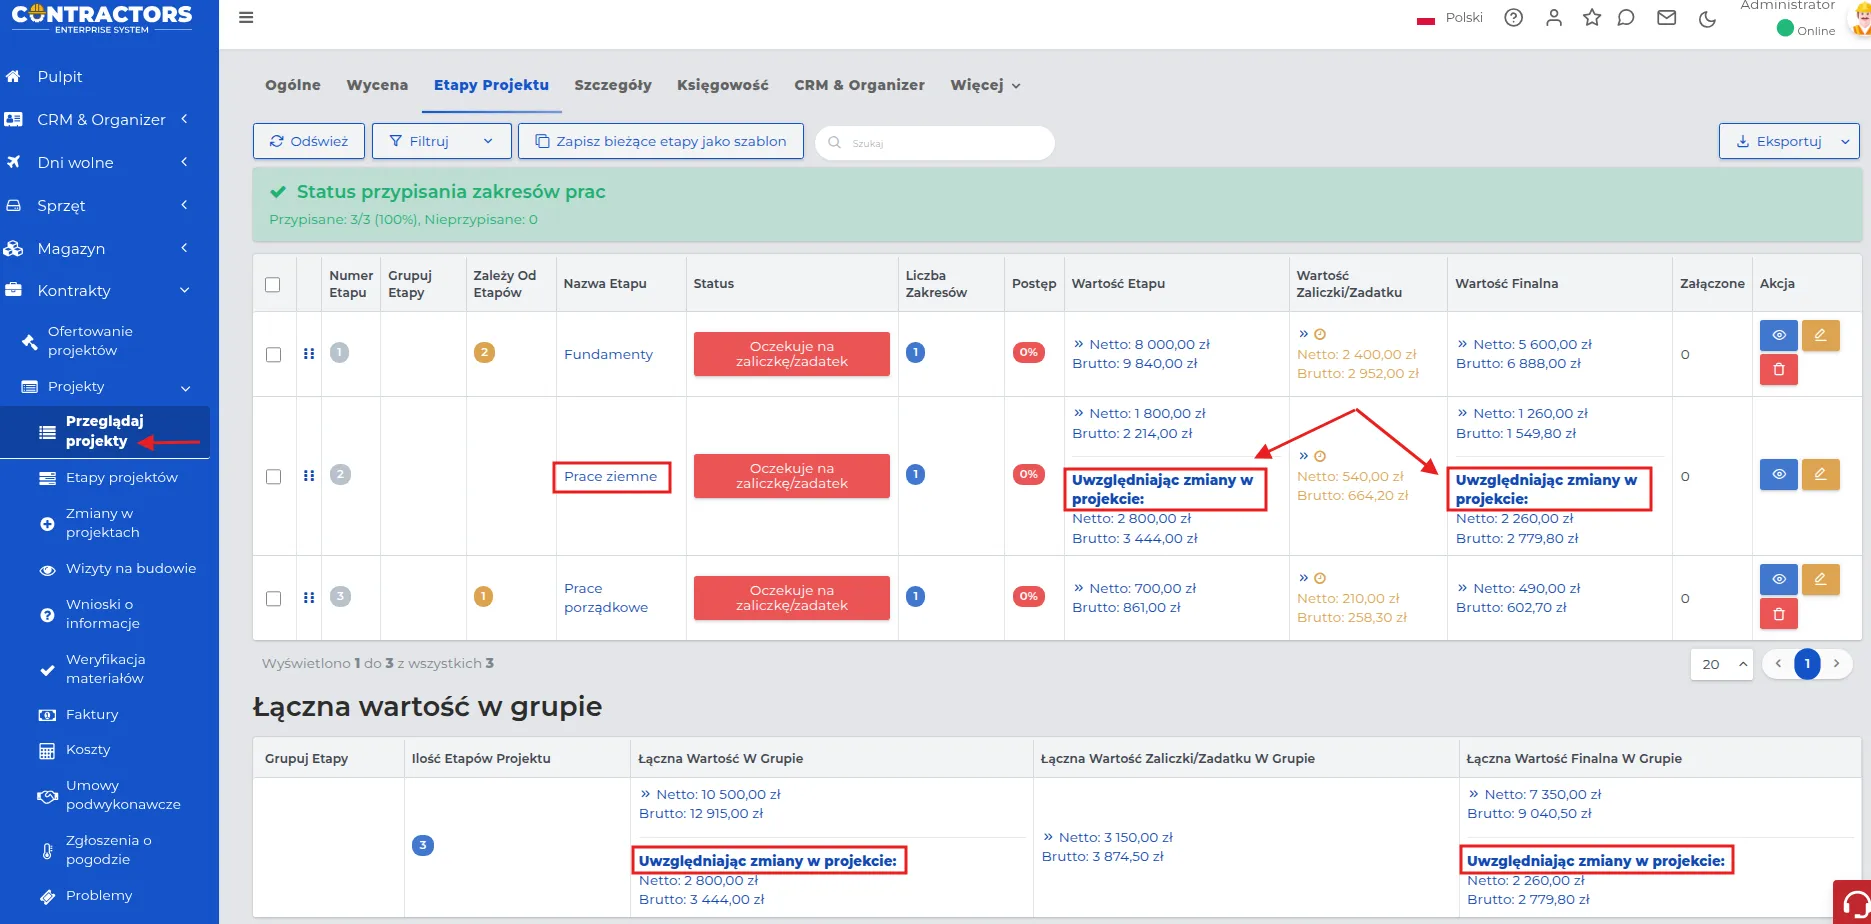
- In the “Earthworks” stage, an accepted project change worth 1,000.00 PLN was included, increasing the final stage value.

To settle this stage of work, follow the steps below:
-
Go to the selected project’s preview on the list by clicking its name.
-
Select the “Invoices” tab and create a new invoice by clicking the “New” button in the upper right corner of the screen.
-
Fill out form fields according to the description below:
- Type: Select “partial or full invoice”.
NOTE: The partial/full invoice option applies when a selected stage or scope has been completed - previously issued invoices reduce contractual liability with each next settlement, e.g. in “Time and Material” projects based on completed work.
-
Stage billing type: Select “stage-by-stage billing”.
-
Stage: Select the stage to settle – in this case Earthworks.
-
Stage completed: Work status.
-
Selecting “Yes” - fills settlement amount with the full stage value, i.e. 2,800.00 PLN net.
-
Selecting “No” - generates an invoice for the advance amount, i.e. 540.00 PLN net.
-
NOTE: The advance percentage value is generated according to stage settings.
In this example we select the advance option, i.e. “No”.
REMEMBER: In the next invoice, after stage completion, the system automatically fills “Net amount” with the difference between the stage advance and full stage value. The system suggests the remaining amount to settle.
-
Tax rates: Set according to tax regulations.
-
Paid in full: Select “No” and leave “Paid amount” empty.
-
Date, Payment deadline: values are filled automatically by the system.
REMEMBER: The administrator sets the default payment-deadline range, which can be changed in the dropdown calendar.
-
Name of goods or services: Enter e.g. “Stage I - Earthworks”.
-
Invoice footer: Additional content visible in the accounting document.
- Save the form with the “Confirm” button.
The created invoice for the selected stage looks as follows:
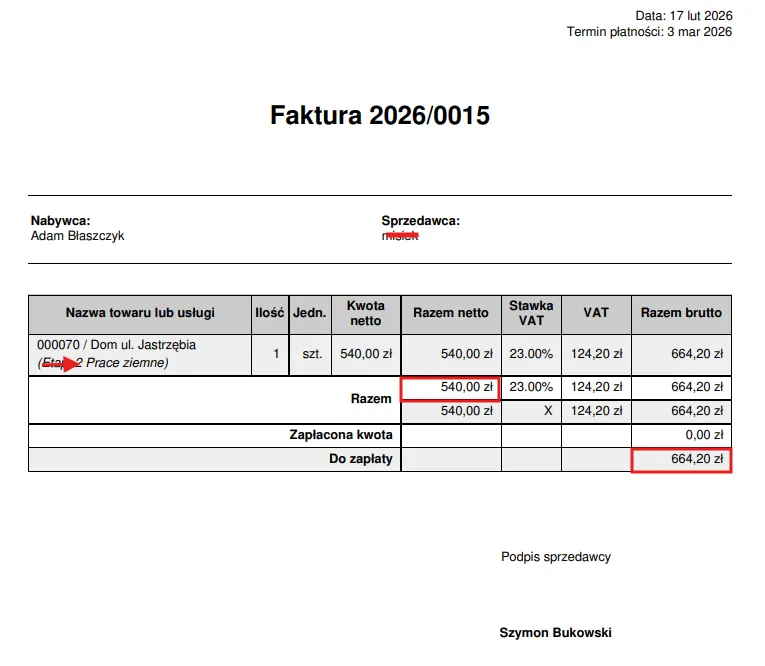
To fully settle the “Earthworks” stage, follow the same steps as for the first invoice, with the following field changes:
-
Stage completed: Select “Yes”.
-
Net amount: Is automatically filled with the difference between contractual value and the amount used in the first invoice, including the added value from the project change, i.e. 2,260.00 PLN.
REMEMBER: Complete settlement of a project stage requires issuing a final invoice, even if a second advance invoice was used.
NOTE: In this settlement model, approved project changes are not shown on the invoice as separate accounting line items.
Example: Invoicing a staged project using advance invoices - final invoice.
After entering the first advance invoice for a selected stage, the option to issue a final invoice becomes available. The system automatically fills “Net amount” with the advance value assigned to this stage.
NOTE: The final invoice is available only in advance-based settlements.
REMEMBER: If multiple advance invoices were issued for one stage, in the final invoice you must indicate all documents assigned to that stage to settle it in full.
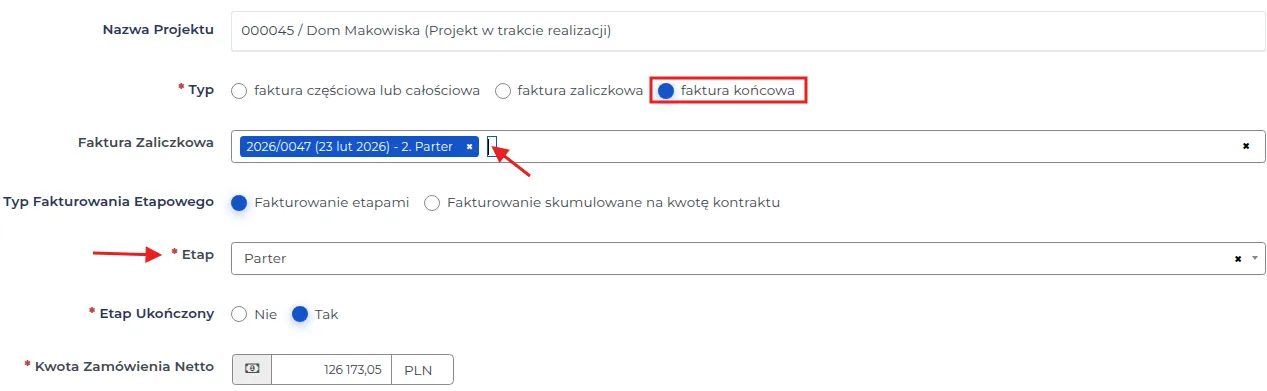
In this example, this is an advance invoice for the “Ground floor” stage for 37,851.92 PLN net, with the total net order value for that stage equal to 126,173.05 PLN. The final invoice is issued for the difference between the advance amount and total net order amount for this stage.
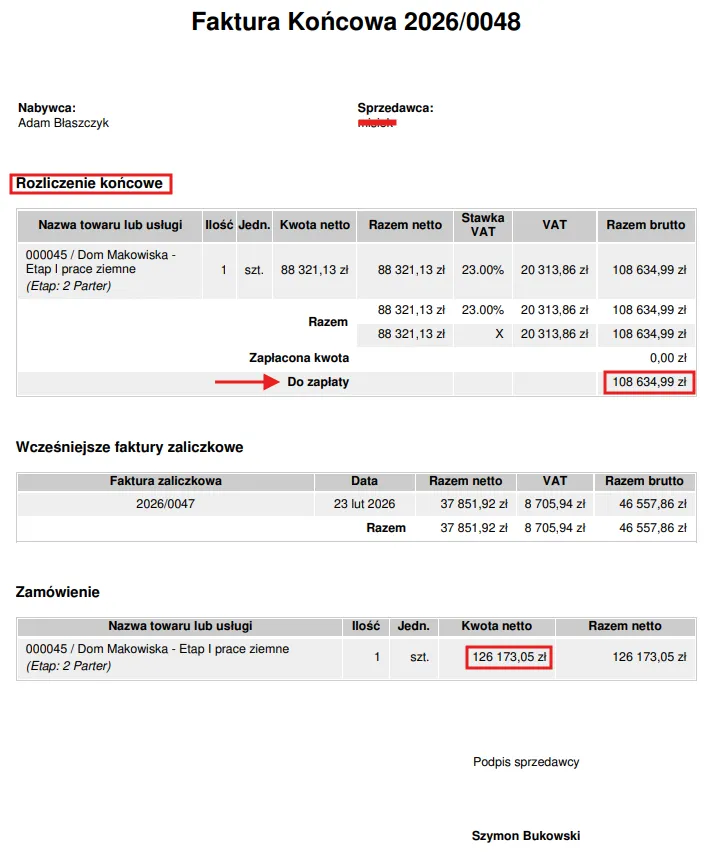
This document includes:
-
total agreed value for the full stage,
-
current advance amount for the final stage with VAT rate,
-
previously issued advance invoices included in final settlement.
You can register settlement of advance and final invoices in the system using the “Change” button shown below.
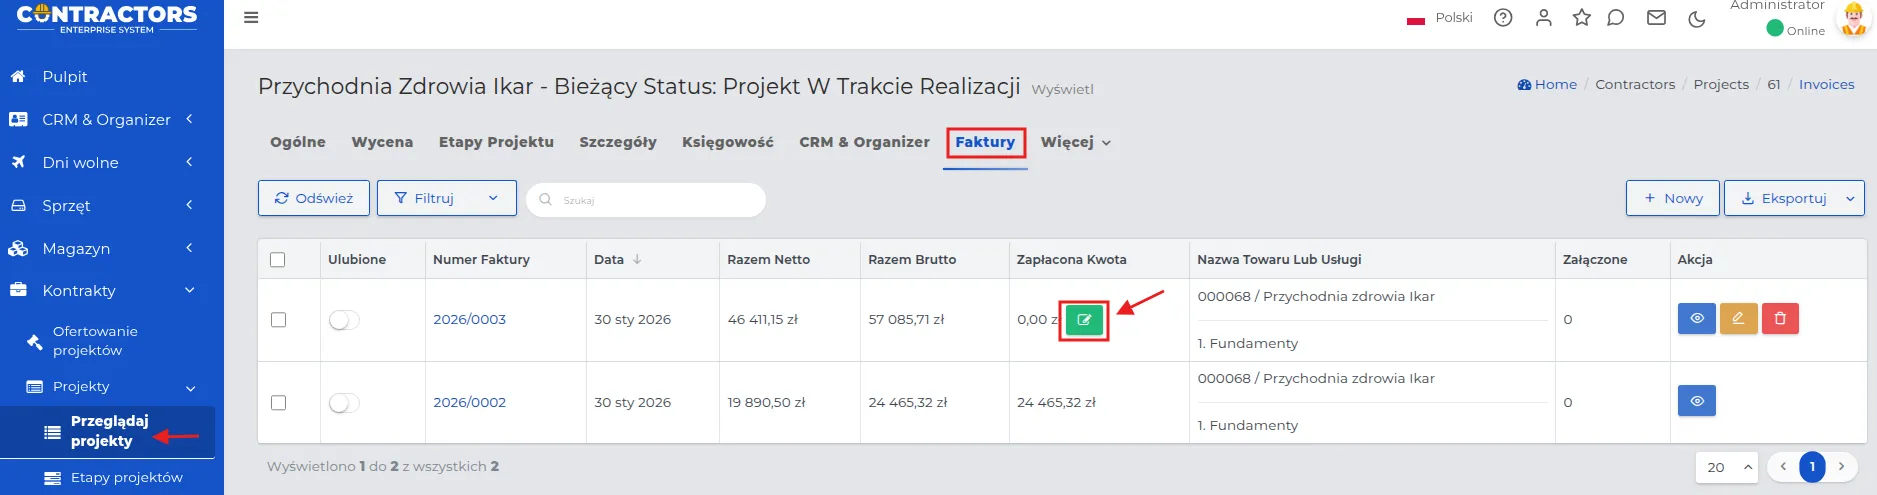
REMEMBER: If the payment from the client is lower than the invoice amount, you can register it in the system. The “Change” button will remain available until the entire amount is settled.
NOTE: Only changing the value in the “Paid in full” field to “Yes” blocks further editing of the record related to the financial settlement.
REMEMBER: Send the invoice to the client by email, or save it as PDF and deliver it in print. To send invoice emails, configure an email account in the system first.
Example: Issuing invoices for projects settled on a “Time and Material” basis
The “Time and Material” model is recommended for work where the full scope and costs cannot be clearly defined before the project starts, and settlement is based on the actual time worked and materials used.
To issue an invoice in the selected settlement model, follow these steps:
-
For the selected project from the list, go to the “Invoices” tab and click the “New” button at the top of the screen.
-
Fill out the form. Field meanings are as follows:
-
Type: Select “Partial or full invoice”.
-
Stage billing type: Select “Cumulative billing for the contract amount”.
-
Update work progress: Select “No” when progress is not updated and settlement includes only work completed so far with assigned material and labor costs.
REMEMBER: Updating work progress is used to manually determine the percentage of work completed under the contract.
- Date, Payment deadline: values are automatically filled in by the system.
REMEMBER: The administrator sets the default time range for the payment deadline, which can be changed in the drop-down calendar.
- Name of the goods or service: Enter, for example, “Cinema - settlement 1”.
- Net amount: Total value calculated from all cost components.
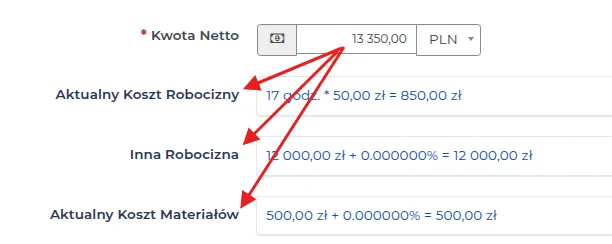
The values for the above component fields are settled based on the costs entered for the given project.
The remaining form fields are identical for all types of invoices and have been described in detail in the preceding example.
- Save the form using the “Confirm” button.
The created invoice will look as follows:
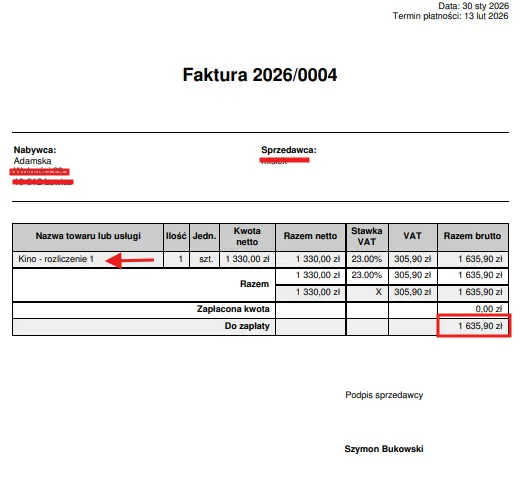
NOTE: The “Balance of receivables without invoice” field shows the amount that remains to be invoiced. If all current costs are invoiced, the value of this field will be 0.00 PLN.
REMEMBER: As new material or labor costs arise, this field will automatically update, and the amount visible in it determines the maximum value that can be invoiced on the next invoice for the client.
Project Cost Register
Section titled “Project Cost Register”During the execution of a project, additional costs may arise (besides employee and material costs). By adding these costs to the system, we obtain a real “Financial Balance of the Project,” showing profits or losses. The “Costs” module allows adding these expenses, enabling more accurate monitoring of the project’s finances.
NOTE: Project costs can be created and reviewed not only by the administrator but also by the Project Manager’s Assistant, Manager, Project Manager, Estimator, and Accountant.
For convenience, a field employee can submit a reimbursement request from the construction site, attaching a photo documenting the incurred cost. Such a request receives the status of a Report. If the request indicates “Amount reimbursed to the employee,” it proceeds to further settlement in the system.
You can add a project cost in the following order:
-
Go to the “Contracts → Costs” menu and select the “New” button.
-
Fill out the form, where the meaning of the fields is as follows:
-
Project name: Select the project from the available list to which this cost relates.
-
Cost Name: Enter the name of the incurred cost. This field is required.
-
Invoice Number: Optionally provide the invoice number associated with this expense.
-
Note: Add additional information regarding this cost if necessary.
-
Date: Enter the date the cost was incurred.
-
Cost Type: Specify the type of expense, whether it pertains to material, wages, equipment, or another type of cost.
-
Amount: Enter the value of the incurred cost, which will be included in the final project settlement.
- Save the data using the “Submit” button.
Invoice and Project Change Settlements
Section titled “Invoice and Project Change Settlements”The above describes issuing invoices and changes in projects. This section concerns their settlement.
A full list of issued invoices is available in the menu “Contracts → Projects → Invoices”. The list can be sorted by the methods described here or searched by the name of the record of interest.
REMEMBER: Only users with specific roles have access and the ability to edit records from this list.
An invoice can be quickly found on the list by an employee settling payments to the account, using the filtering option by project name or invoice number.
To settle an invoice, follow the sequence:
- Search the list for the record corresponding to the obligation being settled, using the available sorting and filtering options for records.
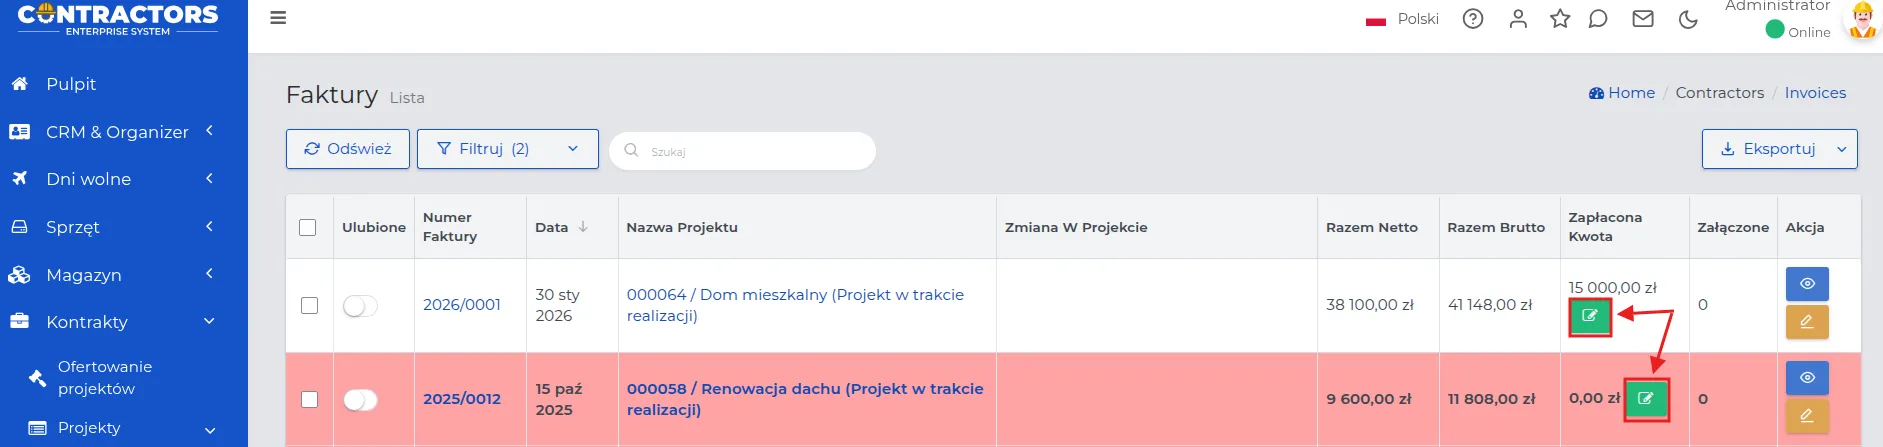
NOTE: Invoices for which the payment deadline has passed are highlighted in red on the list.
- Click the green “Update Paid Amount” button and enter the value of the received transfer in the “Paid Amount” field in the form.
REMEMBER: Unsettled obligations on the list are marked with the “Update Paid Amount” button until fully settled. After settlement, the green button is no longer visible.
- Save the changes with the “Submit” button.
In the preview of the selected invoice, you can attach notes or files.
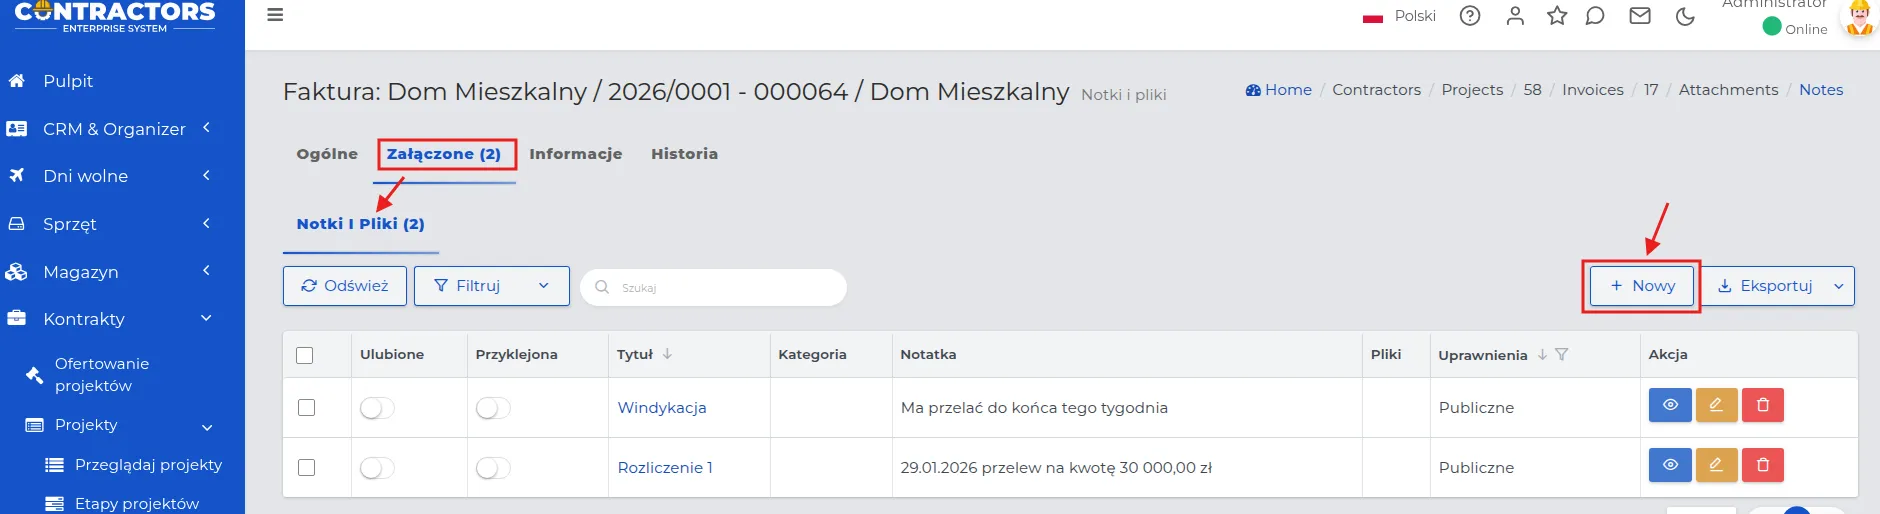
These entries may concern:
-
Dates of receipt of transfers subject to settlement.
-
Collection statuses and arrangements with the client.
-
Internal notes and attached documents supporting the collection process.
To add a note to an invoice, follow the steps:
-
Go to the invoice preview and select the “Attached -> Notes and files” tab.
-
Click the “New” button and fill out the form, where the meaning of the fields is as follows:
-
Pinned: Setting to “Active” will display the note at the top of the notes list.
-
Title: Name of the note.
-
Note: Additional information regarding the entry.
-
Files: Ability to add files from the disk as attachments.
-
Permissions: Determine employee access to system records. More about permissions can be found here.
-
Display as message: Enabling this option will display the note as a message on the invoice list or in the invoice record view.
- Save the entered data with the “Approve” button.
NOTE: Messages appear above the list of entries, and their visibility depends on the settings.
REMEMBER: Using messages above the list is optional and facilitates a quick response to important actions related to collection.
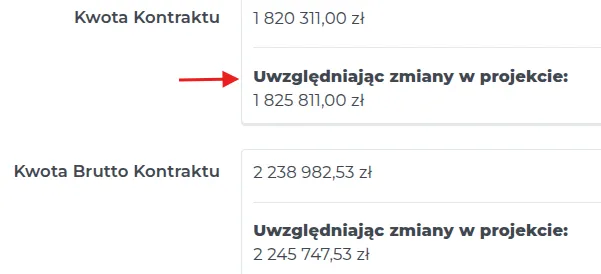
NOTE: Accepted additional costs are automatically added to settlement invoices. After approving the request, the system updates the “Contract amount” field, showing the total value including project changes, without listing each change as a separate line item. No separate invoices are created for project changes.
Handling reimbursement requests
Section titled “Handling reimbursement requests”The module allows viewing and settling reimbursement requests incurred by field employees. The list of reimbursement requests is available in the “Contracts → Projects → Costs” menu.
NOTE: Access to the list of requests, their editing, and settlement are limited to users with appropriate permissions.
REMEMBER: Requests requiring settlement are marked with the appropriate status in the “Reimbursement Status” column. Submissions without an assigned status do not require settlement.
To settle a reimbursement request, follow the sequence:
-
Go to the “Projects -> Costs” menu and find the request with the status “Pending”.
To find the record more quickly, you can use the list filtering option by setting the appropriate criteria.
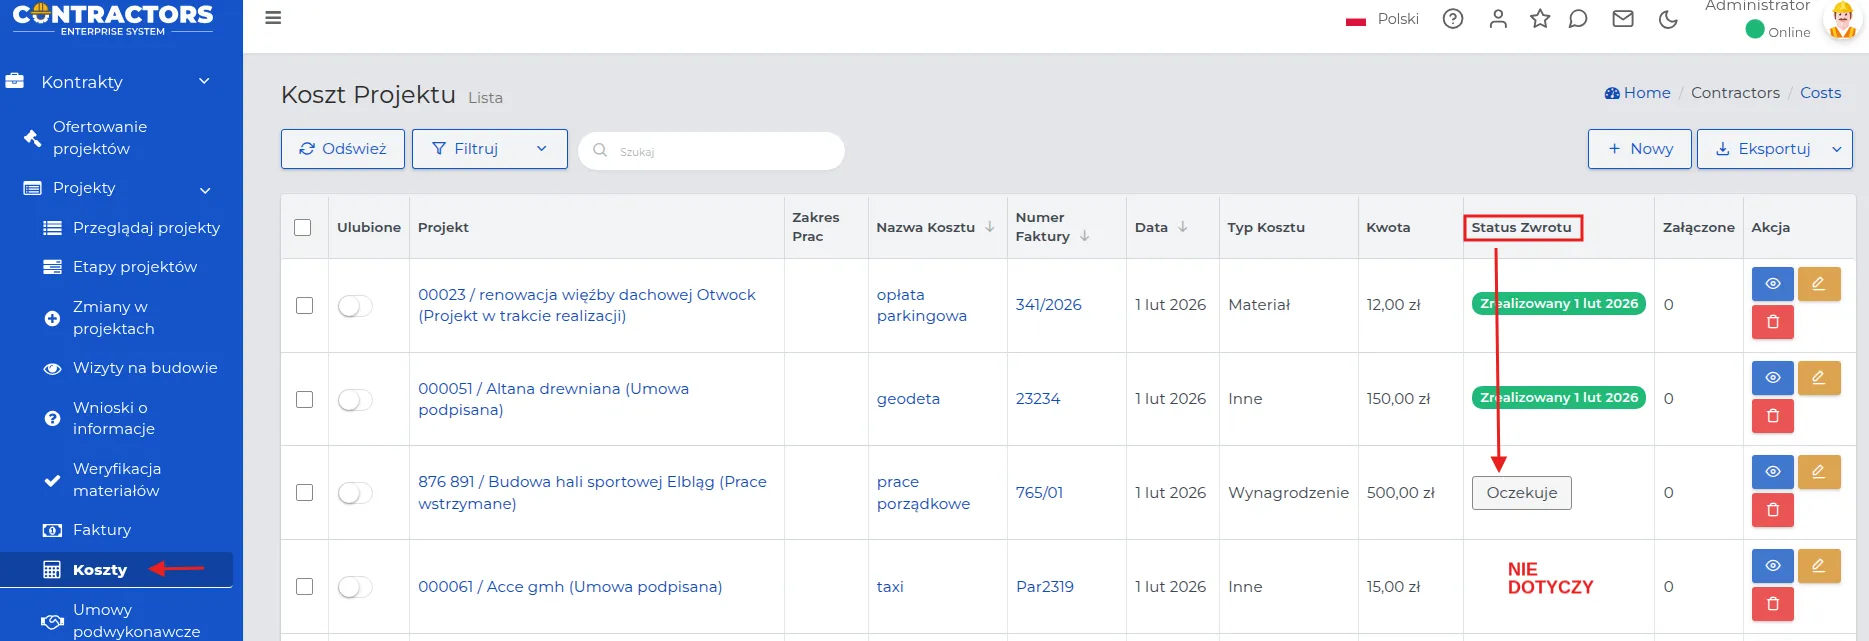
-
Click on the status name and select a new one: Rejected, Accepted, or Completed.
-
Optionally, add a comment to the return and save the changes with the “Approve” button.
REMEMBER: The “Accepted” status adds the cost to the project’s financial balance according to the assigned purpose.
Depending on the company’s policies and accounting regulations in the given country, the return may be made in cash or by transfer to the employee’s account, with an appropriate note specifying what the payment is for. This is not recorded directly in the system - you can add a relevant note if necessary.
Subcontractor Agreements
Section titled “Subcontractor Agreements”Subcontractor agreements are made between our company and an external entity that performs specific tasks or services within the project. The terms of cooperation entered into the system will allow for smooth and clear settlement of agreements with subcontractors.
NOTE: In addition to the administrator, the Project Manager Assistant, HR, Manager, Project Manager, and Cost Estimator can add subcontractor agreements. The responsibility for settling agreements lies with the Accountant.
REMEMBER: According to regulations, a subcontractor agreement must be in writing. The completion date specified in the agreement forms the basis for the payment of remuneration for the services performed. Optionally, you can attach it to the “More → Attached” tab in the selected project.
REMEMBER: If there is no project in the system yet that is to be associated with the “Subcontractor Agreement,” create a record of this project in the “Contracts → Projects” section.
You will register a subcontractor agreement in the system according to the following order:
-
Go to the “Contracts → Projects” menu and select the “New” button.
-
Fill out the form, where the meaning of the fields is as follows:
-
Project: Select from the list the project to which the subcontractor agreement is to apply.
-
Subcontractor: Specify the entity from the “Subcontractor” group responsible for performing the service.
-
Scope of the contract: Describe the arrangements regarding the work to be performed and the deadlines for their completion.
-
Time and material: Choose the method of billing for the service by selecting:
-
Choosing the “No” option - the contract concerns a specific amount for the service, regardless of the number of employee hours and days needed for completion.
-
Choosing the “Yes” option - billing for the service will be calculated after summing up the employee hours, for which a contractual cost per hour of their work must be specified. You can enter their work time into the system or create accounts for the subcontractor’s foremen to facilitate communication and time tracking.
-
REMEMBER: Daily reports created with the number of employees performing a given scope of work will sum up the total number of hours worked, which will be multiplied by the hourly rate for the service.
-
Custom hourly rates: Optionally adjust payment rates for non-standard employee working hours in subcontractor agreements, taking into account the specifics of the work or special conditions. These are set individually.
-
Custom percentage salary rates: Special arrangements for employee work time billing that exceed basic rate hours. These fields are automatically filled by the system with values set by the administrator. These amounts can be changed.
REMEMBER: The system allows for the introduction of multiple subcontractor agreements for the same project and subcontractor simultaneously. The scope of each contract should be specified in a separate form.
- Save the entered data using the “Confirm” button.
NOTE: In the case of a subcontractor agreement concerning a project billed on a “Time and material” basis, it is recommended to fill in the “Work Schedule History” tab or monitor it if the subcontractor’s foreman uses the mobile application and account in the Contractors.es system to monitor work progress and the number of hours worked, according to which the service will be billed.
To add a “Work Schedule History,” follow the steps below:
-
Go to the preview of the selected subcontractor agreement by clicking on its name.
-
Select the “Work Schedule History” tab and fill out the form, where the meaning of the fields is as follows:
-
Scheduled start of work: Enter the date and time when the subcontractor’s work is scheduled to begin.
-
Scheduled end of work: Enter the date and time when the subcontractor’s work is scheduled to end.
NOTE: In the form, you can specify the work range for a single working day. To include additional workdays, use the “Planner → Employee Schedule” section.
-
Breakfast break: Leave the field empty because the workers are not employed by your company.
-
Scope of work: Select from the list the suggested type of work assigned to the subcontractor for the given day.
NOTE: The subcontractor’s foreman can change the scope of work you entered when submitting daily reports by selecting another option from the list available in the mobile app.
- Subcontractor’s Foreman: Select the subcontractor’s foreman from the list.
NOTE: Create a new contact for the subcontractor’s foreman if they do not exist in the system. This is a mandatory requirement.
REMEMBER: If two independent crews are to work on the construction site, each with a different foreman, create a separate contact for each.
-
Planned number of subcontractor’s employees: Enter the number of employees who will be assigned to the task, according to the agreement with the subcontractor.
-
Custom percentage salary rates: By selecting “Yes,” you have the option to adjust the administrative settings entered here and introduce new values in the form fields.
-
Note: An optional additional description related to the work assignment arrangements.
- Save the data using the “Confirm” button.
REMEMBER: “Subcontractor Agreements” related to a single subcontractor are available in the preview of their record on the “CRM & Organizer → Companies → Subcontractor Agreements” tab.
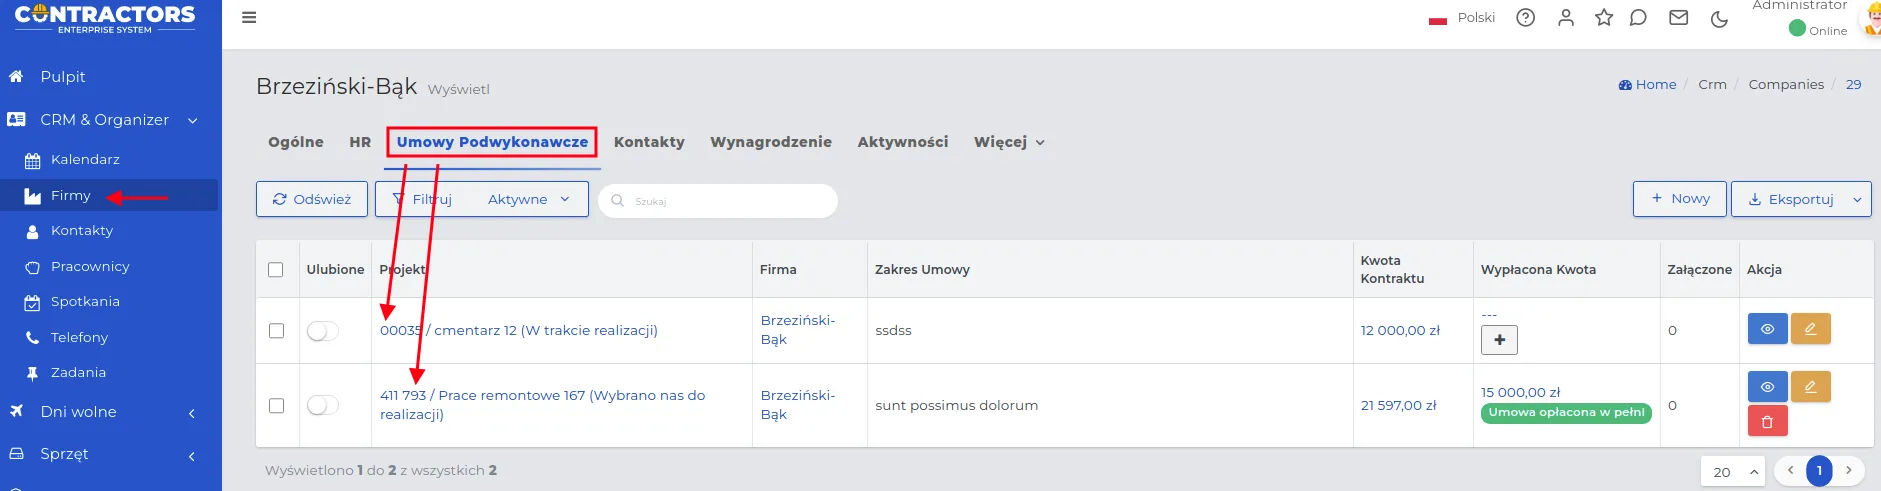
NOTE: In the “Work Schedule History” preview based on daily reports submitted by the subcontractor’s foreman via the mobile app, fields marked with a red arrow will be noted, indicating the actual working time and the number of employees involved in performing the contracted services.

Subcontractor Agreement Settlement
Section titled “Subcontractor Agreement Settlement”In the “Contracts → Subcontractor Agreements” section, the system automatically displays a list of unsettled agreements marked with the “Active” option. You can filter records on the list using standard methods.
NOTE: Only users with appropriate permissions can make changes to records in this system section.
If you want to settle an agreement with a subcontractor, follow the steps below:
-
Go to the “Contracts → Subcontractor Agreements” menu and find the agreement you want to settle.
-
Click the ”+” button or the “View” action button.

NOTE: In the case of ongoing settlements, the amount settled so far will be visible, allowing you to track the remaining amount payable to the subcontractor.

- Fill out the form, where the meaning of the fields is as follows:
-
Subcontractor Agreement: The name of the subcontractor for whom the service settlement applies.
-
Date: The day on which the settlement for the provided service, included in the agreement, was accepted.
-
Paid Amount: The monetary value that will be transferred to the subcontractor.
-
Payment Description: The method of transferring the payment for the service with a note regarding its receipt, for example, “According to the agreement,” “Delay of … days,” “Incomplete service,” etc.
-
Agreement Fully Paid: Specify the payment status for the subcontractor agreement by choosing:
- “Active” switch - The “Paid Amount” may differ from that specified in the “Contract Amount” due to remarks regarding service execution (e.g., improperly executed service).
-
“Inactive” switch - the contract will remain on the list with the visible “Paid Amount” for further settlement.
-
Contractual Work Completed: Specify the stage of the conditions contained in the contract by selecting:
-
“Active” switch - the work specified in the contract has ended, the contract is moved to the “Contractual Work Completed” list.
-
“Inactive” switch - the contract remains on the “Active” list until further settlement with the subcontractor.
-
- Save the changes using the “Confirm” button.
REMEMBER: If the subcontractor’s contract is to be settled based on the total number of employee working hours, the value in the “Contract Amount” column will be automatically updated according to the workday reports. After the project is completed, the total employee working time will stop accumulating.
Example: Multi-stage settlement with a subcontractor.
-
Find the contract to be settled on the list of subcontractor contracts.
-
Click on the “Paid Amount” or the “View” action button.
-
A list of previously paid amounts related to the subcontractor’s contract will be displayed on the screen.
-
By subtracting the value in the “Paid Amount” field from the “Contract Amount,” you will get the remaining amount to be settled with the subcontractor.
-
Click the “New” button and enter a new settlement in the form, entering in the “Paid Amount” field the value by which the “Contract Amount” should be reduced.
REMEMBER: If the settlement proceeded according to the contract and reached the final stage, it is important to mark the switches as “active” in the last two fields of the form.
- Save the entered data using the “Confirm” button.
REMEMBER: Actions on subcontractor contract records should be coordinated with accounting.
Employee Compensation
Section titled “Employee Compensation”Employee compensation for working time is settled according to:
- Number of hours worked calculated based on system settings available in the sections:
“Admin → General Settings → Calendar → Default Working Hours”,
“Contracts → Settings → Working Time: Number of hours in a workday”,
- Value of hourly rates, set individually in the system for each employee through the module:
“CRM → Employees → select an employee from the list → ‘HR’ tab. Variables apply to records for which the following have been specified:
-
Standard gross hourly rate (in the case of a fixed salary),
-
Non-standard hourly rates for specific work ranges,
-
Non-standard percentage salary rates, such as overtime beyond the workday hours or hours exceeding the number of workday hours.
NOTE: If the employee is not a company employee, their settlement is carried out according to the terms contained in the subcontractor agreement.
REMEMBER: The wage rates for field employees using the mobile app are recorded in the section “Contracts → Planner → View Events” at the time of creating a work planning record and calculated at the time of logging in and out of work.
REMEMBER: Before settling employees’ working time, it is worth verifying all fields to ensure that all records have correct start and end work times - it may happen that someone forgets to log out when leaving work.
NOTE: Only users with appropriate permissions can make changes to work schedule records.
For employees listed in the work schedule who do not use or partially use the mobile app, the method of settling working time is possible in two ways:
Method I: Using the “batch method” to automatically fill in empty fields.

There are two options to choose from:
-
Fill in the end of work as planned if there is a start of work: Applies to situations where the employee logged in at the start of work but did not log out at the end or did so with a significant delay.
-
Complete both the start and end of work as planned: The start and end work fields will align with the hours specified for the workday.
Method II: Through manual verification of fields concerning supervisor reports on employee work irregularities.
After locating the selected entry in the employee’s list, make changes using the “Edit” action button.
Method III: If we are filling in the schedule retrospectively, the work time is filled in to match the planned schedule.
REMEMBER: The system marks entries with a red background where there are irregularities related to the time or place of employee login.
REMEMBER: Employee work time can only be accounted for until the salary payment is forwarded to the accounting department.
Example: Monthly accounting of a field employee’s work time.
-
In the “CRM & Organizer → Employees” section, click on the data of the employee for whom the accounting is to be done.
-
In the record preview, select the “Salary” tab and set the accounting period on the drop-down calendars, e.g., September 1-30, 2023.
-
Click on the blue “Search” field just above the table with records.
-
The system will display a sequence of days for the given month for the employee, along with the project name, time range, and the due salary amount assigned for each workday.
-
By expanding the field with the “Salary Amount” value, marked with a red arrow in the screenshot below, a detailed scope of work will be visible, based on which the given rate was calculated.

-
According to the above example, the employee received a basic salary rate for the hours 7:00 - 15:00, which includes the workday hours. However, from 15:00 to 15:30, the salary rate was calculated according to the settings for the scope of work that exceeds the workday hours but falls within the workday hours. The sum of both amounts constitutes the value of the employee’s work time accounting for that day.
-
Scroll down and review the monthly summary to ensure that all days on the list have already been settled.
NOTE: If any days remain unsettled, the “Actual Work Completion” and “Salary Amount” fields will remain empty.
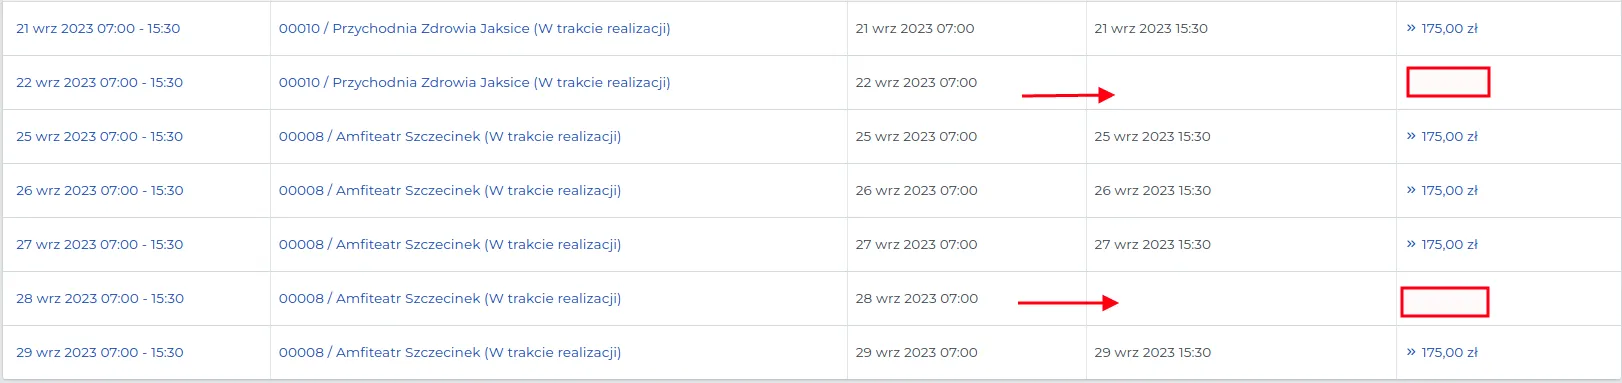
- For unsettled days, edit the existing entries by clicking on the dates of those events.

-
Fill out the forms, paying attention to the “Planned Work End,” “Actual Work Completion,” and “Custom Salary Percentage Rates” fields, which will change the final value for the daily work time settlement.
-
Save the data using the “Confirm” button.
REMEMBER: After creating a summary list of the employee’s salary for the selected time period, the administrator will be able to export it to an Excel file for import into accounting software or another financial system. This permission can also be set, for example, for the accountant role.
NOTE: Changing an employee’s salary does not work retroactively for already worked days. The new rate applies from the day the change is entered in the system.