Estimation
Project estimation is simply an assessment of how much it will cost the client to complete the project from A to Z. The estimation takes into account:
-
material costs,
-
employee work time billing,
-
purchase or rental of specialized equipment,
-
additional costs incurred during implementation.
Each prepared estimate presented to a potential client specifies the estimated amount they will have to bear for the project execution. The estimate defines the budget and work scopes according to which its individual stages will be carried out step by step.
REMEMBER: The way you perform the estimation affects how accurately the project cost will be assessed, as well as its profitability and effectiveness in execution.
NOTE: Estimates entered into the system cannot be deleted if the project status has been marked as “Project in progress” or any subsequent status.
Creating a Project Estimate
Section titled “Creating a Project Estimate”A project estimate can be made at the bidding stage or by adding a new record to the project list.
Creating an estimate at the bidding stage.
- In the “Contracts → Project Bidding” menu, find the selected offer, set its status to “In preliminary estimation” and open the preview by clicking “View”.
- Click the current bidding status, as shown in the screenshot below.
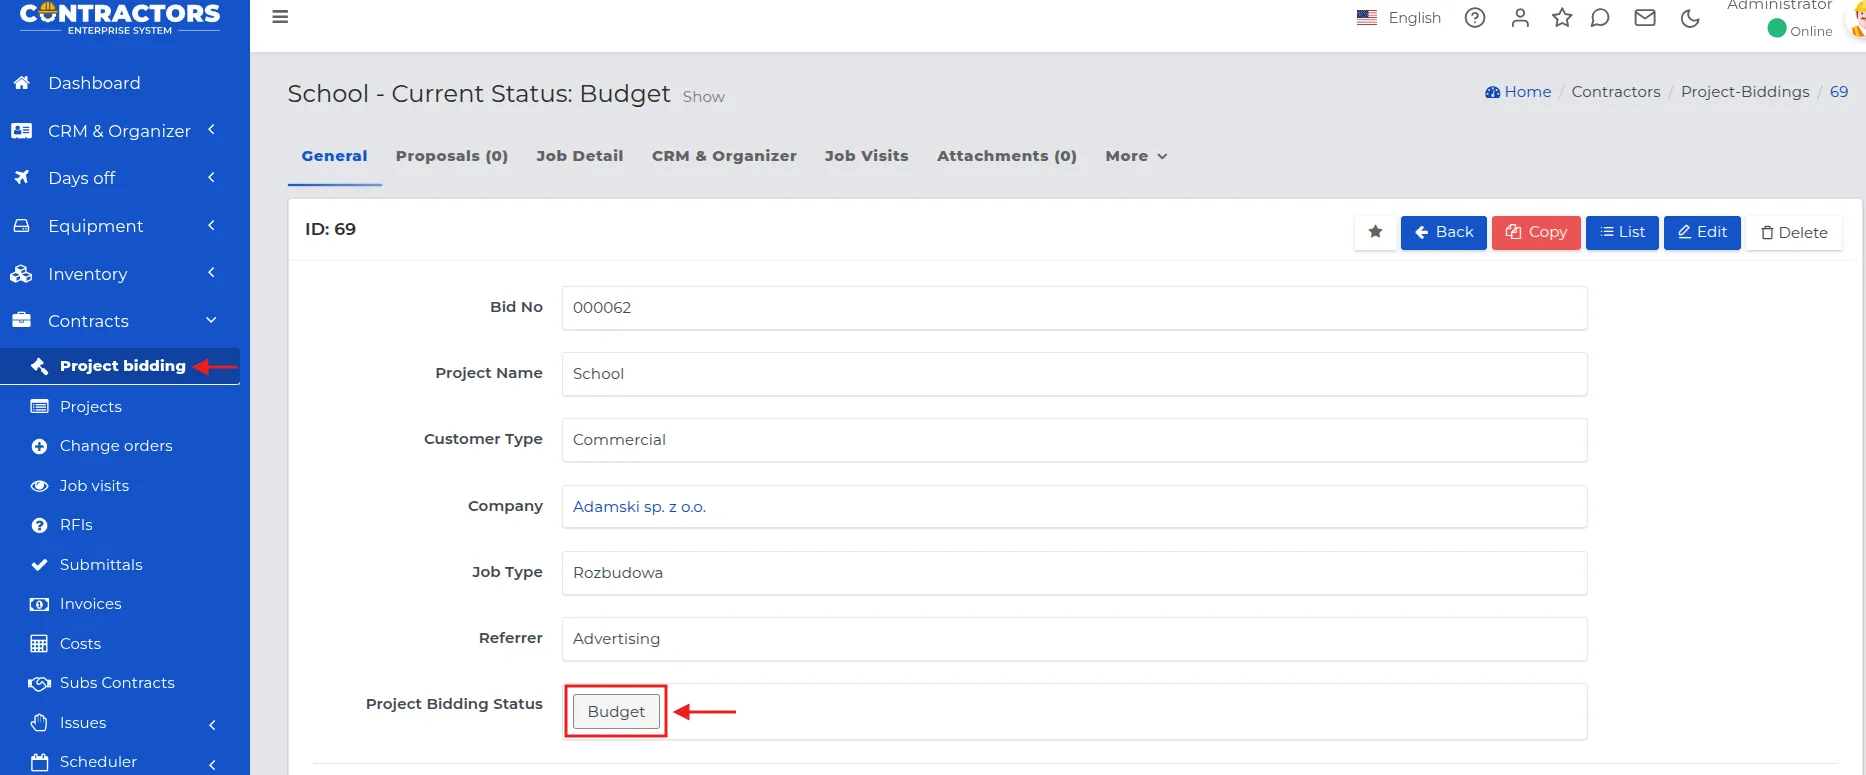
- Select the “Create” button and fill out the form, where the individual fields have the following meanings:
-
Description: A short, optional piece of information regarding the estimate.
-
Scope of work: Select the types of work covered by the estimate.
REMEMBER: You can add additional “Scopes of work” and “Additional materials” with the “New” button or remove them by selecting “Delete”.
REMEMBER: Values for work scopes are automatically generated by the system according to the settings of the administrator, who creates the so-called “Service Price List”. If you click the mouse cursor in the selected field and it becomes active, you will be able to edit the visible value.
NOTE: The service pricing may include the “Time and Material” model, where the following options are available:
-
“No” - The project estimate includes a calculation of individual work scopes, where the service value has been calculated individually or based on the rate per unit (m2) or hour of work multiplied by the number of working days or the number of units to be completed. This pricing method may also include the quantity and value of materials needed to perform the service order (Additional materials).
-
“Yes” - applies to situations where the service is to be settled solely on the basis of an agreed hourly rate and billed according to the hours worked by employees. Materials are provided by the investor or are re-invoiced according to consumption.
-
Additional materials: Type of goods needed to complete the project. Specify whether the material is to be used from the warehouse or not and provide its quantity.
REMEMBER: The system will automatically fill in the material prices based on their last purchase, but you can edit them.
NOTE: If the unit price of the material used from the warehouse is to be higher by a margin set for all types of materials, enter its percentage value in the “Markup” field. This way, even with changes in purchase prices, the estimate will have a safe reserve for the used material.
-
Other costs: Additional costs necessary for the project implementation, e.g., extracts of geodetic maps from the office, insurance, or appropriate permits.
-
Estimated additional man-days: Optionally specify the additional number of working days necessary to complete the project.
-
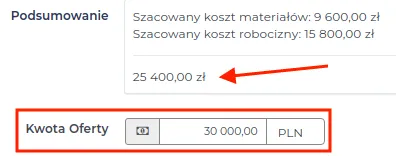
Summary: Total value of the estimate based on the entered data.
-
Offer amount: The value for the created estimate to be presented to the client.
-
Offer sent: Optionally provide the date the offer was sent.
NOTE: You can import a ready estimate from an external program, e.g., Norma PRO (ATH), using the “Import estimate” button.

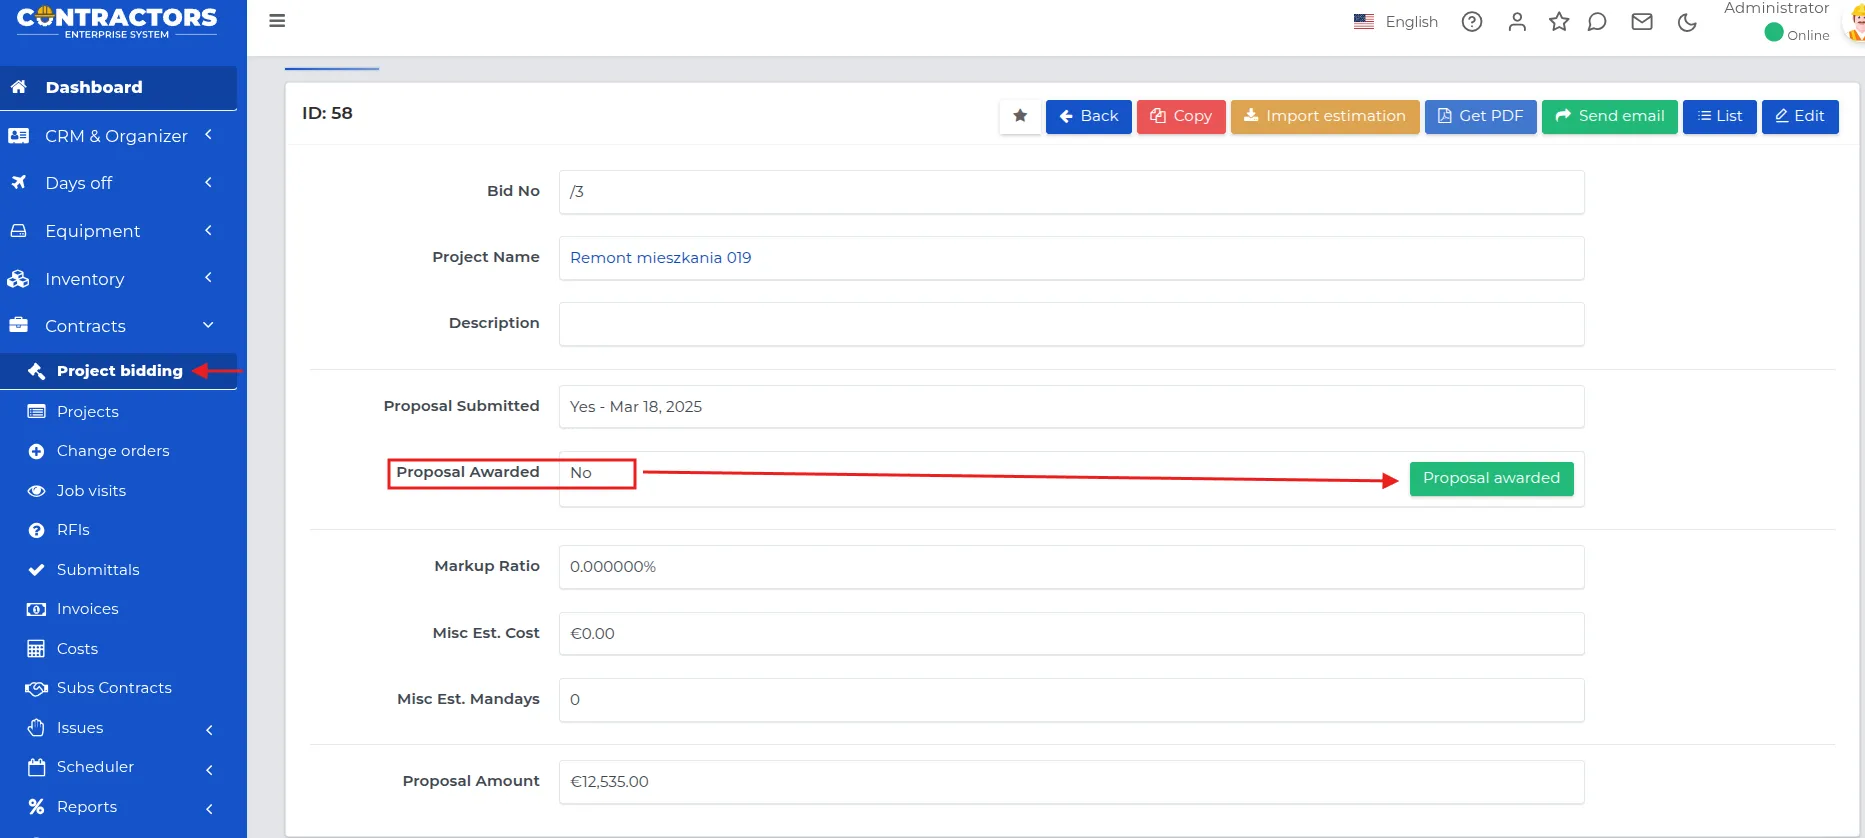
- Save the form with the “Submit” button.
NOTE: When the client accepts the offer, change its status to “Offer Accepted”. From this moment, it will also be visible on the list of acquired projects.
Creating a quote on the project list.
- In the “Contracts → Projects” menu, find:
- a project with the status “We were chosen to execute the project” if there is no quote yet,
- a project with an existing quote for editing, as long as its status is not later than “Project in progress”.
REMEMBER: In ongoing projects, you cannot edit an existing quote. You can only add a new one, which the client must accept.
-
Go to project editing using the “Edit” action button.
-
Select the “Quote” tab and fill in the fields:
-
Time and material: Service billing model based on hourly rate or material costs.
-
Selecting the option “No” - Quote based on the calculation of work scopes, considering individual rates or units (m², hours) and material costs.
-
Selecting the option “Yes” - Billing according to the hourly rate, based on the time worked. Materials are provided by the investor or are re-invoiced.
-
-
Scope of work: Select the types of work covered by the quote.
-
Additional materials: Indicate the type of goods needed for the project. Specify whether the material comes from the warehouse and provide its quantity.
REMEMBER: The system fills in material prices based on the last purchase, but you can edit them.
NOTE: If you want to add a margin to the material price, enter its percentage value in the “Markup” field. This way, the quote will include a reserve even with changes in purchase prices.
REMEMBER: You can add more “Scopes of work” and “Additional materials” with the “New” button or remove them by clicking “Delete”.
REMEMBER: Values for work scopes are generated automatically according to the administrator settings in the “Service Price List”. If the field is active, you can edit its value.
-
Other costs: Additional expenses related to the project, e.g., geodetic maps, insurance, permits.
-
Estimated additional person-days: Optional number of additional workdays needed to complete the project.
Example: If, for instance, the project requires 10 days of work by two people, the total number of person-days is 20 workdays (10 days × 2 workers).
-
Summary: The total estimated value calculated based on the entered data.
-
Contract amount: The total value of the agreement, including agreed costs for project execution, such as services, materials, and other expenses, accepted by both parties to the contract.
NOTE: “Contract amount” is visible only to users with appropriate permissions in the system. By default, only the Administrator, Manager, Project Manager, Estimator, and Accountant can see the contract value.
- Number of hours in a workday for this project: The specified number of working hours in a day, adopted for the execution of the given project.
-
Save the data using the “Confirm” button.
-
Go to the next tab “Details” and fill in the fields:
-
Plans: You can attach documents and technical drawings related to the project.
-
Deadline for delivering pre-construction documentation to the client: The date for providing the client with the required documents before starting construction work.
- Verify the entered data and save it using the “Confirm” button.
NOTE: If the scope of work changes from the estimate to the signing of the contract, it should be updated when changing the status to “We have been selected for execution.” The scope of work is later used in project work planning.
REMEMBER: The “Accounting” tab, used for project settlement, is visible only to users with appropriate permissions.
Example: An estimate for replacing the roof truss with the installation of 4 skylights, without insulating and finishing the attic. The service execution includes the purchase of materials and labor costs.
-
In the “Contracts → Projects” menu, we enter the project.
-
In the “Estimate” tab, we set the “Time and material” field to “No,” because the estimate includes the full service along with materials.
-
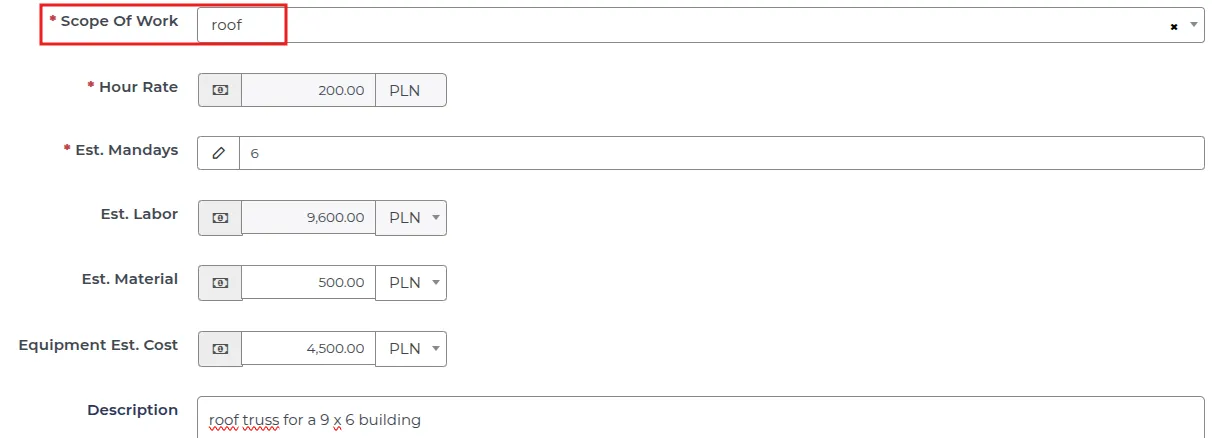
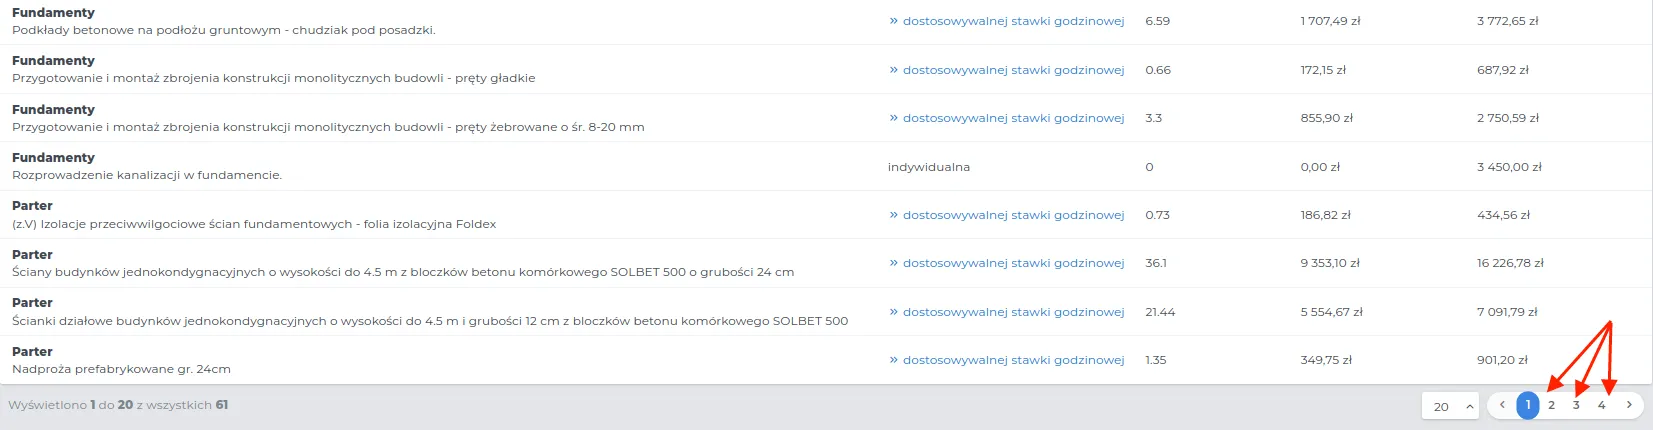
We select “Scope of Work”:
I. Roof
-
Hourly rate: 200.00 PLN.
-
Estimated man-days: 6.
We assume that replacing the roof will take 48 hours. With an 8-hour workday, this gives 6 estimated man-days.
-
Estimated labor cost: Hourly rate × number of hours
48 hours × 200 PLN = 9600 PLN
-
Estimated cost of materials and equipment: Costs of necessary materials and tools.
We assume 500.00 PLN for material costs and 4,500.00 PLN for crane rental.
-
Description: Brief supplementary information.
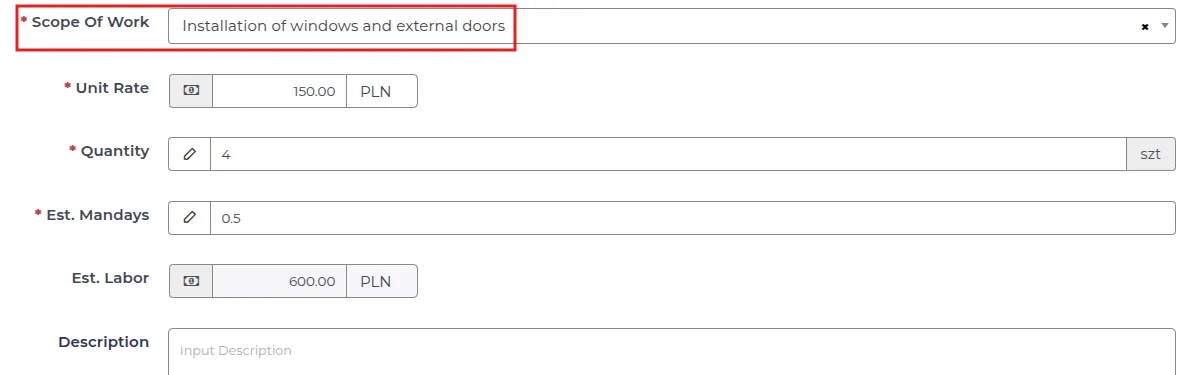
II. Installation of windows and external doors
-
Rate per unit: 150.00 PLN
-
Quantity: 4
-
Estimated man-days: 0.5
We assume that replacing the windows will take 4 hours. With an 8-hour workday, this gives 0.5 estimated man-days.
-
Estimated labor cost: Hourly rate × number of hours
4 x 150.00 PLN = 600.00 PLN
-
Description: Brief supplementary information.
-
We add “Additional materials”
- Materials from the warehouse: No
-
Mounting foam: 6 packages at 40 PLN each. Total 240.00 PLN.
-
Wooden rafters: 120 pieces at 60 PLN each. Total 7200.00 PLN.
-
Mounting accessories: 500 pieces at 3.00 PLN each. Total 1500.00 PLN.
-
Roof window: 4 pieces at 1500.00 PLN each. Total 6000.00 PLN.
- In the next section, we fill in sequentially:
- Markup: 5 %.
The value by which the total cost of the estimate is increased, visible in the “Summary” field.
-
Other costs: 800.00 PLN (Health and Safety)
-
Contract amount: The agreed value of the service fee with the client - this field should be filled in after negotiations with the client and signing the contract.
-
Number of working hours per day for this project: We assume an 8-hour workday, according to the administrator’s settings.
REMEMBER: Entering additional days in the “Estimated additional man-days” field will not affect the remuneration value in the estimate, but will inform the client about a possible extension of the work deadline. It is worth using the “Markup” field, which allows an optional increase to cover the costs of hiring workers.
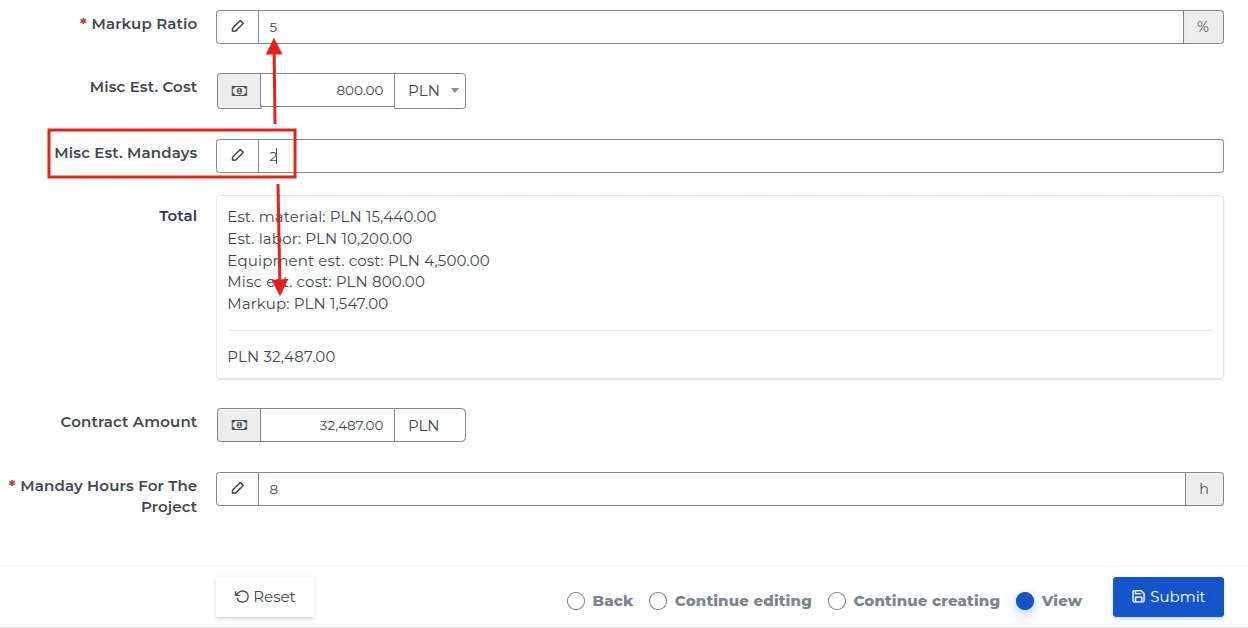
NOTE: The system automatically calculates the “Contract Amount” based on all components. You can round it, but then the system will optionally adjust the percentage value in the “Markup” field.
REMEMBER: If you, as an administrator, change the rates in the scope of work settings after generating the estimate, the system will not take the new rates into account - the rates are saved in the project at the time of making the estimate.
NOTE: Interrupting the process of creating an estimate without saving the form will result in the loss of current data.
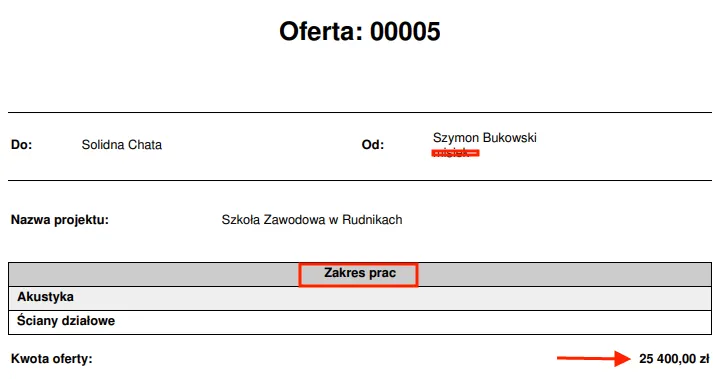
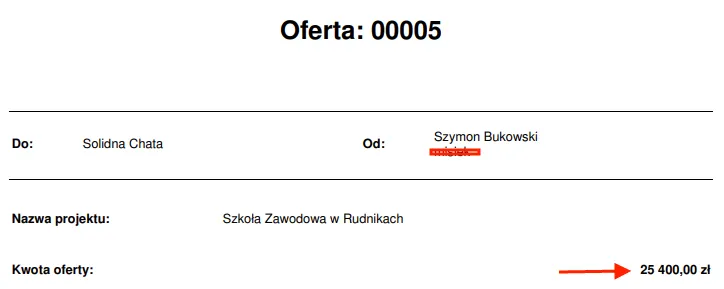
PDF Format Estimate
Section titled “PDF Format Estimate”The system allows generating an estimate in the form of a PDF file, which can be directly sent to a potential client via email.
To prepare and save the estimate in PDF format, follow these steps:
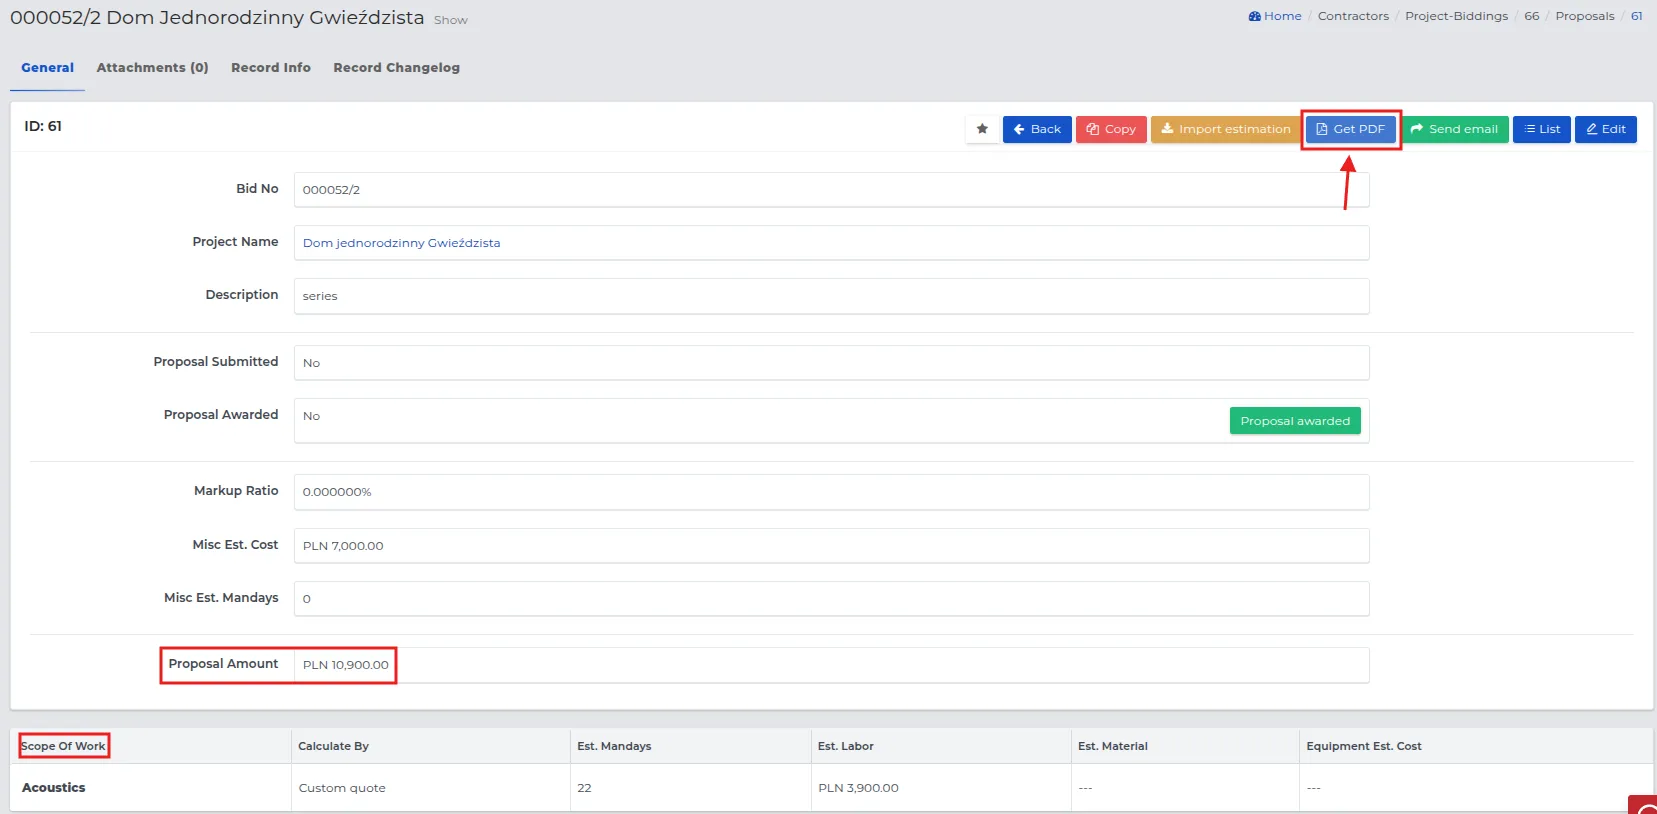
- Go to the preview of the selected estimate by clicking on its name.
NOTE: You can create a PDF format estimate only for a project that has at least one “Scope of Work” and a specified final “Offer Amount.”
-
Select the “Estimate” tab and use the “Download PDF” function button.
-
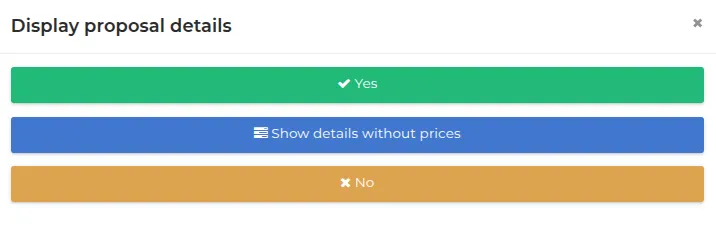
Specify the details of the estimate that should be visible on the PDF document by choosing one of the following options:
-
Yes: A detailed estimate, including “Scopes of Work” that considers labor costs and material costs.
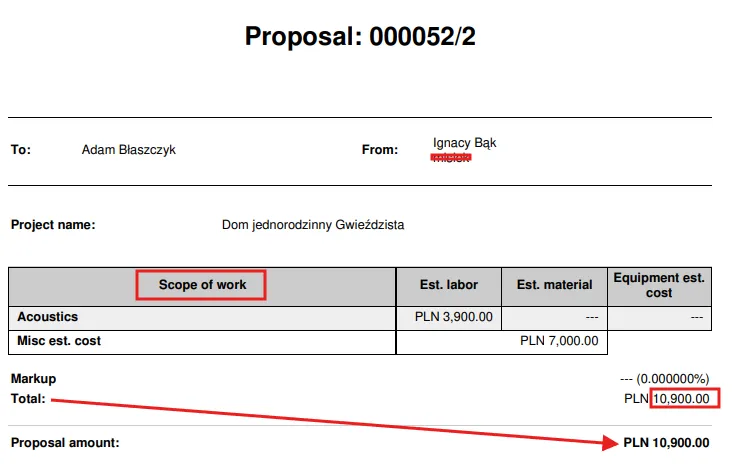
NOTE: If the “Offer Amount” in the selected price offer is changed to a higher or lower value, the system will add the difference to the value in the “Markup” field and inform you with a message below.

- Display what was included in the estimate, but without showing prices: An estimate with hidden detailed costs for individual “Scopes of Work.”
- No: The estimate contains only the offer amount, without revealing the “Scopes of Work” and the costs associated with them.
- Download the generated file and save it to the destination location on your disk.
REMEMBER: You can send the prepared estimate immediately via email by clicking the “Send Email” button instead of “Download PDF”.
Importing an Estimate from a Norma PRO (ATH) File
Section titled “Importing an Estimate from a Norma PRO (ATH) File”To meet customer needs, we have provided the ability to import files with estimates prepared in the Norma PRO program. This way, the fields for the estimate in Contractors.es will be filled automatically, eliminating the need to re-enter the estimate.
To import an estimate from a Norma PRO file, follow the steps below.
-
Go to the appropriate menu:
-
“Contracts → Projects”, if the import concerns a project.
-
“Contracts → Project Bidding”, if the import concerns a bid.
-
-
Select the project or bid to which the data import should apply.
REMEMBER: This function can only be used for projects with a status preceding “Project in Progress” and for bids in preparation.
- Click on the name of the project or bid, and then go to the appropriate tab:
-
“Estimate” for projects.
-
“Bids” for bids.
-
The execution scheme will be the same – use the functional button “Import Estimate”.

-
Fill out the form, where the meaning of the fields is as follows:
-
File Type: Norma PRO, the possible format for import is (ATH).
-
File: Select the file in the required format that was previously saved on the disk. A correctly imported file will be marked with a green “checkmark”.

- Clear previous scope of work and materials: Set the slider to “Active” to clear the previously created project estimate.
REMEMBER: With each import, it is worth marking the option to clear previous data to avoid duplicating them in the estimate. If the estimate is staged, e.g., performed by 2 estimators in 2 different files, then the previous estimate should not be cleared with the second file.
-
Save the form using the “Submit” button.
-
The lists will import the names of the pricing stages according to the notation used in the Norma PRO program.
Updating Project Pricing Statuses
Section titled “Updating Project Pricing Statuses”Changing statuses in projects allows for tracking progress from the initial pricing and informs about readiness for subsequent steps, such as approval or submission of the pricing to the client.
REMEMBER: To change the pricing status, click its name and select the appropriate one from the available list. You don’t have to go through all the statuses, but it’s worth adding notes—they create a complete documentation of agreements with the potential client along with the document flow.
NOTE: Statuses related to client agreements can only be changed in project offers that have at least the status “In the process of preliminary pricing.”
Example illustrating the next possible statuses to choose from, after the status “In the process of preliminary pricing.”
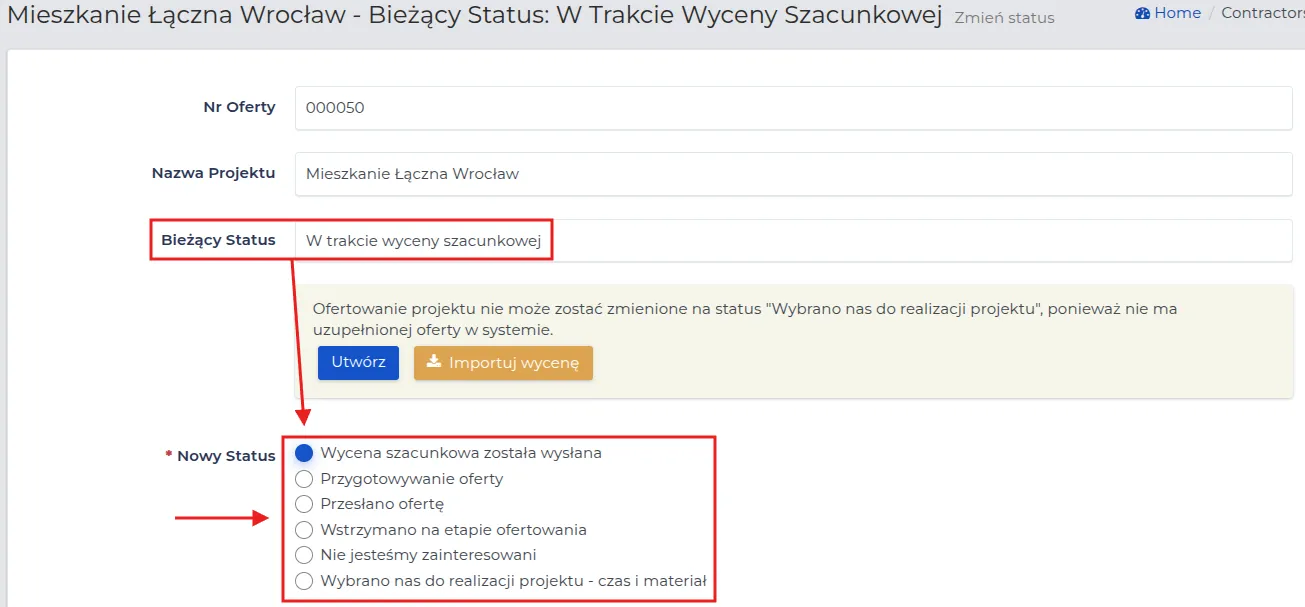
-
Preliminary pricing has been sent: Indicates that the pricing has been sent to the client for analysis. It is not yet a final commitment, but a proposal of costs and scope of work.
-
Preparing the offer: The offer is being developed. You can still make changes to the scope of work, costs, and materials before sending it to the client.
-
Offer sent: The offer has been sent to the client and is awaiting their decision. At this stage, changes to the pricing are not anticipated unless the client requests a correction.
-
Paused at the offering stage: The offering process has been temporarily suspended. This may result from the client’s decision, the need for additional arrangements, or other factors delaying further actions.
-
We are not interested: The offer will not be further considered. This may result from unfavorable cooperation conditions, lack of resources, or other business factors.
-
We have been selected for project execution - time and material: The client has accepted the offer in the “Time and Material” billing model. This means that the work will be invoiced based on the actual working time and costs incurred for materials.
-
We have been selected to execute the project: The client has accepted the offer, and the project moves to the execution phase.
-
Contract prepared: The contract has been drafted and is ready to be presented to the client. At this stage, any necessary amendments can still be made before signing.
-
Contract signed: The client has accepted the terms and signed the contract. The project can proceed to the next execution phase.
-
Pre-construction documentation awaiting preparation: The process of preparing the documentation has not yet started but is planned to be executed.
-
Pre-construction documentation in progress: The documentation is being developed by the appropriate individuals or department. At this stage, required information and approvals may be gathered.
-
Pre-construction documentation completed: All necessary documents have been prepared and are ready for verification or submission to the client.
-
Pre-construction documentation verified: The documentation has undergone internal review and meets the requirements. It can be submitted to the client for final approval.
-
Pre-construction documentation sent to the client: The documentation has been submitted to the client for analysis and approval. We are awaiting their decision.
-
Pre-construction documentation approved by the client: The client has approved the documentation, and the project can proceed to the next phase.
-
Project in progress: Work on the project is actively being carried out according to the schedule. Subsequent stages are being executed as agreed.
-
Project has been canceled: The execution of the project has been permanently halted. This may be due to the client’s decision, financial issues, or other factors.
-
Work suspended: Temporary halt of work on the project. This may be due to weather conditions, lack of resources, or other factors requiring a pause.
-
Problem with the project: Difficulties have arisen that may affect the timeline or budget. This requires analysis and appropriate action.
-
Completed: Work on the project has been completed as agreed. Final settlement and acceptance may still be required.
-
Closed: The project is completely finished, all work, documentation, and settlements have been finalized.
REMEMBER: For quotes with the status “We have been chosen for implementation,” it is necessary to provide the “Contract Amount” before starting work.
NOTE: Changing the status to “Project in progress” blocks the ability to edit general project information.
REMEMBER: A project that has been completed and finished should always be marked in the system as “Closed.” Only then can you forward it to accounting for financial settlement with the client.