Control and Supervision
In the “Control and Supervision” chapter, we focus on key aspects ensuring efficient project implementation, such as changes, control visits, requests for information, and material verification. These actions aim to ensure compliance with project assumptions and quality standards.
Changes in projects
Section titled “Changes in projects”During the implementation of projects, situations may arise that require changes. These can be modifications to the scope of work commissioned by the client or requests for change from the contractor. The changes introduced must be justified and precisely described to ensure transparency and understanding of their consequences.
REMEMBER: Changes in projects can only be reported for “active” projects and for those whose valuation is not based on the “Time and Material” principle.
NOTE: The amounts of changes in projects are by default visible only to the Administrator, Project Manager Assistant, Manager, Estimator, and Accountant. Other users see the names of changes, but without their amounts. Permissions can of course be modified in role settings.
You will enter the change request into the system according to the scheme:
-
Go to the “Contracts → Changes in projects” menu and select the “New” button.
-
Fill out the form, the meaning of the fields is as follows:
-
Title: Name of the change or project modification.
-
Type: Determine the side that reports the change.
-
Project name: Select the project to which the change applies.
-
Estimator: The person responsible for preparing the change estimate.
-
Department: The department responsible for changes.
-
Description: Additional information describing the need for change.
-
Date: Date of application preparation.
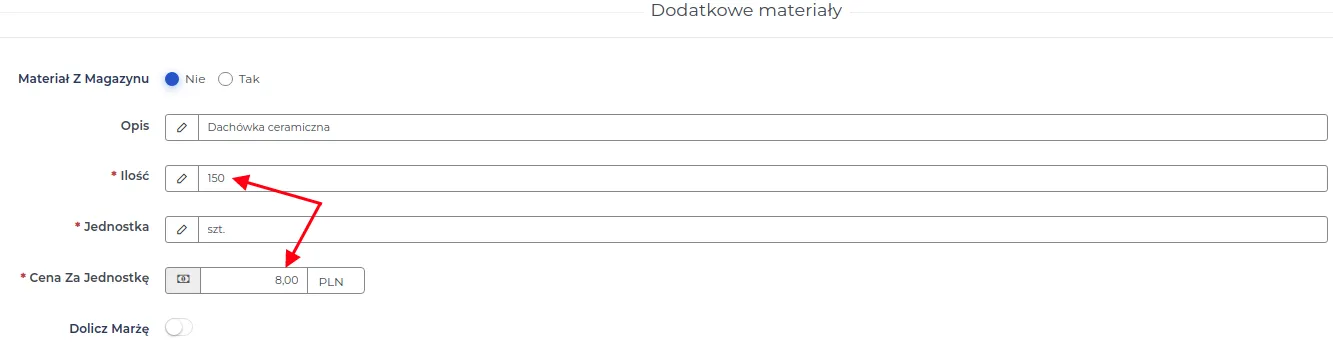
- Select from the list “Scope of work” and possibly “Additional materials”, if they are related to the reported change.
NOTE: If the scope of work requires the use of additional materials, they should be selected from the warehouse list or outside it and their value should be determined in the “Unit price” field.
REMEMBER: The “Unit price” for the selected material from the warehouse list is determined based on the last purchase made. You can change it according to your own needs.
REMEMBER: If you want to add a margin to the unit price of the material used from the warehouse, activate the “Add margin” option. This will provide a reserve for changes in purchase prices, according to the margin value set by the system administrator.
- Optionally, fill in the two remaining fields in the form:
-
Margin percentage on additional materials: The percentage value added to the amount of materials, exceeding the planned consumption level.
-
Additional days extending the investment: The estimated number of days by which the planned implementation of works may be extended due to the introduced change.
-
Verify the value generated by the system based on the changes made in the “Summary” field, which determines the amount increasing or decreasing the initial project valuation.
-
Set the “Status” indicating the current stage of creating the application. The system automatically marks the status as “Draft”.
-
Save the data using the “Submit” button.
NOTE: Only changes in projects with the status “Accepted” can be continued in the further implementation of the project.
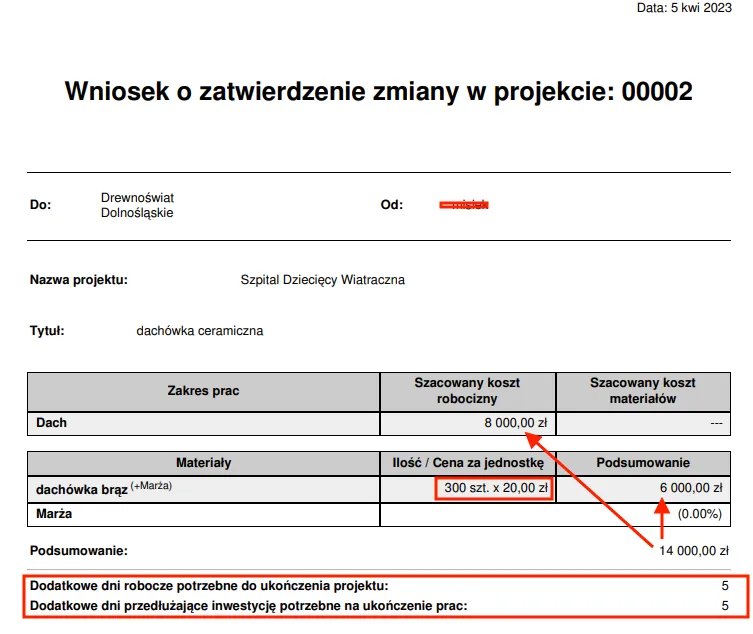
Example: The client has submitted a request for a change in the scope of work, which includes renovation of only a certain part of the roof.
-
In the “Contracts → Project changes” menu, we submit an application.
-
We define the “Scope of work”, choosing:
- Roof: 24 m2 of roof was reported, for which the rate without material costs for 1 unit of repair is 180.00 PLN. Time allocated for the change: 3 working days. The estimated cost for roof repair will be 4320.00 PLN.

- Additional materials: It was agreed to purchase 150 pieces of ceramic roof tile at 8.00 PLN per piece. The total value of materials, without the added margin, will be 1200.00 PLN.
- We verify the summary and save the application form, in which the change will concern an increase in the cost of the service by the amount of 5520.00 PLN.
NOTE: Changing administrative settings for “Scopes of work” will not update previously saved changes in projects.
REMEMBER: If you want to use the new administrative settings, delete and re-add the introduced change. Selected entries in the reported change cannot be deleted.
NOTE: Costs associated with “Changes in projects” will be included in the “Invoices” section.
NOTE: For each project, the numbering of changes starts from the beginning, which means that change numbers may repeat, but they refer to different projects.
Change of status for a submitted application for a change in the project
Section titled “Change of status for a submitted application for a change in the project”Applications for changes in projects are waiting for their status to be changed.
REMEMBER: Only authorized users can change statuses when reporting changes in projects.
NOTE: For projects settled on a “Time and Material” basis, applications for changes in the project cannot be submitted. However, a new project can be created in the system, which will be used to settle with the client for work to be done according to the estimate, not in the form of “time and material”.
To change the status for a submitted application for a change in the project, follow the order:
-
Go to the “Contracts → Changes in projects” menu and click the “Edit” action button for the selected application.
-
Verify the content of the application and select a new status at the bottom of the form, the meaning of which is as follows:

-
Draft: Status automatically set by the system for the entered record regarding a new change in the project.
-
Verified: The change has been previously checked for correctness.
-
Sent: The document with the change has been sent to the client for acceptance.
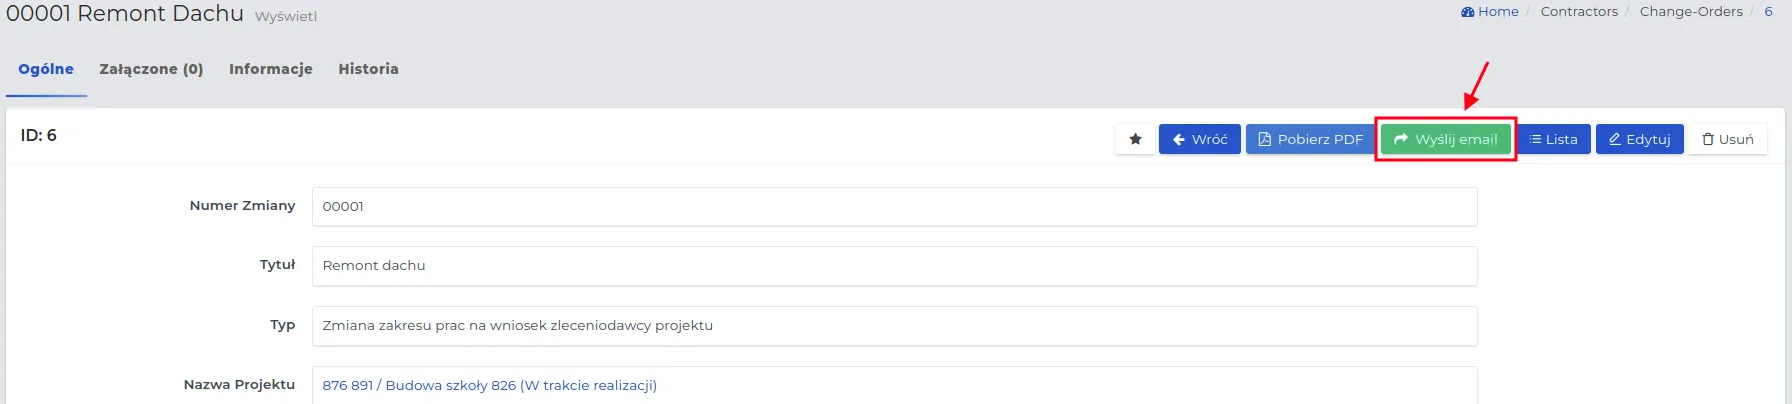
REMEMBER: In the change preview, use the “Send email” button to convey the content with the change in the project.
NOTE: Specify the recipient of the email by selecting them from the contact list or add them if they do not exist in the system, in the manner described here.
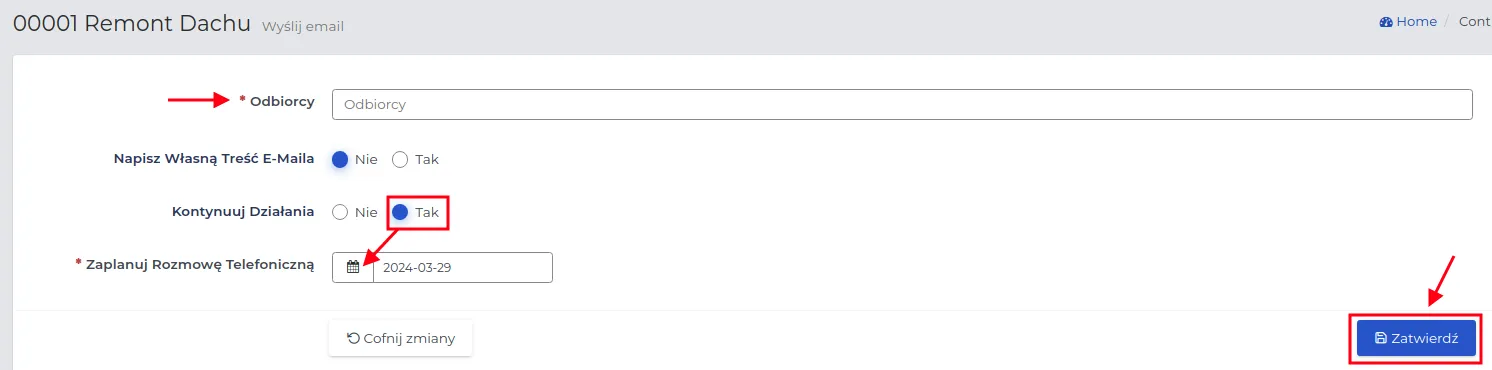
REMEMBER: You can enter your own message content and continue actions related to accepting the submitted change by selecting the “Yes” option.
NOTE: It is worth attaching the sent email content to the project to which the agreed change is to apply.
- Accepted: Conditions containing details of the settlement for the change have been accepted. The “Acceptance Date” and “Contract Amount” fields should be completed.
At this stage, billing arrangements can be omitted. Only after the work is completed, the accounting department will properly prepare the settlement for the resulting change. More about project billing can be found [here]/en/contracts/4/).
REMEMBER: After accepting changes in the project, enter the work schedule for employees according to the number of days given in the “Estimated working days” field. More about creating a work schedule for employees can be read [here]/en/contracts/5/).
REMEMBER: Submit a material request for the change in the project only after it has been accepted by the client.
NOTE: After accepting the application, further editing is possible only for accounting purposes. You cannot change the arrangements and amounts that have been approved and have received the “Accepted” status.
- Not accepted: No agreement to make changes to the project.
- Save the changes with the “Approve” button.
NOTE: Downloading the document in PDF format is only possible for changes with the “Sent” status. This file can be printed and delivered to the client in paper form.
Example: A sample document in PDF version presenting the “Request for approval of changes in the project”.
REMEMBER: Reported changes in the project must be accepted by the client before their implementation. The change acceptance process should be formally confirmed by both parties. Only then can you start planning work or ordering the necessary material.
Project control visits
Section titled “Project control visits”The purpose of a control visit to the project is to ensure monitoring of work progress and to check whether the work is proceeding according to plan and expectations. The types of control visits are determined by the system administrator.
NOTE: Inspections can apply to projects with various statuses. Before starting a project, the inspector may determine, for example, the condition of the building, during the work, control the workers, and at the end of them, determine the quality of the work.
If you want to create an inspection, follow the order:
-
Go to the “Contracts → Inspections” menu and select the “New” button.
-
Fill out the form, the meaning of the fields is as follows:
-
Project name: Choose from the list the project for which the inspection is intended.
-
Inspector: Determine the person responsible for conducting the inspection. Information about the visit will appear in the selected employee’s calendar according to the date of the planned visit.
-
Status: Visit status - default “Pending”.
-
Type of inspection: Choose the subject of the visit from the system list, e.g. “Estimate” or “Safety”.
NOTE: For “Types of construction site visits” for which the administrator has set the “active” slider in the “Estimation accuracy and work progress” field, when changing the status, the inspector will have to make an additional description regarding the progress of the work.
-
Inspection date: Determine the date and time of the start of the inspection.
-
Duration: Choose the number of minutes or hours of the visit or the option “Select date and time” for a non-standard time range, for which in the “End” field you can specify the end time of the inspection.
-
Reason for inspection: You can describe the reason and objectives of the planned inspection.
- Save the data using the “Submit” button.
Changing the status for the entered inspection
Section titled “Changing the status for the entered inspection”Changes in inspection statuses allow tracking progress and the current state of inspection on the project.
NOTE: The administrator has the ability to create a special survey containing questions for the inspector, the answers to which are necessary to change the status - to add a rating sheet, go to the settings of types of construction site visits (Admin → Contracts → Types of construction site visits), and then in the preview of the type of visit, select the “Ratings” tab.
To change the status for a logged inspection visit, follow the scheme:
- On the calendar in the “CRM & Organizer” menu, after the visit is over, click on the field with the name of the visit on the project.
REMEMBER: You can filter the list of inspection visits in the “Contracts → Inspection visits” menu to easily find the inspection visits assigned to you.
-
In the form, in the “Status” field, click on the name of the current status “Pending”.
-
Set a new status by selecting one of the options:
-
Completed: The visit has been carried out.
-
Cancelled: The visit has been cancelled.
- Add a note explaining the course of the inspection visit.
REMEMBER: If the inspection visit is to be rescheduled, in the “Create a new event as a continuation” field, select “Visit to the project”.
- Save the data using the “Confirm” button.
NOTE: Visits with the status “Completed” for which no further continuation has been set can be considered closed.
Requests for Information
Section titled “Requests for Information”Requests for information are used to obtain additional explanations or information about the project being implemented. The circulation of this documentation in the system is similar to the process of reporting changes in the project.
You will enter a request with a change notification into the system according to the scheme:
-
Go to the “Contracts → Requests for Information” menu and select the “New” button.
-
Fill out the form, the meaning of the fields is as follows:
-
Project name: Select the project to which the application relates.
-
Title of the application: Define the subject of the application.
-
Description of what explanations are needed to implement the project: Indicate the items causing doubts during the implementation of the project and specific questions requiring explanations.
-
Attachments (documentation): Optionally add files with marking of elements that are the subject of the application e.g. technical specifications, construction plans.
-
Assigned employees: Select employees associated with the project to which the request for information relates.
-
Date: Date of submission of the request for information.
-
Status of the application: The current stage of the request for additional information process. The system automatically marks the status as “Pending”.
- Save the data using the “Confirm” button.
NOTE: The request for information can also be created by the foreman through the mobile application.
Changing the status for a submitted request for information
Section titled “Changing the status for a submitted request for information”The progress of work related to providing a response for a submitted request for additional information is determined by its status change.
After selecting the request in the “Contracts → Requests for Information” list, you should click on the current status name and select a new status from the available options:
-
Pending: The request has been submitted, but has not yet received a response.
-
In progress: The request is being considered.
-
Completed: A response has been received to the question contained in the request.
-
Cancelled: The submitted request has been rejected.
REMEMBER: Only a “Pending” request can be sent as an attachment via email or generated as a PDF file for direct transfer to the person responsible for its consideration.
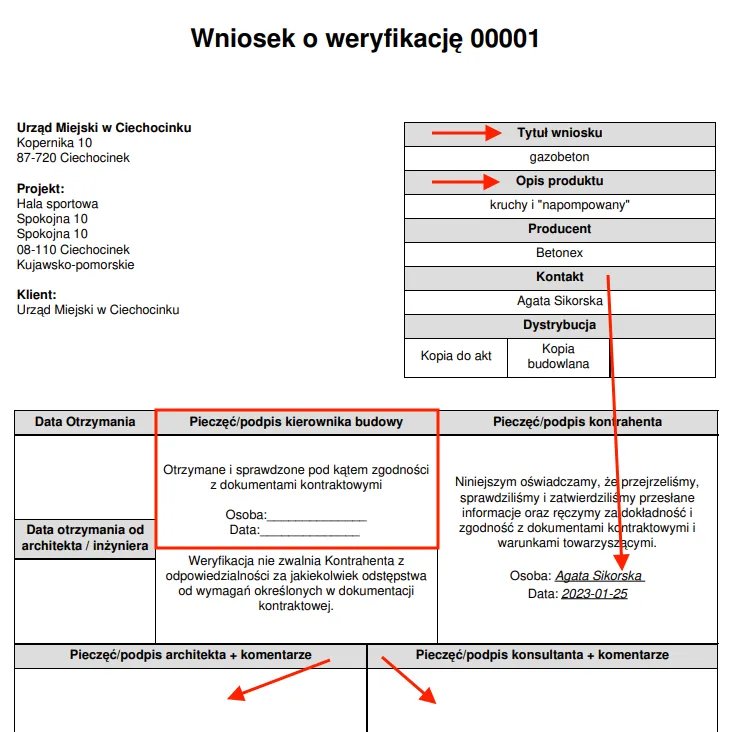
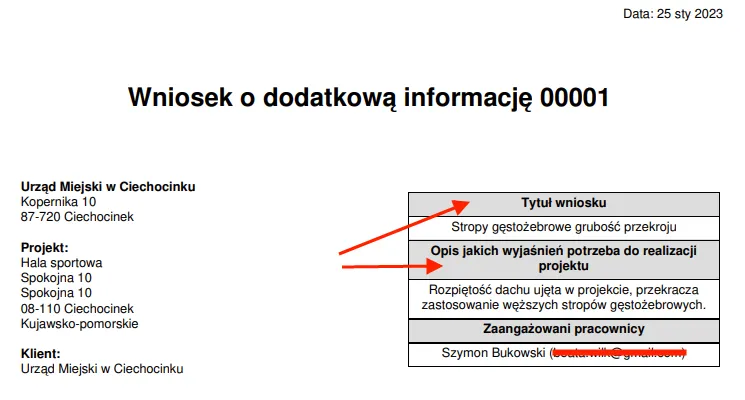
Example: A PDF version of the document showing the “Request for Additional Information”.
NOTE: Changing the status to “Completed” for a submitted request for information is equivalent to accepting the explanations provided by both parties.
Verification of materials intended for implementation
Section titled “Verification of materials intended for implementation”It is worth checking whether the construction material or other product meets the standards required by the project before using them. This verification ensures safety and minimizes the risk of potential complaints, discrepancies or even accidents. Creating a request for material verification is necessary when we have doubts about its compliance with the required standards.
Creating requests for material verification is done according to the scheme:
-
Go to the “Contracts → Requests for Information” menu and select the “New” button.
-
Fill out the form, the meaning of the fields is as follows:
-
Project name: Select from the list the project to which the notification relates.
-
Request title: Specify what the submitted request should concern.
-
Specification number: The number assigned by the supplier specifying the standards of the supplied product.
-
Product Description: Describe the appearance and distinctive features that the material should have.
-
Attachments (Documentation): Add electronic files, e.g., project documentation.
-
Manufacturer: Provide the name of the product manufacturer or select it from the list belonging to the “Supplier” group.
-
Supplier: Select the unit that supplies or intermediates in the sale of a given material or goods.
-
Responsible Employee: Select the employee who is responsible for verifying the submitted application.
-
Date: Provide the date of submission of the verification application.
-
Status: Select the current stage at which the application for material verification is located. The system automatically marks the status as “Pending”.
- Save the data using the “Submit” button.
Changing the status for a submitted application for material verification
Section titled “Changing the status for a submitted application for material verification”The way to change the status in the application for material verification is identical to the two types of applications described above. After selecting the application in the “Contracts → Material Verification” list, click on the current status name and select a new status from the available options:
- Pending: The application has been submitted, but has not yet received a response.
- Accepted: A positive response has been given to the application, i.e., the product meets the required standards indicated in the project documentation.
- Accepted with note: The response to the application included information with an explanation in the “Acceptance Note” field - product conditionally accepted.
- Rejected: A response was received that the material does not meet the required standards and cannot be used.
REMEMBER: Only the “Pending” application can be sent as an attachment by e-mail or generated as a PDF file for direct transfer to the person responsible for its consideration.
Example: A sample document in PDF version presenting the “Application for Verification”.