Planner
Regardless of the number of ongoing projects, the Contractors.es system allows you to register a work plan for each of them. The graphical representation of the planner in a tabular form is clear and transparent. The Planner module is divided into categories related to the projects themselves or directly related to the employees assigned to a selected construction site.
Project Schedule
Section titled “Project Schedule”The project schedule allows you to set a work time calendar for each project in the system. The created “Project Schedule” allows you to view for each project:
-
what has been planned for the project (work scopes),
-
what is the planned time for completing individual work stages,
-
how many employees have been assigned to these tasks.
NOTE: By default, all users have access to the project schedule, but only those with appropriate permissions can create events on the calendar.
Depending on your needs, you have the option to use four tabs containing specific system functions.
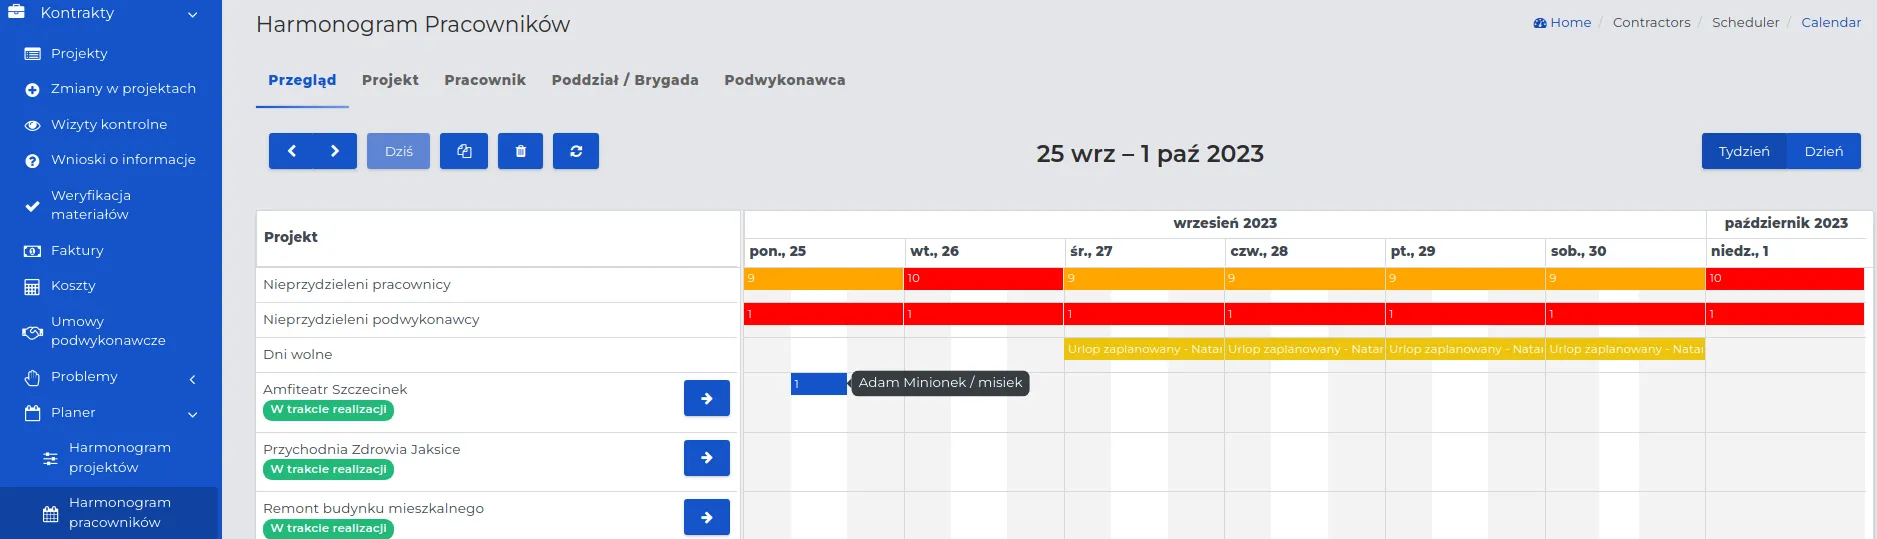
I. “Overview” Tab.
These are settings related to how the calendar is presented on the user’s dashboard.
- Define the time interval (Week or Month) using one of the buttons:
![]()
- Weekly calendar view.

- Monthly event entries on the calendar.

- Both calendar presentation methods, weekly and monthly, can be moved on the dashboard using navigation buttons that allow you to move both backward and forward through subsequent weeks or months.
![]()
-
The remaining function buttons above the calendar are sequentially labeled:

-
“Today”: Pressing this button will display events occurring in the time interval (weekly or monthly) including the day with today’s date.
-
“Copy”: Allows you to copy a specific cell from the calendar table and paste it elsewhere.
-
“Trash”: Allows you to delete a selected entry from the events table.
-
“Refresh”: Updates the schedule view (in case of simultaneous editing by more than one person).
REMEMBER: The copy function remains active until it is turned off by clicking the icon again. This way, you can paste the same task multiple times on different days.
NOTE: The copy function in the form retains settings only regarding the number of planned employees assigned to another work scope. The number of workdays always remains at “1” and can be changed by editing the form, available by clicking its name with the mouse cursor.
NOTE: You can also delete a selected cell in the calendar table by clicking its name and then selecting the “Delete” button in the upper right corner.
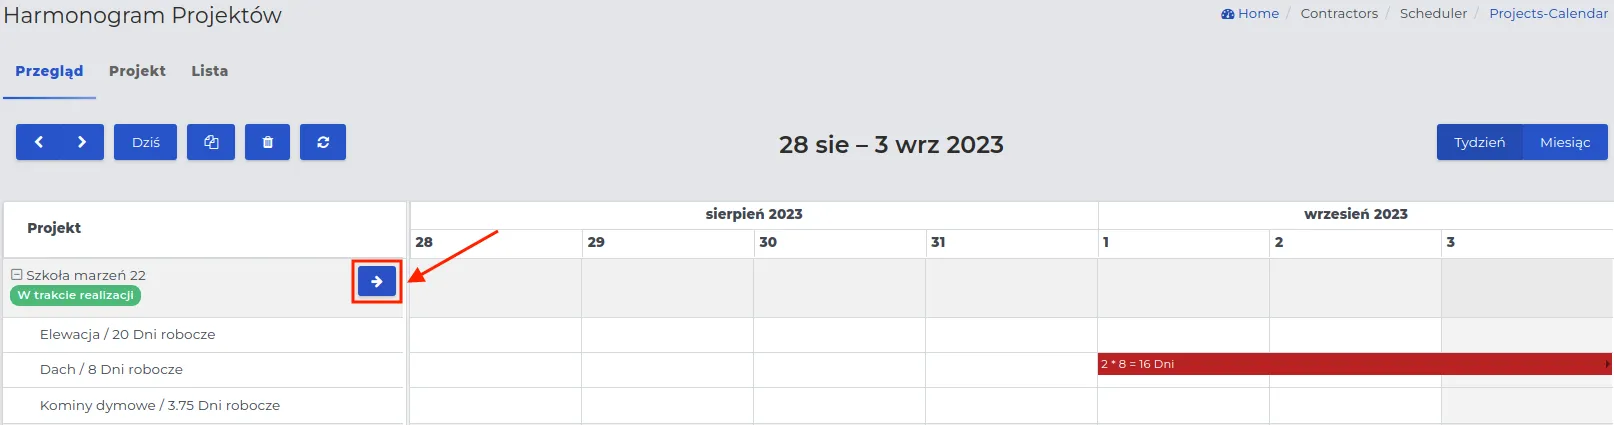
REMEMBER: The “Arrows” button allows quick navigation between different tabs related to a given project on the list.
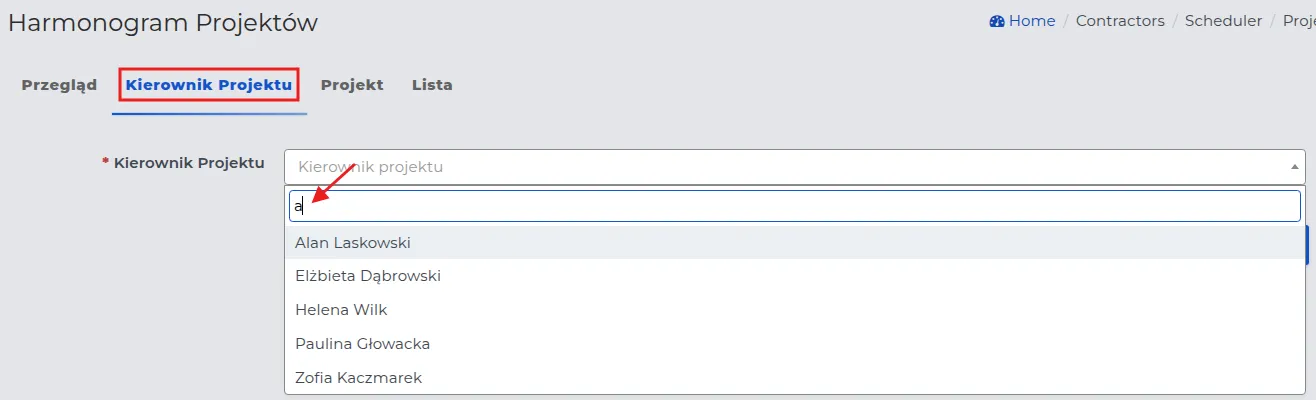
II. “Project Manager” Tab.
Allows you to check which projects involve the selected user with project manager permissions. After choosing the project manager from the dropdown list and confirming the selection, all work schedules created by this user will be displayed.
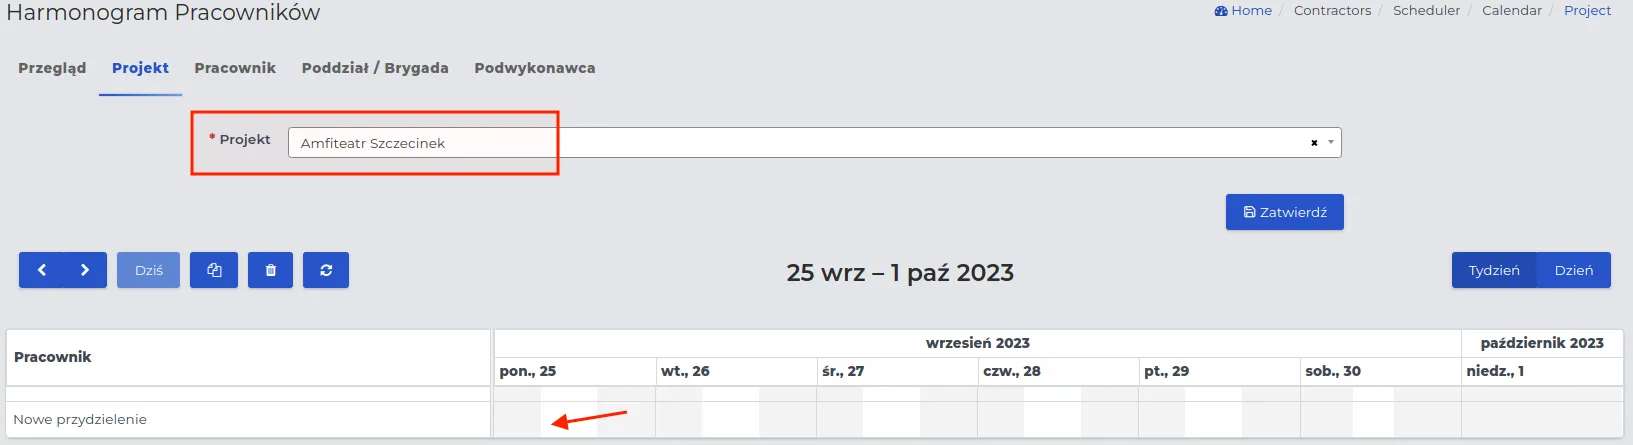
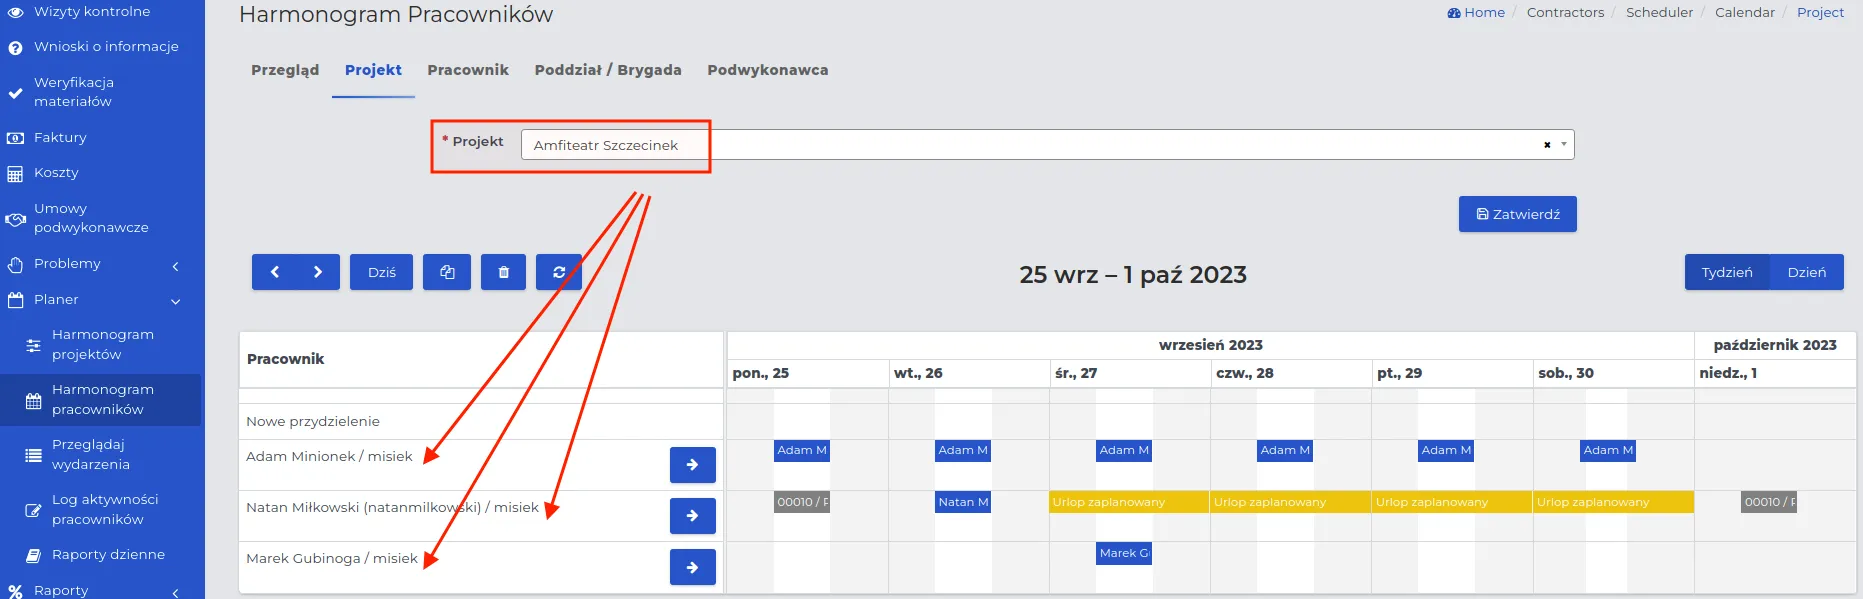
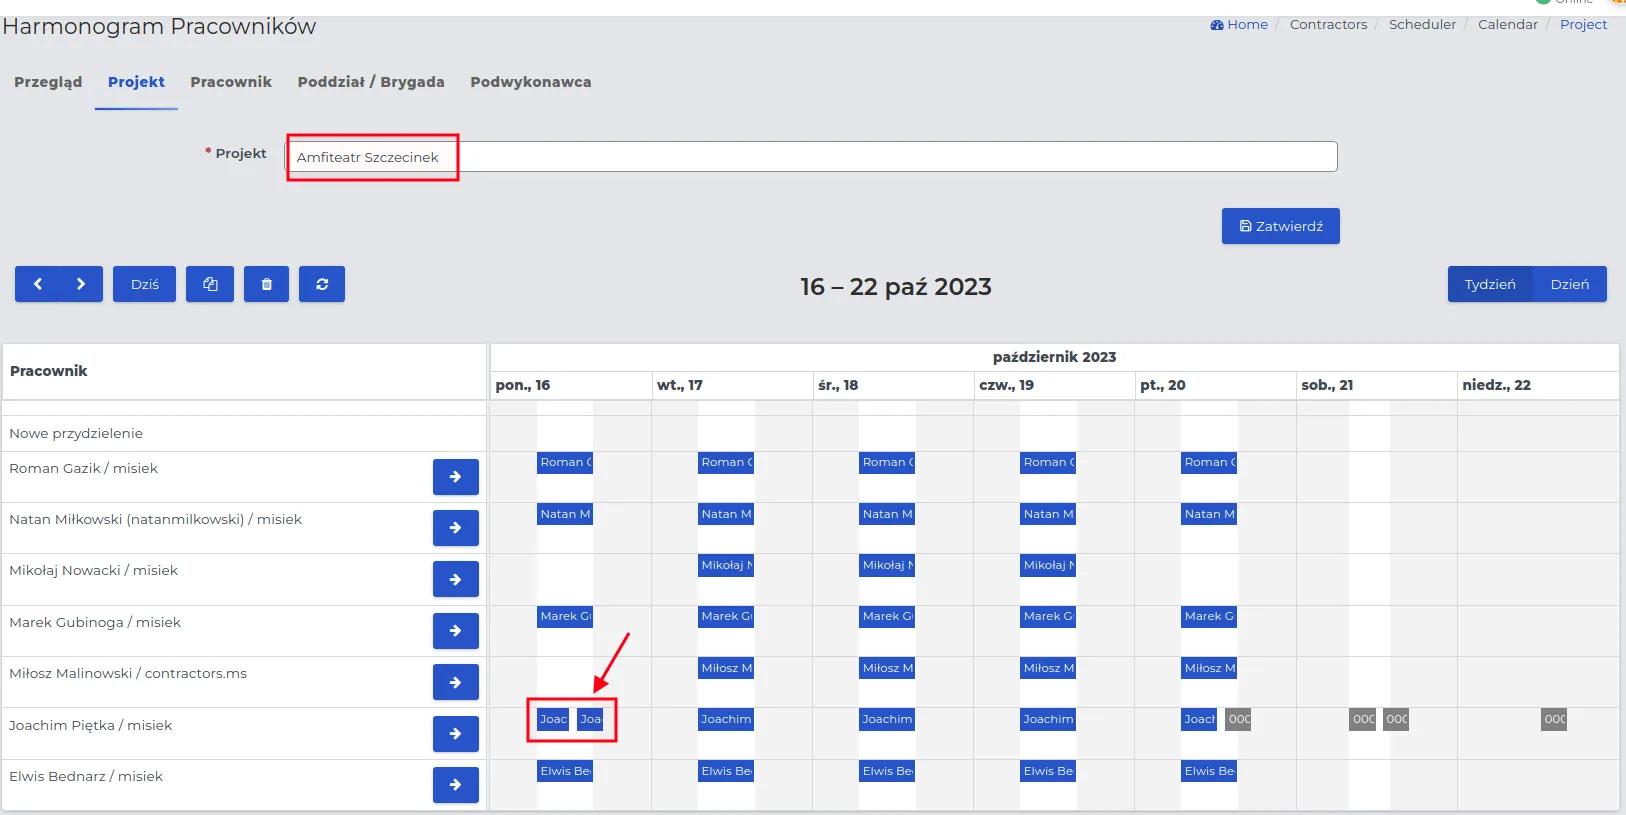
III. “Project” Tab.
Allows the user to find any project in the system by entering the initial letter or syllable in the “Project” field. After making a selection, the event calendar associated with it will be displayed on the user’s dashboard.
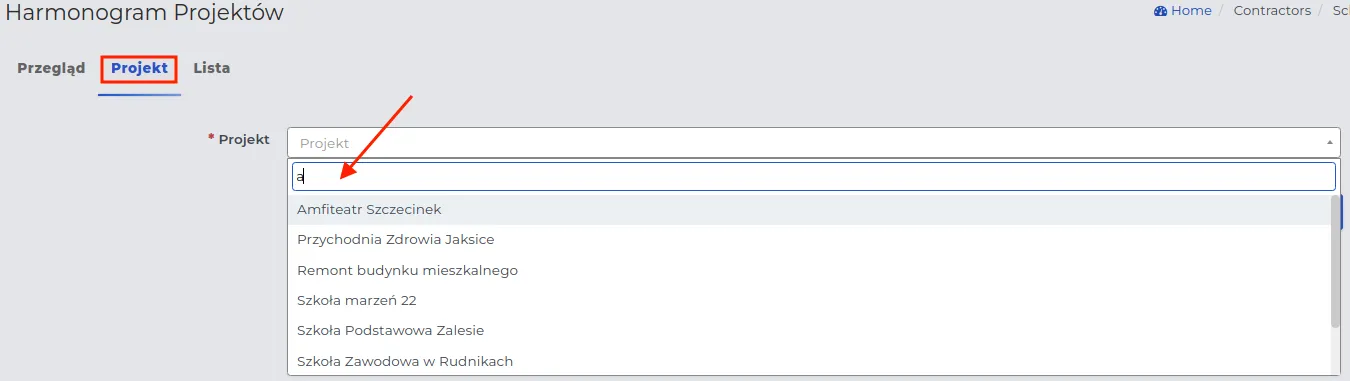
NOTE: By selecting a different project name from the dropdown list, you will switch to viewing its schedule.
IV. “List” Tab.
These will be events defining the work scopes for all projects. The system will automatically display only those events that have been scheduled. Thanks to the record filtering function, marked with a red arrow in the screenshot below, it is possible to specify a time interval for events as “Future, Past, and All.”

REMEMBER: Work scopes located in the “Trash” can be restored to the list by the administrator using the “Restore” action button. They are not permanently deleted from the system. They will reappear on the “active” list in the group with the appropriate time interval.
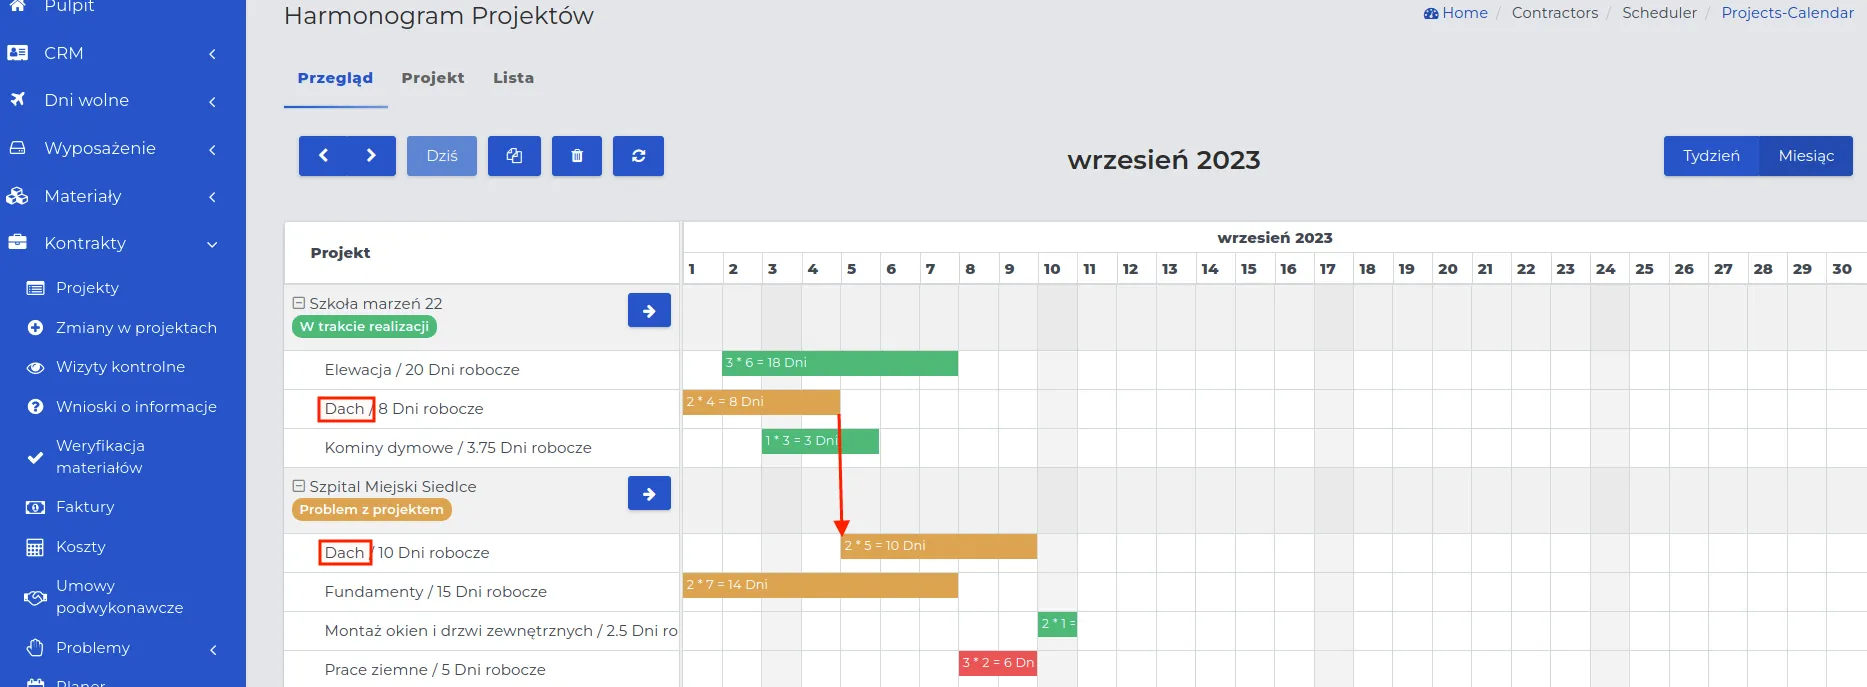
Entering Work Scopes on the Schedule
Section titled “Entering Work Scopes on the Schedule”Thanks to the capabilities offered by Contractors.es, you can effectively plan the organization of work scopes, ensuring continuity of working days for employees and smooth project execution according to the schedule.
Example illustrating the completion of the work schedule while maintaining continuity of employee working days.
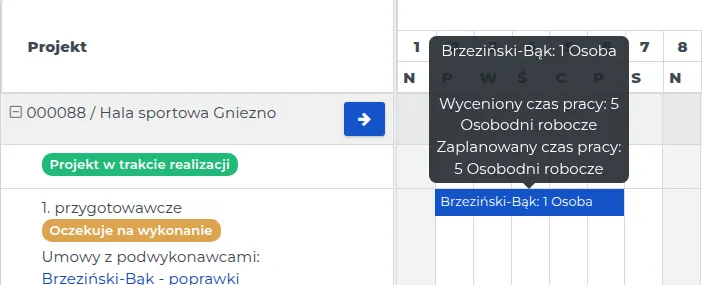
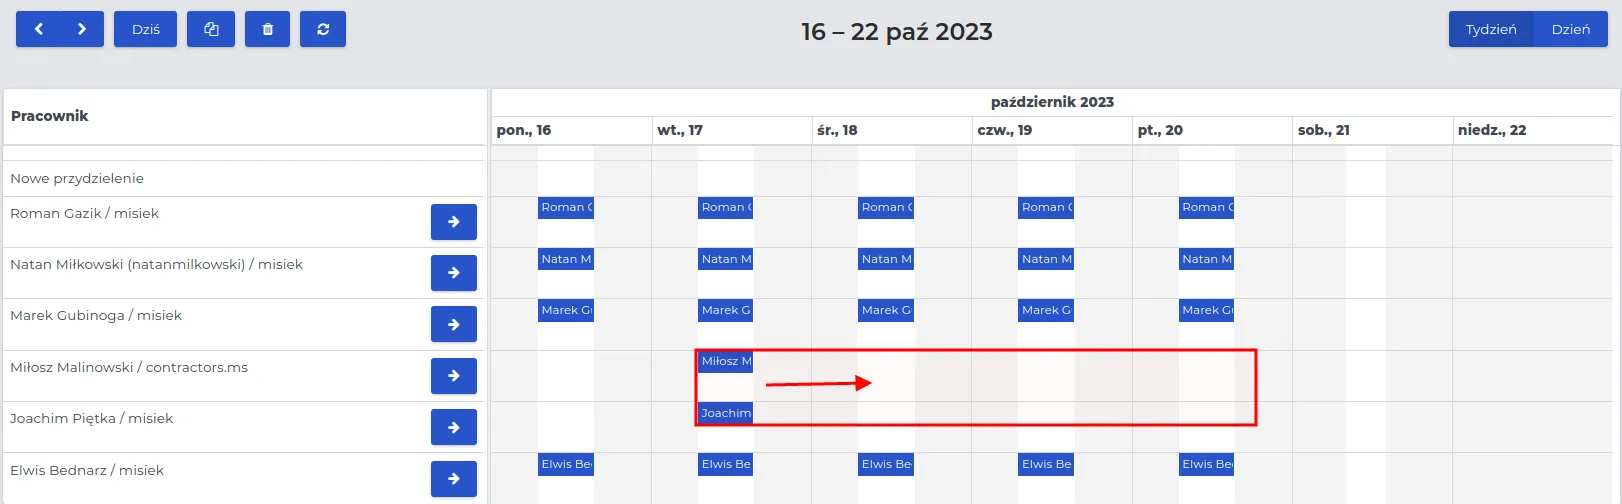
Two employees started working on roof construction for a project that was supposed to last 4 working days. On the fifth day, they were assigned to another roof construction task, but on a different project. The graphical arrangement of colorful cards on the work schedule is a useful tool that facilitates organization and ensures full utilization of available dates in the calendar.
The end and restart dates for these employees are marked with a red arrow on the screenshot.
You can determine time and workforce resources for a given scope of work in ongoing projects in two ways.
Method I: By adding a new event to the list of already entered work scopes.
-
In the “Contracts → Planner → Project Schedule” module, go to the “List” tab.
-
Above the list of entries, click the “New” button and fill out the form. The meaning of fields is as follows:
-
Project: Select the project name for which you want to add a planner entry.
-
Task type name: Define what kind of work is being planned.
-
Delays dependent tasks (days): For dependent tasks, the system automatically sets the number of days needed to finish one stage before the next can start. You can adjust this value manually.
REMEMBER: The “Delays dependent tasks (days)” field is visible only when a dependency is defined for the selected task type. Otherwise, this field is not shown in the form.
NOTE: Dependent tasks are configured by the administrator, and task type settings define how work is distributed over time. More information is available here.
- Stage: Select the work stage, if stages were defined in the estimate.
NOTE: This field is available only for estimates that include project stages.
-
Planned start of work: Enter the planned start date for the work scope.
-
Stretch based on estimated stage time: Specify whether work should be automatically adjusted to the stage duration from the estimate.
-
If you select “No”, tasks will not be automatically stretched to the estimated stage duration. Set the finish date in “Planned end of work”.
-
If you select “Yes”, tasks will be distributed according to the estimated duration for that stage.
-
NOTE: Automatic schedule stretching does not work for projects billed as “Time and Material”.
-
Performed by: Select the performer group for whom the assignment should be planned.
-
Internally: Employees from your company. In “Planned number of people”, enter how many workers should perform the work.
REMEMBER: After saving the form, assign specific workers in the employee schedule as described here.
-
Subcontractor: Choose an agreement with an external company and define exclusivity.
-
Brigade: Select a worker brigade from the list.
-
To automatically assign all members of a selected brigade or a foreman supervising a subcontractor, use the “Create assignment” field. This allows the project schedule to automatically include the right number of people without manually selecting each worker.
REMEMBER: For stable, specialized brigades handling specific work types, automatic assignment is recommended. The system automatically spreads the number of days in the planner based on person-days, including hours and employee availability.
NOTE: Changing the number of workers causes the system to automatically recalculate the work duration - either extending or shortening it depending on available resources.
REMEMBER: In case of sudden staffing changes, you can add a worker from outside the brigade as a replacement, or allow the system to automatically extend completion time.
REMEMBER: Employees using the mobile application receive assignments several days in advance, according to administrator settings.
- Note: Optional space for additional information.
- Save data using the “Confirm” button.
Method II: Directly from the project calendar displayed on the dashboard.
- Go to “Contracts → Project Schedule” and select the project where changes should be made.
REMEMBER: If many projects are active, use the search function in the “Project” tab.
-
Optionally change the schedule display interval using the “Week” or “Month” buttons.
-
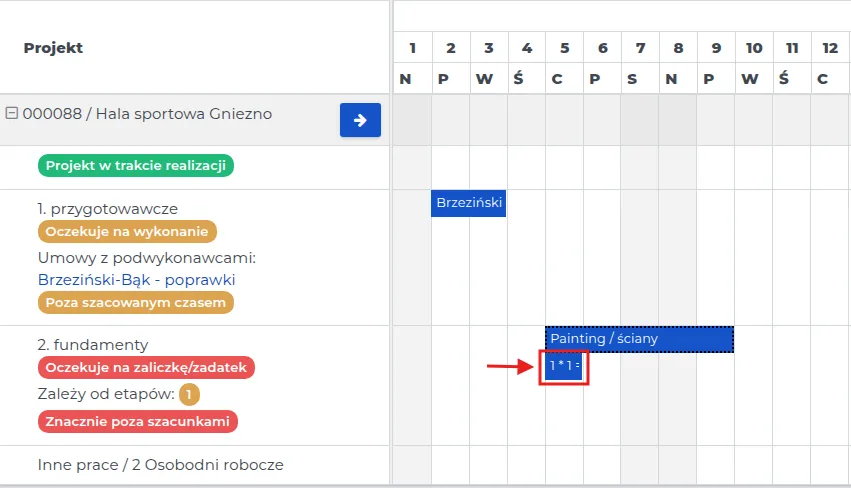
For the selected work scope, verify how many working days were planned for this scope when creating the estimate. This information is marked with red fields in the screenshot below.
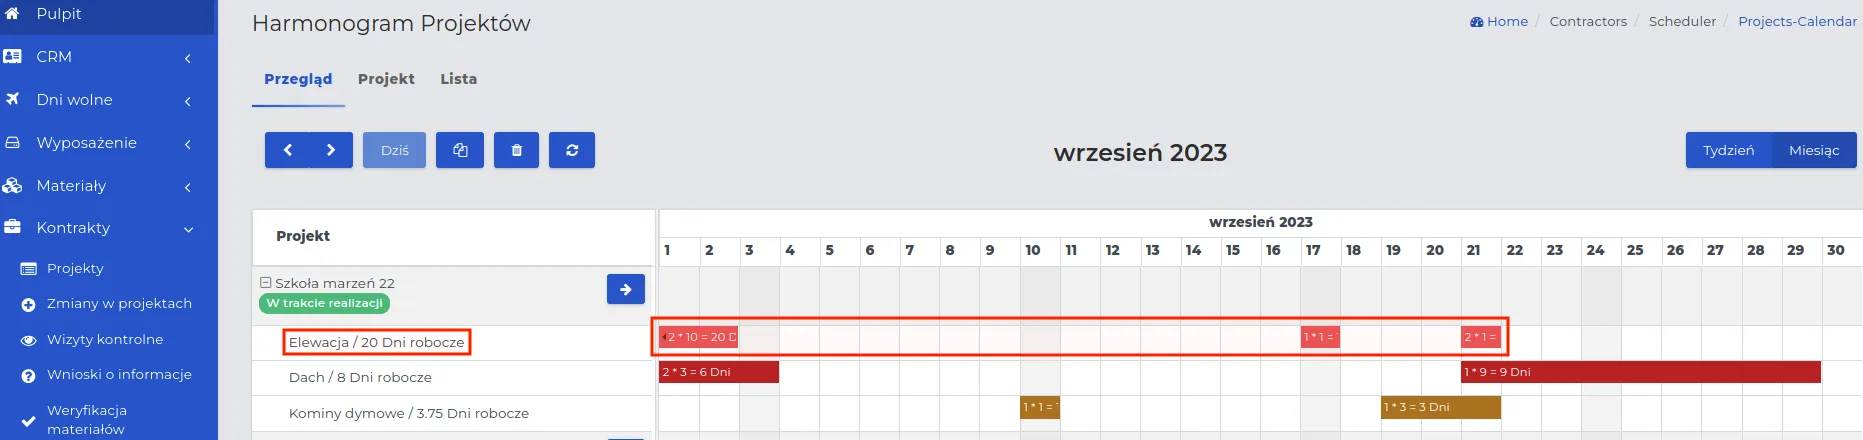
REMEMBER: The total number of workdays marked on the calendar for a given scope should match the number of days defined in the estimate. All days assigned to this scope are summed.
NOTE: The number of workdays for a given scope should account for the total working hours of all employees assigned during that period.
- Click the selected calendar cell and fill out the form according to the field descriptions in Method I.
NOTE: If you change the scope name in a table row to another scope, values related to that scope will appear in the row that matches the selected scope name.
Changing the scope name does not remove previously entered records. It only places them in the proper row in the table.
- The selected scope is assigned to the proper row, even if that scope name differs from the row where you clicked.

- The selected scope is shown in the proper row according to its name.

- Save entered data with the “Confirm” button.
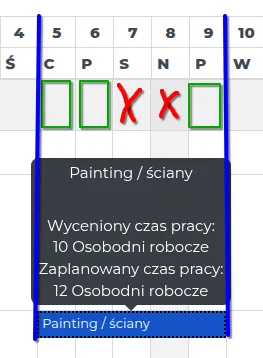
Example: Entering a work schedule for external facade execution.
The estimate was set with the following conditions:
-
Execution time: 20 working days.
-
Number of employees: 2.
-
According to the recommendation, the total number of employee workdays assigned to facade work should equal the total workdays defined in the estimate. If the estimate assumes 20 working days for facade execution and you assign 2 employees, their total should still equal 20 days (2 employees * 10 days = 20 days).
-
After clicking the selected start date in the schedule, complete the form according to the instructions provided here.
Because this work contains only one stage, skip automatic schedule stretching and assign tasks manually.
For this scenario:
-
In “Planned number of people”, enter “2” to define the number of employees assigned to this scope.
-
In “Planned end of work”, enter a date 10 days later than the start date in “Start”. For example, if the start date is 01-04-2024, the end date should be 11-04-2024.
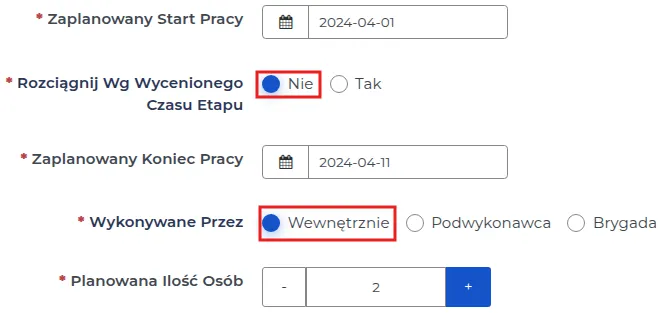
- Save entered data using the “Confirm” button.
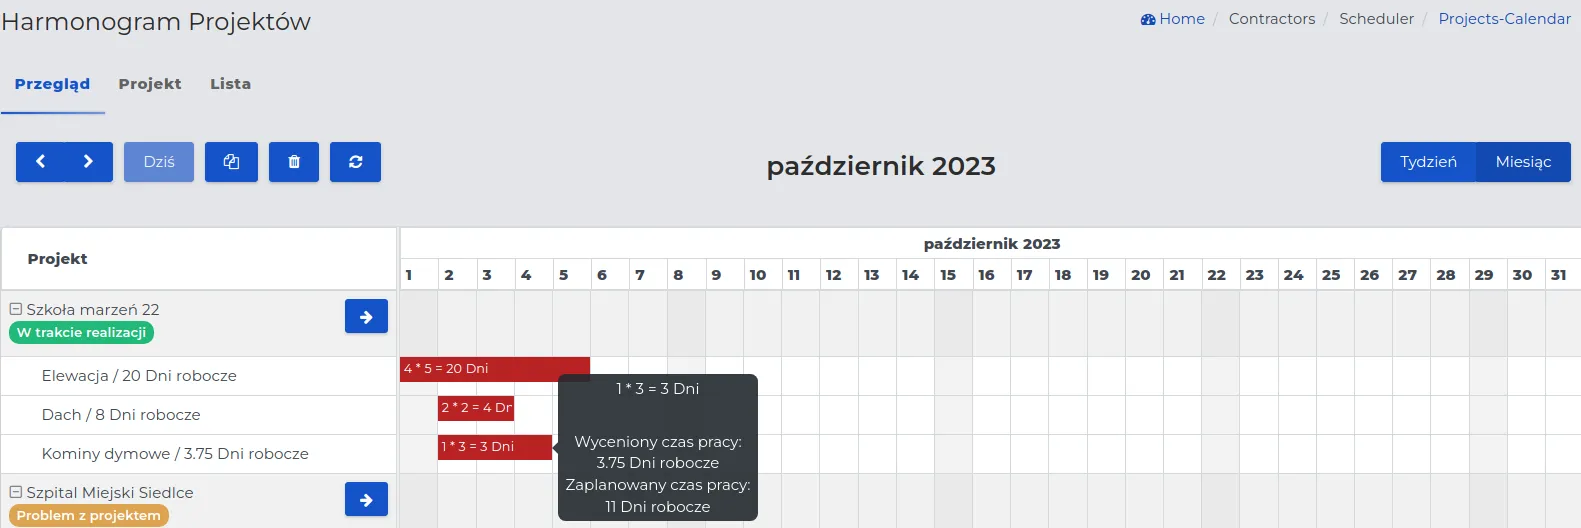
NOTE: Completed fields are color-coded depending on consistency with the estimate assumptions:
- Green fields - data is within assumptions (estimated work time is lower than planned).
- Orange fields - data slightly exceeds the threshold (estimated time is close to planned).
- Red fields - data exceeds assumptions (estimated work time is higher than planned).
REMEMBER: Entering the number of workers for a given work scope does not automatically assign specific employees to that task. Detailed employee schedule assignment is described below.
Example: Work schedule using the “Stretch based on estimated stage time” function.
This planning method allows automatic adjustment of labor resources to the scope of work defined for the entire project or for its stages (if stages exist). This makes it possible to plan assignments across several days without manual worker-count calculations based on estimate values, saving time and reducing errors.
REMEMBER: How many days in advance employees receive assignment notifications in the mobile app depends on administrator settings.
-
Go to “Contracts → Planner → Project Schedule” and select the project for which planner settings should be applied.
-
Click the blue arrow shown in the screenshot below to display only the schedule for this project.

-
Select the start date on the calendar for the stage from the list.
-
Complete the form according to the description available here, selecting “Yes” in “Stretch based on estimated stage time” for the work scope “Attic roof”.
Method I: Performed by: Internally
- Verify the number of workers assigned to the selected work scope.
In this example, it is 21 working person-days with 1 employee. The system will place this scope on the calendar for 21 days.

REMEMBER: Working person-days are calculated based on administrator settings. If the company does not work on Saturdays, only business days are counted, and the system marks 21 working days on the calendar, skipping weekends.
NOTE: Changing the number of workers proportionally changes completion time based on the number of person-days in the estimate. Example: 21 person-days with 3 workers gives 7 workdays (21 / 3 = 7).

Method II: Performed by: Subcontractor
- Select the subcontractor agreement from the list.
REMEMBER: If no agreements are available in this field, you must first add an agreement to the project.
- Define subcontractor exclusivity.
NOTE: Setting this option to “Yes” prevents assigning the subcontractor to other tasks in the same time window.
- Verify the number of people generated by the system.
In this case, work duration equals 5 working person-days. The number of workers entered in the form affects proportional distribution of execution time in the calendar.
NOTE: Changing the number of workers automatically recalculates calendar time. If a task requires 5 person-days and 3 workers are entered, the system plans 2 days, because 3 people complete 6 person-days in that period.
- Adjust the schedule for the Subcontractor Foreman so they can supervise the work.
REMEMBER: If the subcontractor is not supervised by your company, leave “Create assignment” set to “No”.
Method III: Performed by: Brigade
-
Select the brigade to which you want to assign the work scope.
-
Adjust the schedule for the entire brigade by setting “Create assignment” to “Yes”.
In the presented example, the “Walls” brigade was used, consisting of 4 workers. With a planned duration of 10 person-days, the system distributed work for the entire brigade across 3 workdays. The company does not work on Saturdays and Sundays.
REMEMBER: The system adjusts the number of days in the estimate depending on the number of workers assigned to the brigade and on working-day settings.
REMEMBER: If one or more workers leave the assignment during execution, the schedule is automatically updated, extending completion time beyond initial assumptions.
- Save data with the “Confirm” button.
NOTE: In the project schedule, when using “Stretch based on estimated stage time,” event dragging with the cursor is not available. The system does not allow manual changes beyond estimate assumptions.
NOTE: Work cannot begin on a non-working day - the system automatically sets the start to the first working day and skips holidays in person-day calculations.
REMEMBER: Adding an employee from outside the brigade requires creating a separate “Performed by: Internally” entry, without using stage-time stretching.
Editing Project Schedules
Section titled “Editing Project Schedules”Moving events in the table allows you to control the stages of work and fill in free slots with those scopes of work that do not conflict with currently ongoing tasks.
You can edit the data entered in the project schedule in two ways.
Method I: Through direct preview in the table of the selected scope of work.
- Select the appropriate scope of work on the project calendar that you want to modify.
REMEMBER: You cannot change the scopes of work provided in the estimate for projects that are already underway.
NOTE: If there is a need to add a new scope of work for an ongoing project, use the “Contracts → Changes in Projects” section and submit a new request. Once accepted, the scope of work will appear on the project list.
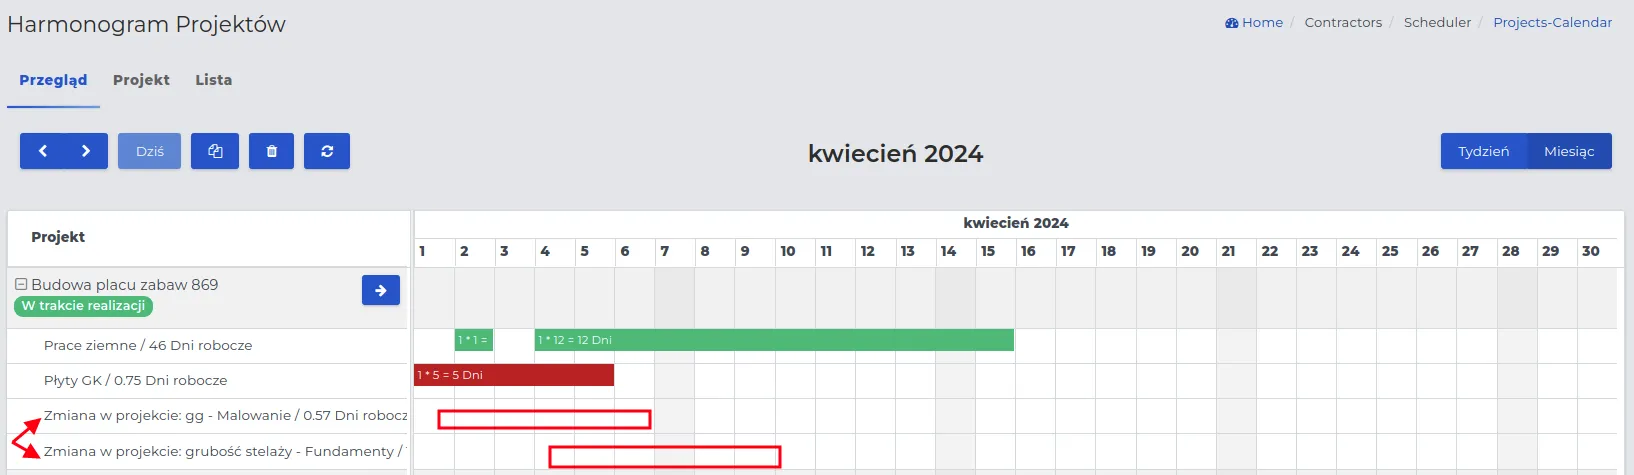
-
Click on the card with an entry marked in green, orange, or red.
-
In the preview, use the “Edit” function button and make changes in the form, then save them using the “Confirm” button.
Method II: By dragging cells in the calendar table whose settings you want to change.
-
Select the work range for which you want to change the settings or size in the calendar table.
-
If the change is only to move to another location without changing the content of that field, grab the data field with the cursor and drag it to the target location.
REMEMBER: Moving the field will change the scheduled work time for the work range to which the table cell has been moved.
NOTE: The moved field disappears from the place where it was located. If you want the value in this field to remain unchanged, you must use the “Copy” function for the given field in the calendar.
- If you want to change the width of the field where the duration of the given work range is specified, grab the appropriately selected edge (right or left side of the cell), decrease or increase its width, and release the cursor.
NOTE: When you change the width of the fields, the system automatically fills in the values according to the data entered in the form. The number of employees will remain unchanged, the number of days will change according to dragging the field to the right or left on the calendar.
NOTE: If work on a given project has been paused and will be resumed at another time, the previous number of days allocated for the realization of the given work range will be included in the total “Scheduled work time” visible on the black field in the screenshot below.
REMEMBER: Resuming work in the next month will sum up the number of days worked so far in previous months, also taking into account the planned workdays.
Employee Schedule
Section titled “Employee Schedule”The work time schedule allows you to assign selected employees from the list to a specific project, taking into account the day of the week and their working hours.
Thanks to the employee work schedule functionality, an employee can:
- be assigned to different job sites, e.g., during the week, they can work on two different construction sites.
- be on several projects in one day, e.g., in the morning, they can lay paving stones in one place, and in the afternoon, lay floor tiles in another place. These events can be one-time or continuous.
A graphical calendar maintained in this way with color-coded fields is clear and readable. Thanks to flexible coordination and simple changes in the table cells, working with this module is easy and trouble-free.
REMEMBER: Adding an employee to the schedule automatically sends a notification to the mobile app, informing them about the time and place of work.
NOTE: Notifications are sent only to employees who have an account on Contractors.es and have the mobile app installed on their phone.

Depending on your needs, you have the option to use five tabs containing specific system functions.
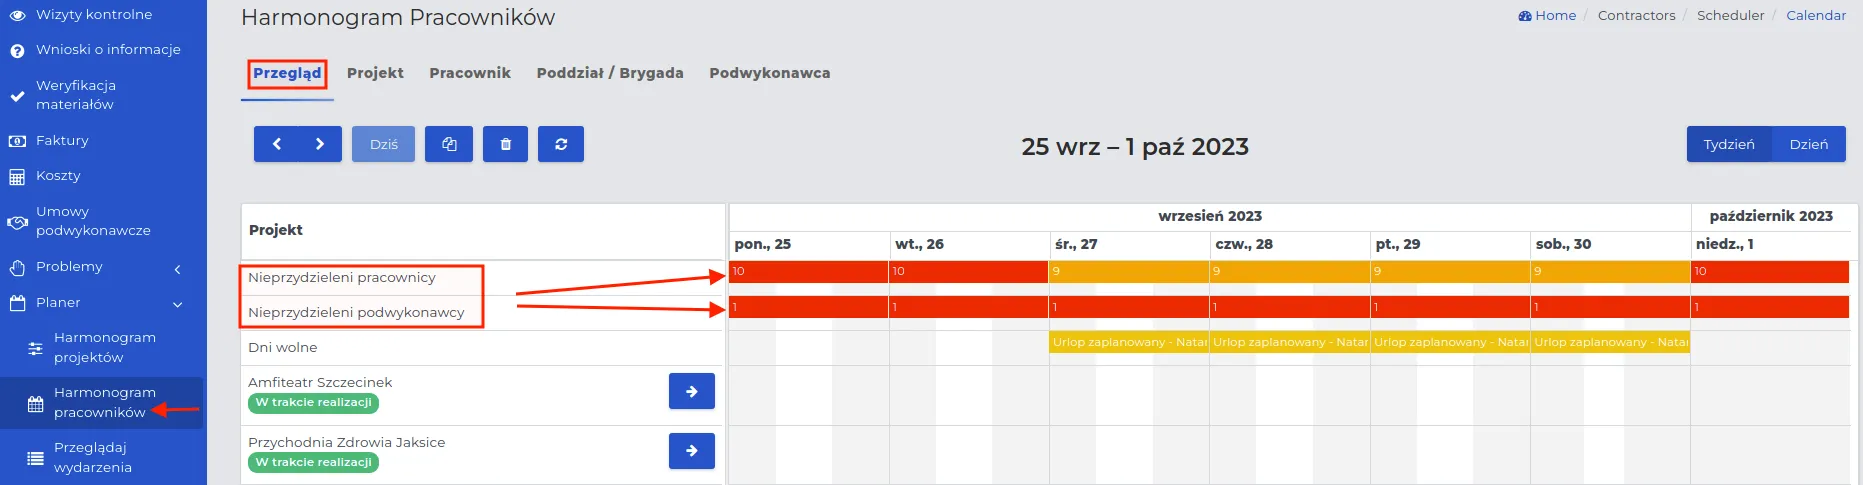
I. “Overview” Tab.
These are similar settings as described for the name of this tab in the “Project Schedule” section.
- Weekly entry on the employee schedule.

- Daily event record on the calendar.

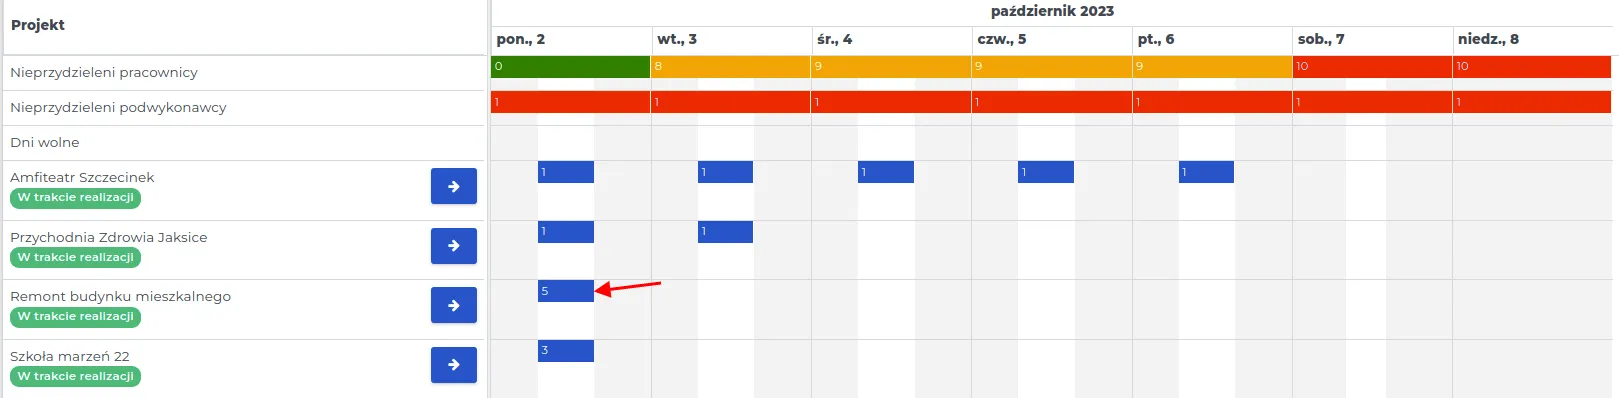
Above the list of projects in the calendar for each day, the quantities are marked:
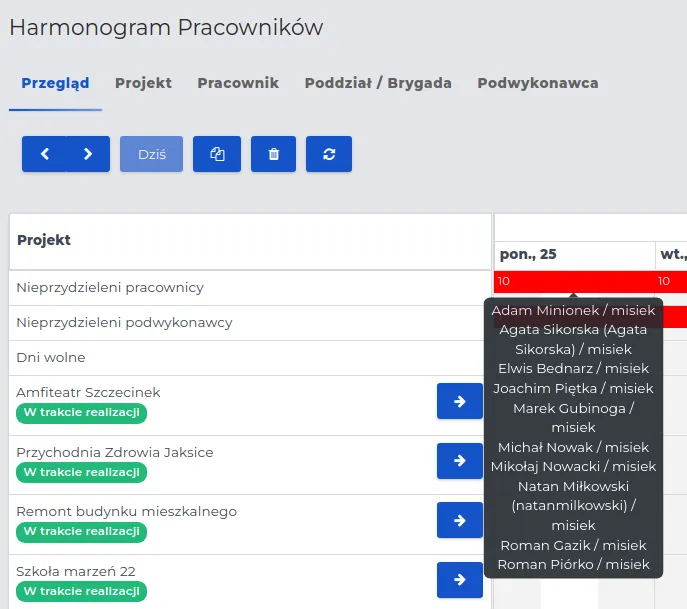
-
Unassigned Employees - how many employees have not yet been assigned to work.
-
Unassigned Subcontractors - how many subcontractors are “free.” If all are busy, the field will not be visible.
-
Days Off - planned employee vacations.
Thanks to the above indicators, the user can easily monitor the availability of employees and subcontractors and identify days off in the work schedule. This facilitates planning and prevents potential conflicts related to resource availability.
REMEMBER: To display the employee work schedule for a selected date, simply click the cursor on the appropriate date on the calendar displayed on the dashboard.

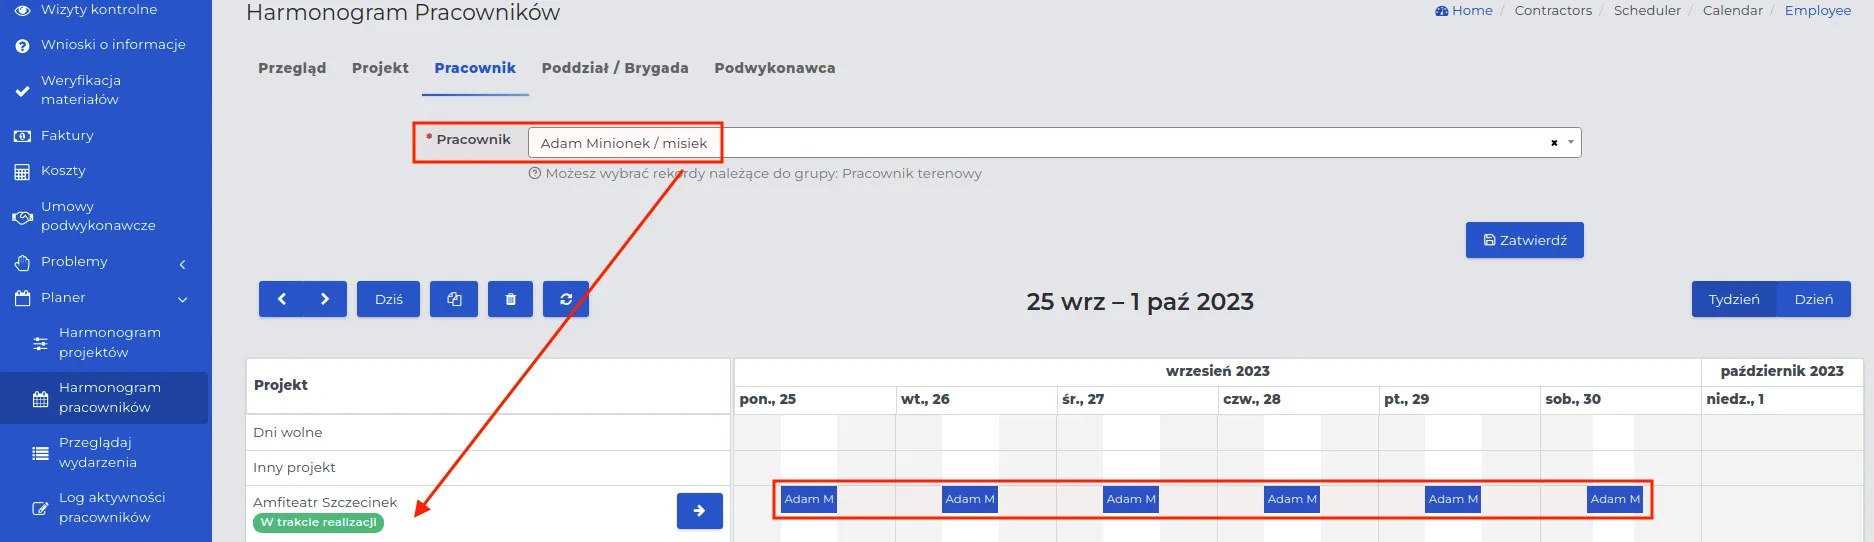
II. “Project” Tab.
Allows the user to find any project in the system by entering the initial letter or syllable in the “Project” field. After making a selection, the employees assigned to it will be displayed on the user’s dashboard.
NOTE: Selecting a different project name from the dropdown list will take you to view its schedule.
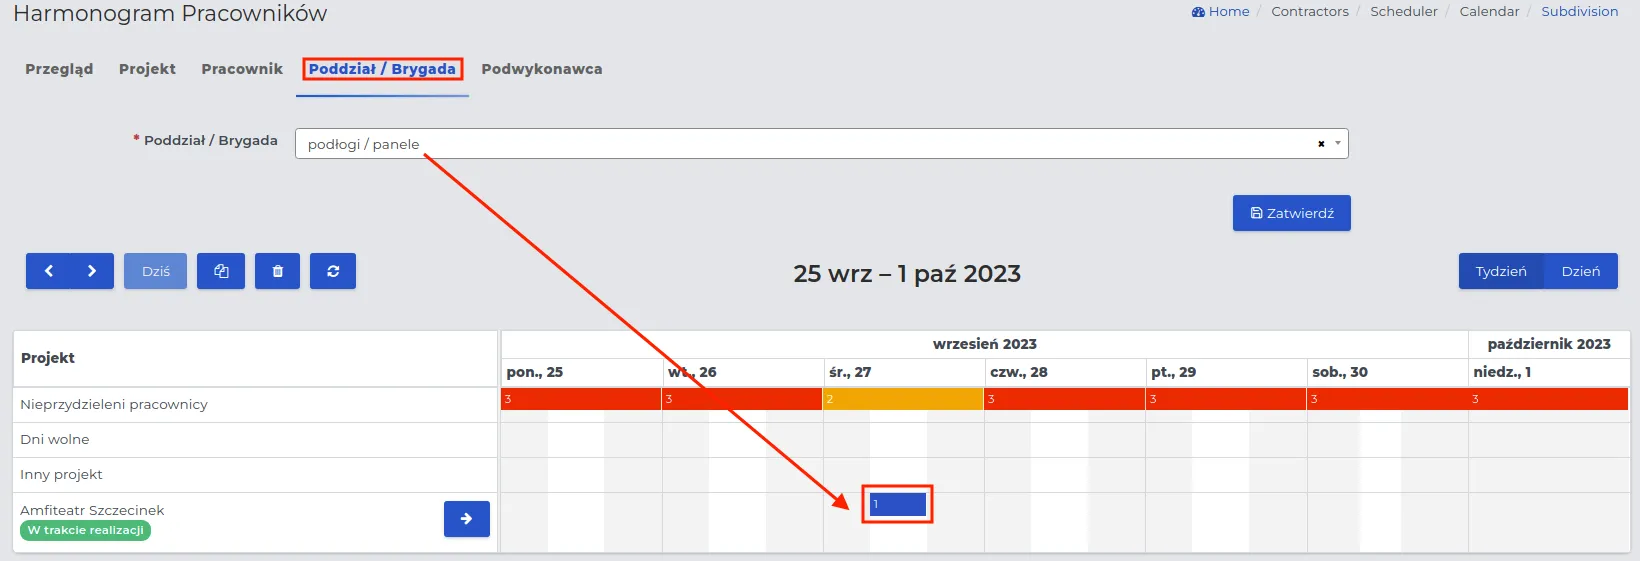
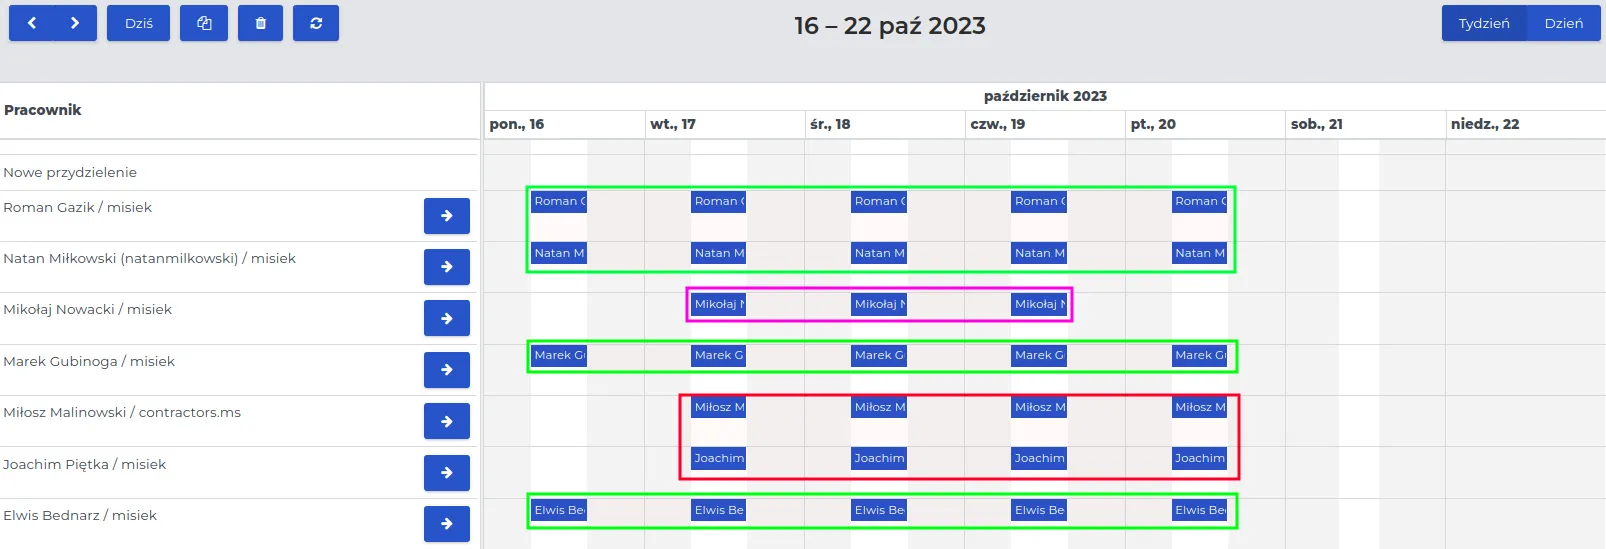
Example illustrating the assignment of employees to a selected project from the list.
For the Szczecinek Amphitheater project, four employees have been assigned to work, as indicated by the red arrow in the screenshot below.
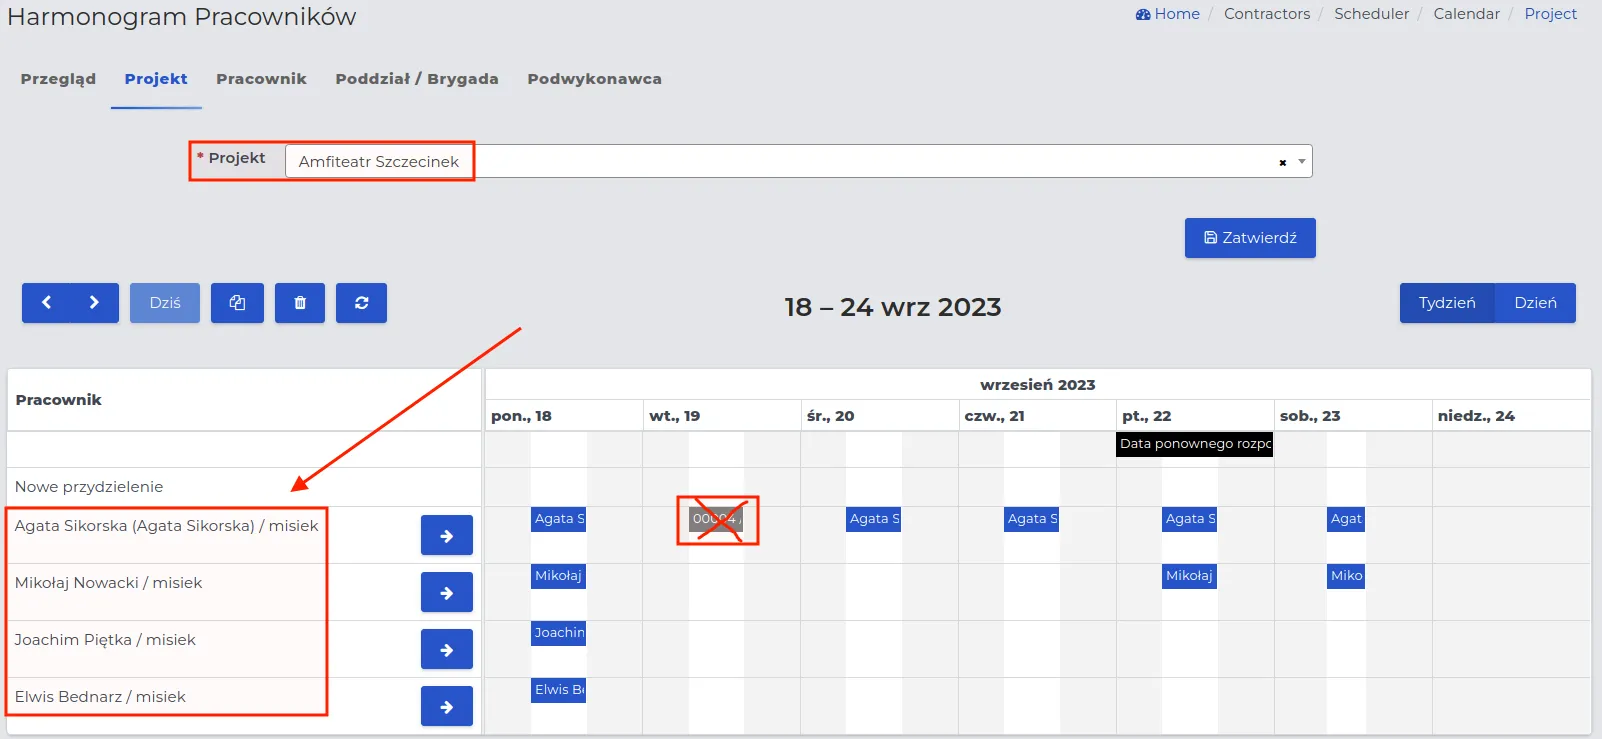
REMEMBER: Assignments for specific days of the week related to the selected project are marked in blue.
According to the assignment made, it can be observed that:
-
On the first day, all employees are to report to the construction site.
-
On the second day, only employee Agata Sikorska has been assigned to work, while the others have not been assigned any tasks on this project.
NOTE: Employee Agata Sikorska has been assigned to another project because the assignment is marked in a color other than blue.
- In the following days, some employees received assignments, while others did not.
REMEMBER: Hovering over one of the fields will display information about the project to which the selected employee has been assigned.
![]()
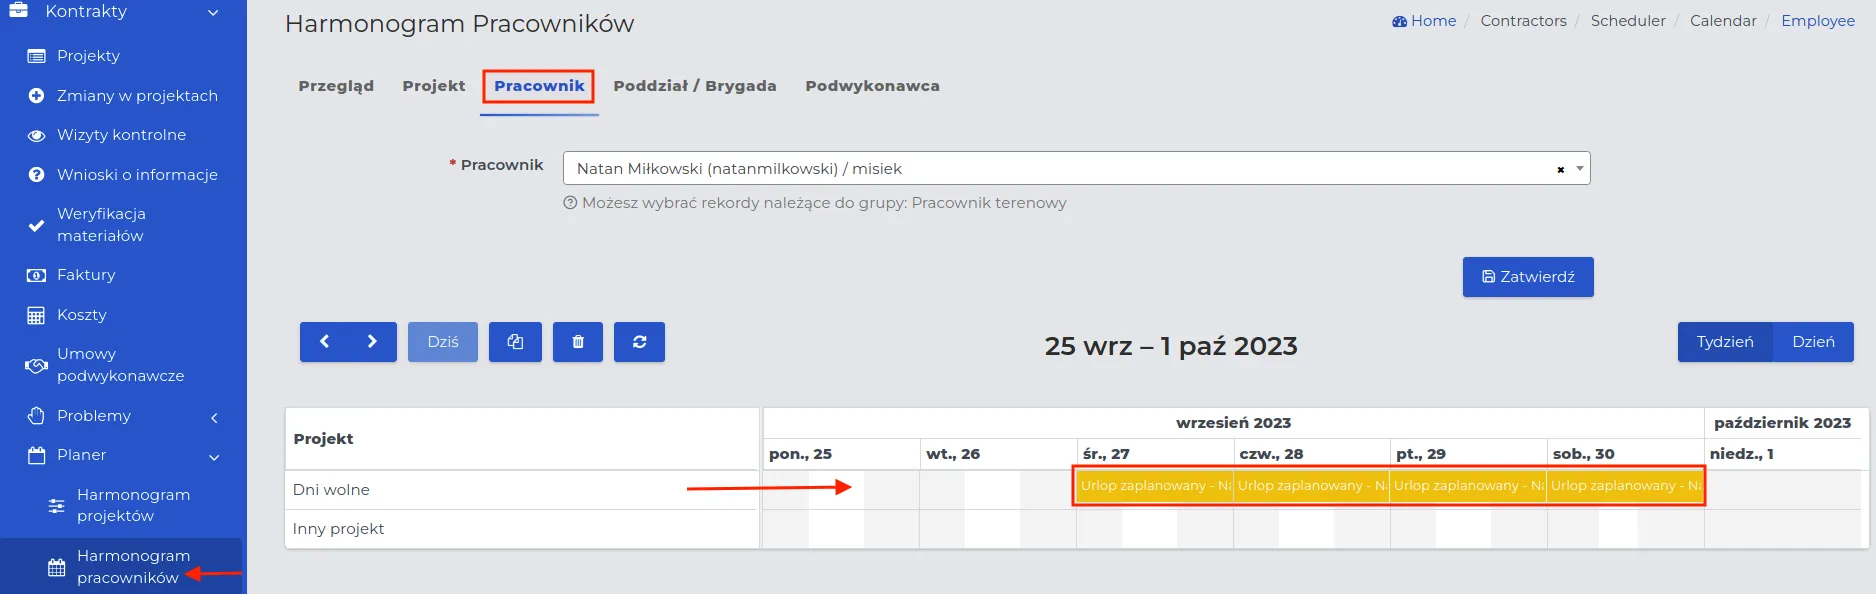
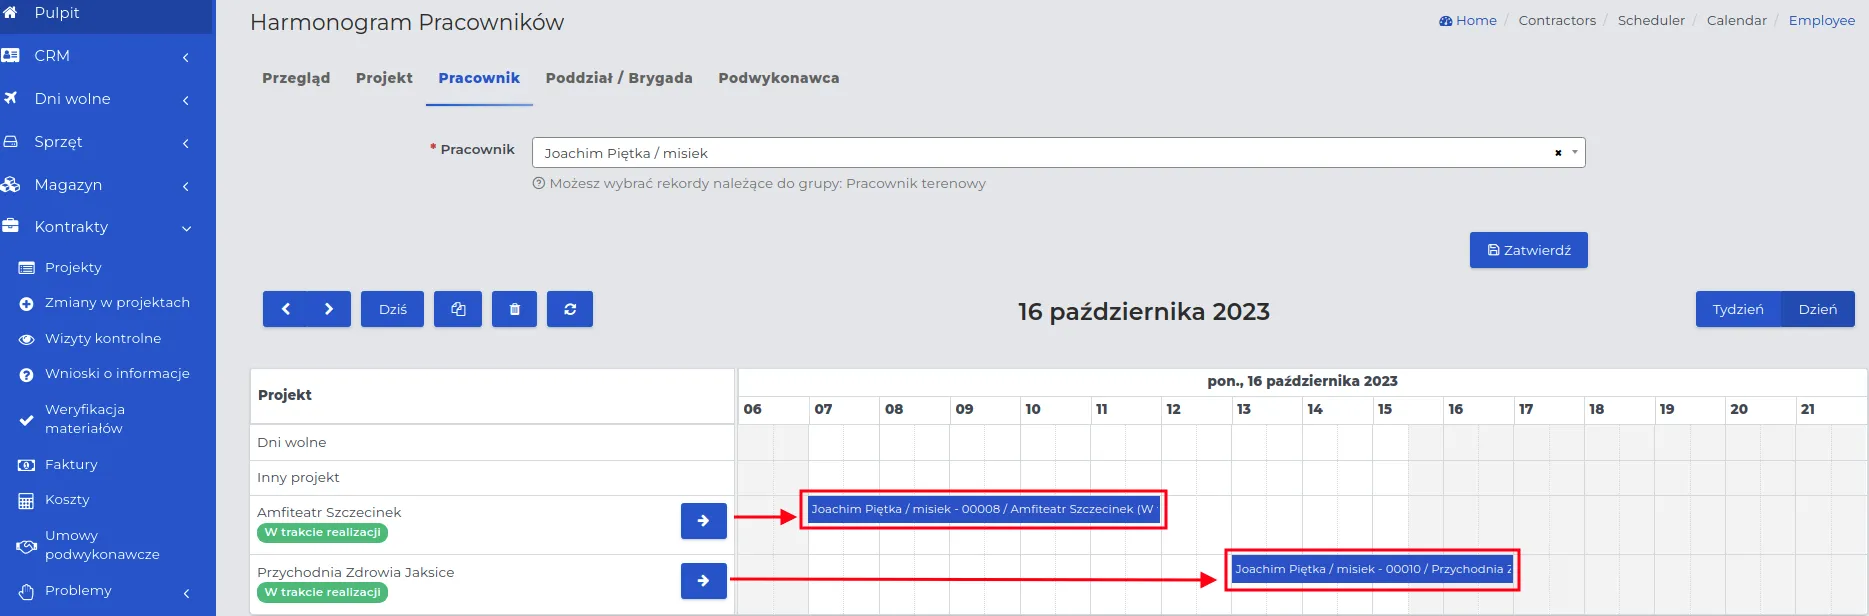
III. “Employee” Tab.
Allows the user to find the work schedule of any employee in the system by entering the initial letter or syllable in the “Employee” field.
NOTE: Only records belonging to the “Field Employee” group are available on the list.
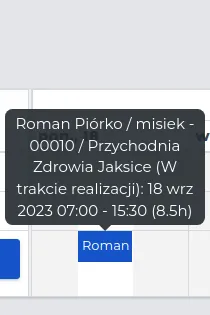
Hovering over a selected day of the week will display not only information about the ongoing project but also the working hours of the given employee. An example is shown in the screenshot below.
On the employees’ schedule, not only their work assignments will remain visible, but also previously planned days off. In the row marked “Days off,” indicated by the red arrow in the screenshot below, are the planned vacation days.
IV. “Division / Brigade” Tab.
Using the search function, you can find the work schedule of a specific work brigade. You can add employees to “Divisions and Brigades” by editing the employee’s contact - “HR” tab.
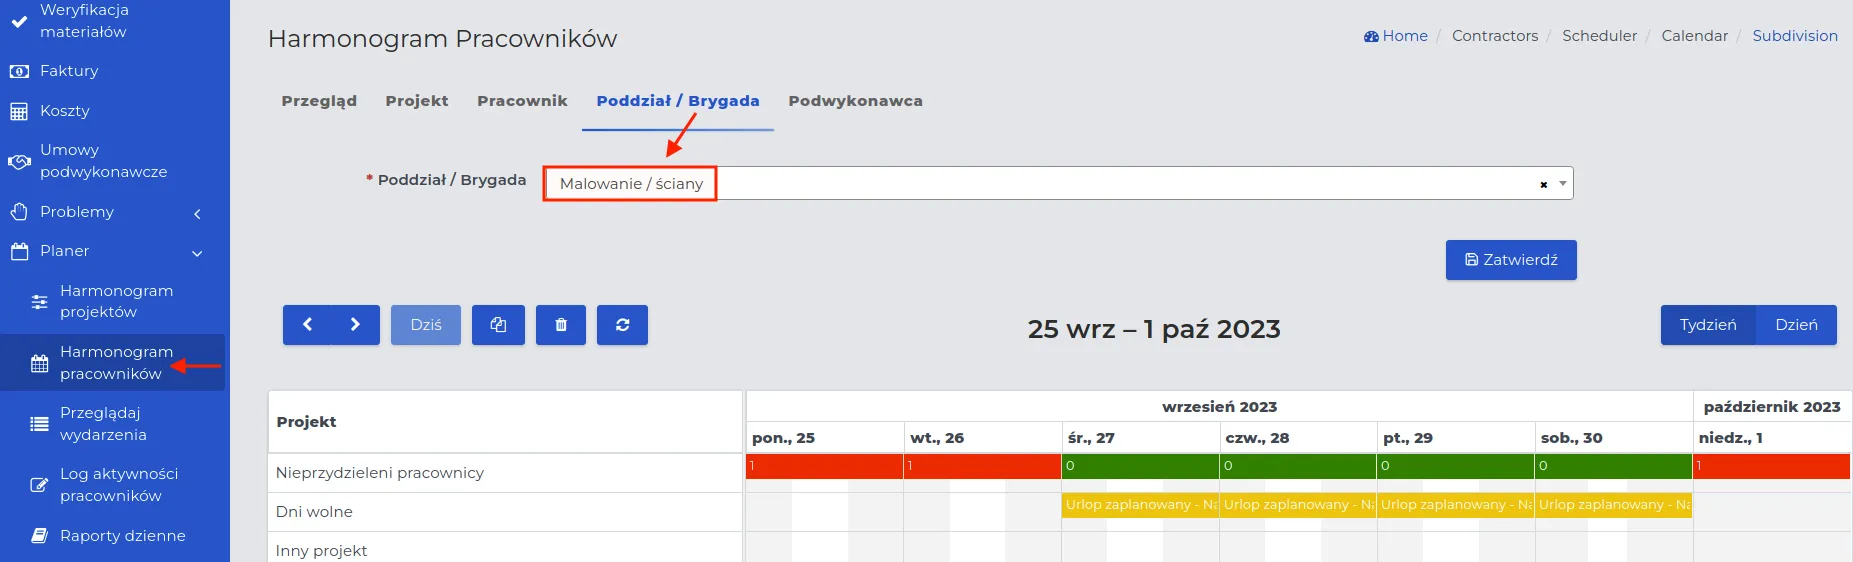
If the workers of a given brigade are to start work on the project, it is worth using the described tab to be able to:
-
Check the number of employees from a given department assigned to work so far, for whom their assignment is indicated by colors in the “Unassigned employees” row:
-
Red fields - indicate employees who are not yet assigned to any scope of work. You can select them for the project and assign them tasks.
-
Green fields - indicate employees who already have tasks assigned on the calendar. You can change their project, but make sure to also update the number of employees in the place they are being moved from.
-
-
Check the number of days off planned by employees during a given period in the “Days off” row. By hovering over a specific day of the week, you will see the data of the employee who will be absent on that date.
-
Determine the names of the projects to which a given department has been assigned. They are visible when you hover over the selected field.
V. “Subcontractor” Tab.
If you have regular cooperation with a given subcontractor, it is worth marking on the calendar the dates they are to appear and the type of work they are to perform. In the case of contracts with a subcontractor settled according to the “time and material” scheme, this way you will calculate their payment. Otherwise, you will gather information that may be useful, e.g., to determine who specifically was on the construction site on a given day.
Creating a Work Planner for Field Employees
Section titled “Creating a Work Planner for Field Employees”You can fill in the work calendar for employees in three ways.
Method I: Directly from the calendar view, which contains a full list of all work assignments.
This method allows you to view all ongoing projects on the calendar, where employees are assigned to specific scopes of work. Thanks to the graphical representation of the calendar, you can clearly plan work for the remaining employees who have not yet received an assignment.
-
Go to the menu “Contracts → Planner → Employee Schedule” and select the project to which the assignment should apply.
-
Click on the blue arrow next to its name to view the existing entries.
NOTE: In the cells marked with red arrows, pay attention to the availability of human resources that can be assigned to the project.
REMEMBER: When you hover the mouse cursor over the cell indicating the amount of unassigned workforce (fields: Unassigned employees, Unassigned subcontractors), a list of people you can assign to work will be displayed.
- In the “New Assignment” row, click on the selected date.
NOTE: If a subcontractor has been assigned to the selected project, an entry with their name and schedule will be visible under the “New Assignment” row, which can be viewed using the blue arrow.

- Fill in the displayed form, where the meaning of the fields is as follows:
-
Planned start of work: The day work begins.
-
Planned end of work: The day work ends.
NOTE: You can enter a one-day assignment and later drag it to the right on the calendar to the date that should mark the end of the work. You can also use the copy and paste function.
REMEMBER: The time range for the start and end of the workday is calculated based on administrative settings regarding the default working hours of employees. You can extend the working hours of employees, but overtime pay will be calculated accordingly based on “Custom Percentage Rates.”
NOTE: Changing the date on the calendar will automatically enter the assignment on the schedule in the cell with the newly selected date.
- Breakfast break: This is an unpaid additional break during work hours. Depending on the country and company policy, it may be disabled by the administrator.
-
Project: Select the name of the project to which you want to assign the workforce.
-
Scope of Work: Specify the type of work the employee is to perform.
-
Subcontractor: For employees, leave the option as “No.”
-
Department: Optionally select the department responsible for the chosen “Scope of Work.”
REMEMBER: If you select a “Department,” you will limit the list of employees who are both assigned to it and are field workers. Not selecting a department will allow you to choose all field workers who have not been assigned during the given time frame.
- Employee: Click on the employees for whom you want to make the assignment.
NOTE: For each employee, their current location is visible in relation to the address selected from the project list.
REMEMBER: If you want to select all employees from the list, use the arrows located above the list. Arrows pointing in the opposite direction allow employees to return to the “available” list.

-
Custom Percentage Salary Rates: If you have agreed with the employee to pay differently on a given day, you can change the salary settings.
-
Note: Additional description, information regarding the work assignment being created.
- Save the entered data using the “Confirm” button.
REMEMBER: For each employee on the list, their distance from the project location is visible. This allows you to assign tasks to those closest first.
After entering one employee into the work calendar according to the scheme described above, the employee schedule will appear as follows:
Method II: Selecting a specific project from the list for which you want to make a work assignment.
This method allows you to fill the project work schedule with the human resources available to the company in a clear and quick way.
-
Go to the “Planner → Employee Schedule” menu and in the “Project” tab, search for the project in which you want to plan the employees’ work time.
-
The list will display the work schedules of employees entered so far. You can edit or delete them.
- Click on the “New Assignment” row and fill out the form according to the field descriptions provided in Method I.
Method III: From the work schedule preview of a selected employee from the list.
Using this method allows us to monitor the current location of the employee, their current tasks for the upcoming days, and create new work schedules.
-
Start the process the same way as in Method II, but this time select the “Employee” tab.
-
Then search for the specific person for whom you want to create a work schedule and create it according to the repeatable procedure.
-
You can edit or delete their visible current work assignments.
- Save the entered data using the “Confirm” button.
Assignment to two different projects in one day
Section titled “Assignment to two different projects in one day”An employee can be assigned to work on two projects at different times on the same day. If they are handling specialized tasks that do not require a full day in one place, you can set up their work schedule in the following order:
- Go to the “Employee” tab in the “Contracts → Planner → Employee Schedule” section and search for the employee for whom you want to enter a split workday.
NOTE: If the employee has already been assigned on a given day, you can edit it by changing the location or time range.
REMEMBER: Changes to employee schedules are only possible for future dates.
REMEMBER: When planning work assignments between distant projects, consider the time needed for the employee to travel between them. You can include this time in the previous project, the next one, or make a break between projects (you do not pay for travel).
- Click on the date in the calendar for the first assignment, and then specify its start time.

-
Complete and save the form according to the description available here, remembering to provide the end time.
-
Add another assignment for the employee, considering a different start and end time. You can select another project and scope of work from the list.
NOTE: You cannot add new events during hours that have already been reserved by previously made work assignments for the given day until the first assignments are modified.
NOTE: In the “Scheduled End of Work” field, the time corresponding to the total number of working hours is automatically generated. Changing the end time of the workday beyond the working hours will result in additional rates being charged as “overtime.”
REMEMBER: You can also create a shared workday for crews by selecting the “Division/Crew” tab instead of “Employee” for the chosen project.
Example: Division of an employee’s working time during a single workday.
During the workweek, the employee must appear at two different projects located 60 km apart to perform specialized work at each. Two time slots have been established: 7:00 - 12:00 and 13:00 - 17:00.
To create a weekly work schedule considering the above assumptions, follow the scheme:
-
In the “Employee” tab available in the “Contracts → Planner → Employee Schedule” section, find the person for whom you want to plan the workweek in this way.
-
Click on the date in the calendar that starts the workweek, e.g., October 16, 2023.
-
In the “Other Project” row for 7:00, click with the cursor and fill out the form, remembering to select the first project name, scope of work, and end time 12:00.
-
Save the data with the “Confirm” button.
-
In the schedule, make an entry for the second time slot in the same way, specifying in the form the start of work at 13:00, the second project name, scope of work, and end time 17:00.

- In the schedule preview for the selected employee, the created schedule will appear as follows:
- On the list of all employee assignments, a shared workday entry for one of them will be marked as follows:
REMEMBER: If you want to adjust the duration hours of the assignment, you must edit one of them so that the employee’s work time does not overlap on two projects simultaneously.
NOTE: Moving the work assignment to the same project will remove the existing entry on a project with a different name.

You can copy the created work schedule to the following days of the week as follows:
-
Open the work schedule preview selected from the employee list.
-
Click the “Copy” function button and select the assignment you want to transfer to the following days.
-
Click on the subsequent calendar fields, and the system will fill them with the copied entry.
REMEMBER: The “Copy” function button is active until the icon is highlighted in black. Until then, you can place the copied content in the calendar table.
- Proceed in the same way with the second work range.
Adding a Work Schedule for the Entire Brigade
Section titled “Adding a Work Schedule for the Entire Brigade”For the entire Brigade assigned to a project, you can easily and quickly create a work schedule in which each employee from this brigade will receive a notification about the place and time of work. You do not need to search for each employee on the list and create an assignment for them individually. You can do this automatically, as described below:
-
Go to the “Contracts → Planner → Employee Schedule” menu and select the “Subdivision/Brigade” tab.
-
Search for the name of the brigade for which you want to enter the work schedule, e.g., painting/walls, and confirm your selection with the “Confirm” button.
REMEMBER: The system will automatically load the current work schedule of the selected brigade members. These can be both group entries and individual employee assignments that have been previously saved.
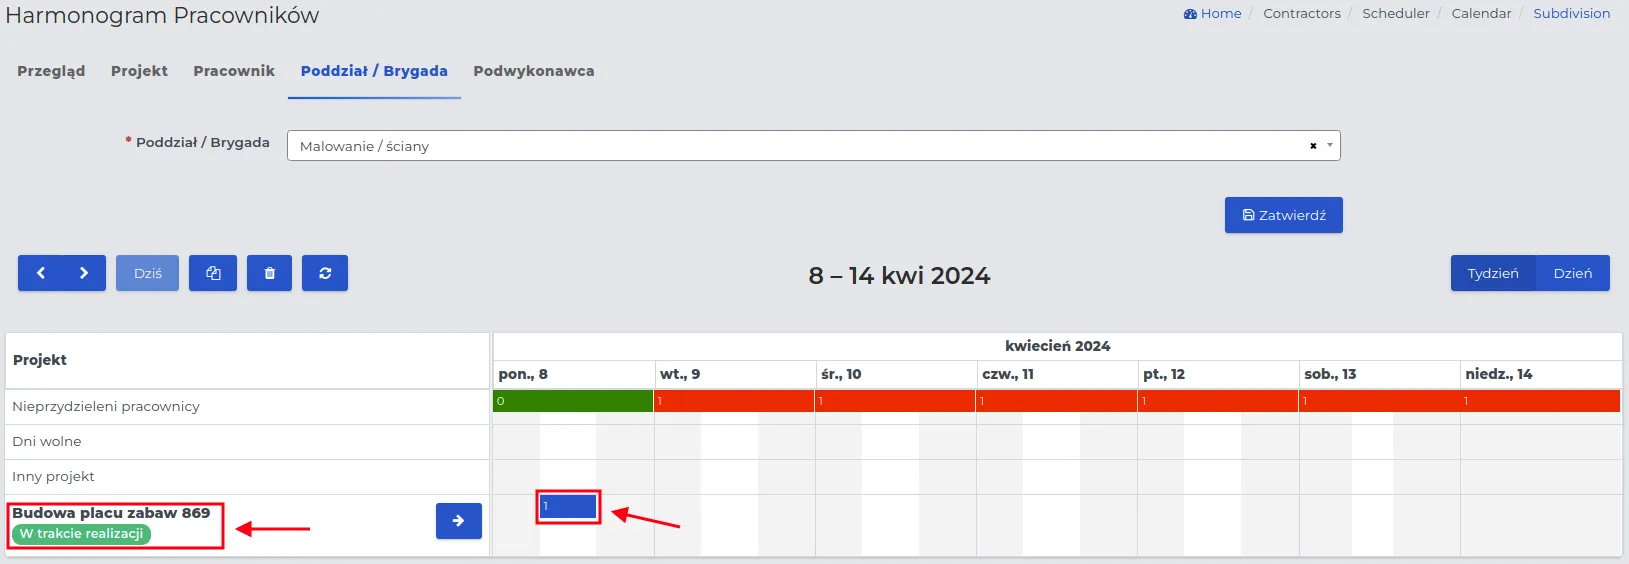
REMEMBER: Hovering over the blue field will display the data of employees assigned to a different allocation.
- In the “Other project” row, select the date for the work schedule being created and click on it with the cursor.

- Fill out the form, where the meaning of the fields is repetitive, and save the data using the “Confirm” button.
REMEMBER: Check if the list of employees assigned to a given team in the system is correctly filled out.
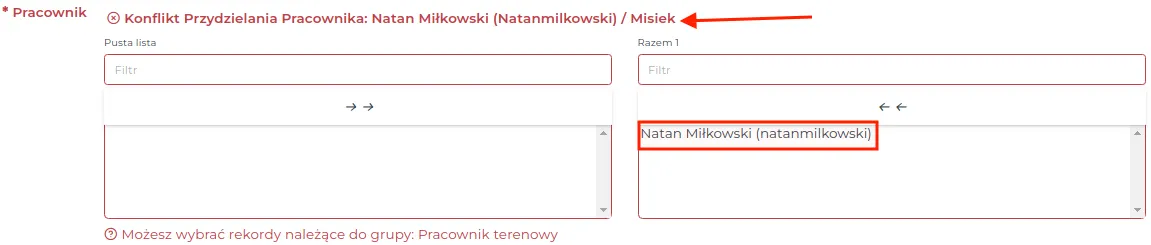
NOTE: If any employee from the selected team already has work scheduled on another project on the same date, the system will notify you of a schedule conflict. Click on their name, and they will not be included in the work schedule being created.
REMEMBER: You can always remove an entry with an employee’s assignment from the planner and create a new assignment. Alternatively, you can also use the edit function in the entry preview to make changes and save them as new.
NOTE: When the number of employees in a given work team is less than required to complete a specific scope of work, you can select employees from outside the team. Make a new assignment for this project and scope of work, skipping the “Department” field in the creation form.
Creating a Work Schedule for a Subcontractor
Section titled “Creating a Work Schedule for a Subcontractor”For a project in which a subcontractor collaborating with you is to participate, you can create a work schedule that will be settled based on daily reports submitted by their foreman.
To create a work assignment for a subcontractor, follow the steps:
-
Go to the menu “Contracts → Planner → Employee Schedule” and select the “Subcontractor” tab.
-
Search for their name on the list and confirm the selection with the “Confirm” button.
-
An optional work schedule for the selected subcontractor will be displayed on the dashboard, provided it has been previously entered into the system.
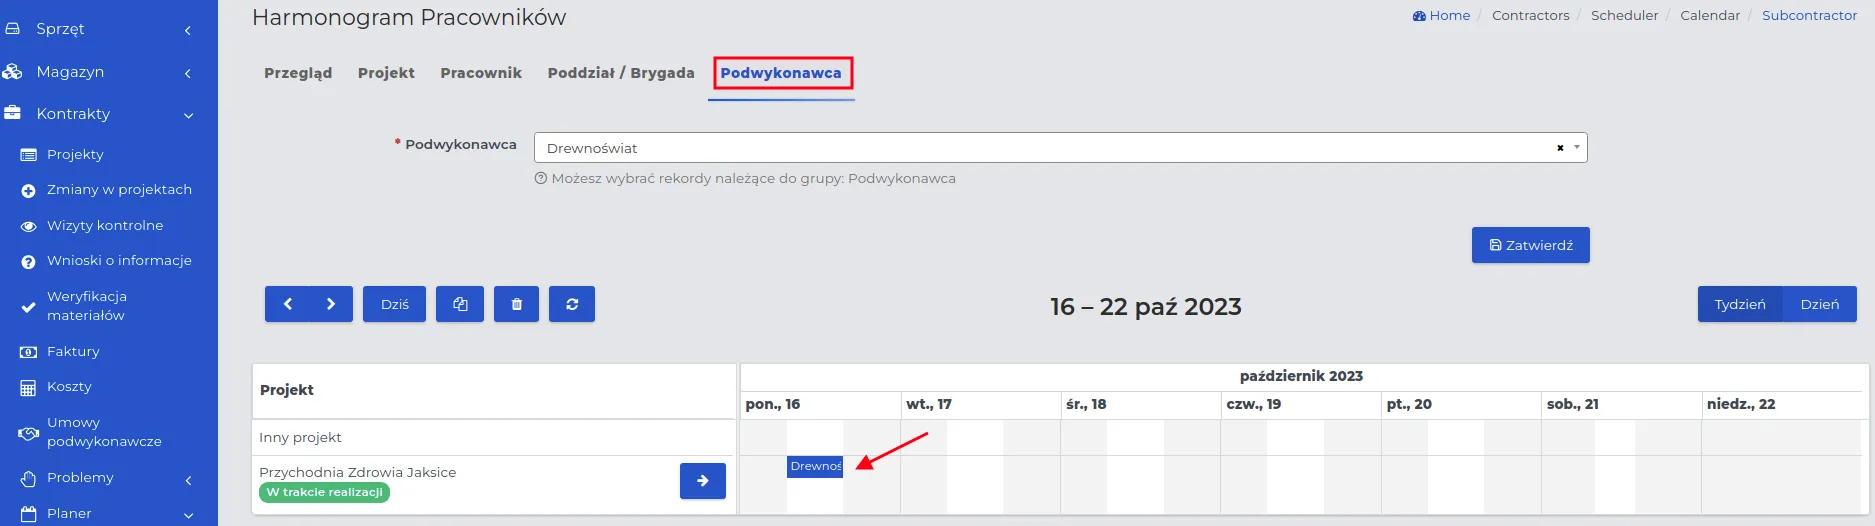
-
In the “Other project” row, specify the date for the assignment being created and click on it with the cursor.
-
Fill out the form, where the meaning of the fields is repetitive except for the fields:
- Subcontractor Agreement: Select from the list the agreement related to the work order.
NOTE: If the field does not contain any agreements in the dropdown list, you must first attach an agreement to the selected project for it to be visible.
- Subcontractor Foreman: Specify the person responsible for supervising the work.
REMEMBER: The “Subcontractor Foreman” does not simultaneously serve as the foreman in your subdivisions. This is a separate contact assigned to the company you are collaborating with.
- Planned Number of Subcontractor Employees: This is important only for agreements settled on a “Time and Material” basis, where the working time of employees will be multiplied by their number and billing rate.
- Save the entered data using the “Confirm” button.
REMEMBER: The number of employees specified in the subcontractor work schedule creation form will be visible in the mobile application used for logging in at work (time tracking) and communication.
Changes in Employee Schedulers
Section titled “Changes in Employee Schedulers”In the work schedule calendar, you can make the following changes:
- completely remove an assignment,
- edit an existing entry,
- copy a record and paste it elsewhere,
- move an entry on the calendar.
I. Removing Work Assignments.
Using the “Trash” icon.
![]()
- First, click on the icon.
- Click the entry on the calendar that you want to remove.
REMEMBER: You cannot remove records from the calendar table whose deadline has already passed and the employee was logged in at work (i.e., they have been considered settled) or which are currently ongoing (when the employee is logged into the project).
NOTE: The system automatically blocks the editing or removal of records from the database that have been marked as settled by the button in the salary report. You also cannot remove records where the employee logged in at work - to remove such a record, you must first edit it and remove the employee’s login hours.
REMEMBER: Leaving the “Trash” icon in an active state (black fill on white) means that the function for deleting records in the calendar is still enabled. Click again to disable the delete mode.
Alternatively, you can drag and drop events into the trash.
II. Editing existing entries.
-
Select and click on the entry in the planner that you want to edit.
-
Use the “Edit” function button, make changes in the form, and save them using the “Confirm” button.
REMEMBER: You cannot edit entries if the employee has already started work on that day (e.g., logged into the application) or if the assignment time is the current time.
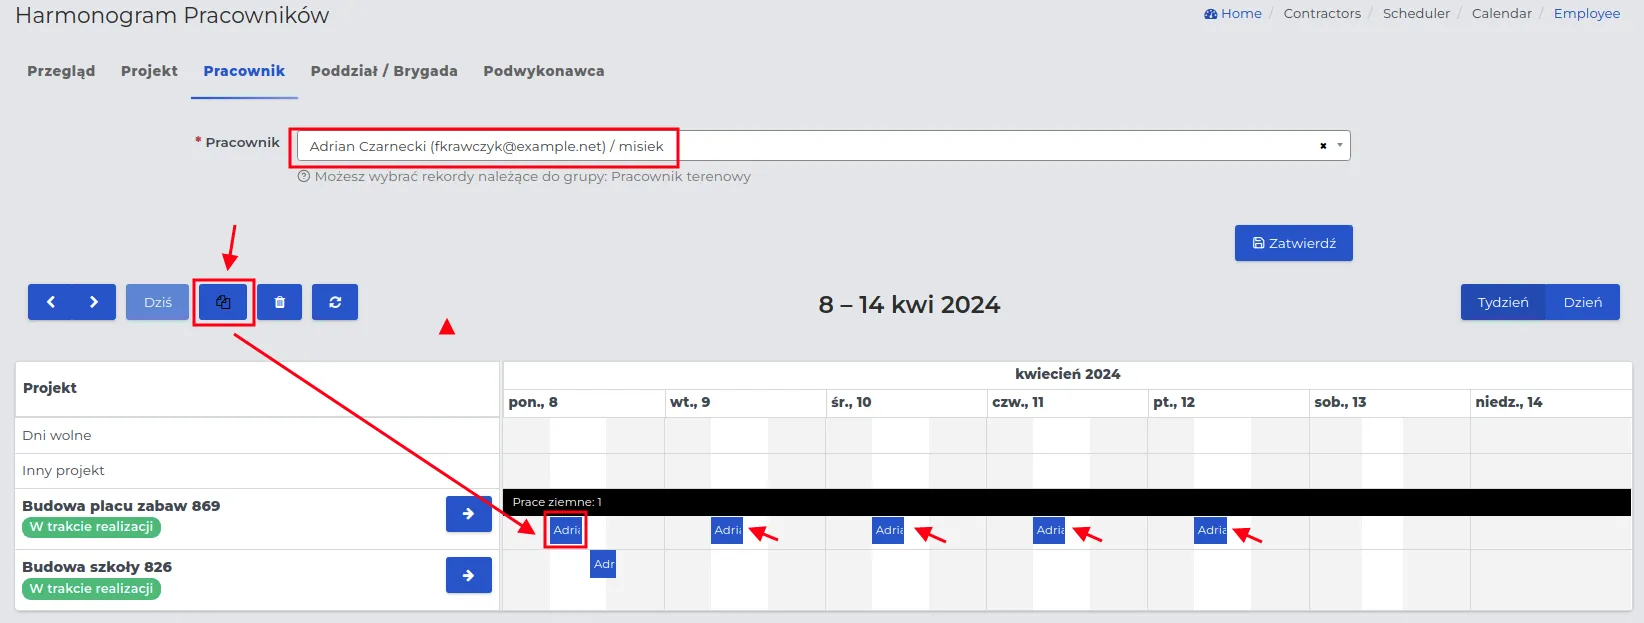
III. Copying and changing the location of the copied entry.
The system allows copying selected table records in two ways.
Method I: Using the “Copy” function button.
![]()
- Click the “Copy” button.
- Click on the assignment you want to copy.
- Click on the chosen destination (date/project) where you want the selected entry to be copied.
REMEMBER: Leaving the “Copy” icon in an active state means that the function for copying records in the calendar is still enabled. The record can be pasted multiple times. To change the copied record, click on another record.
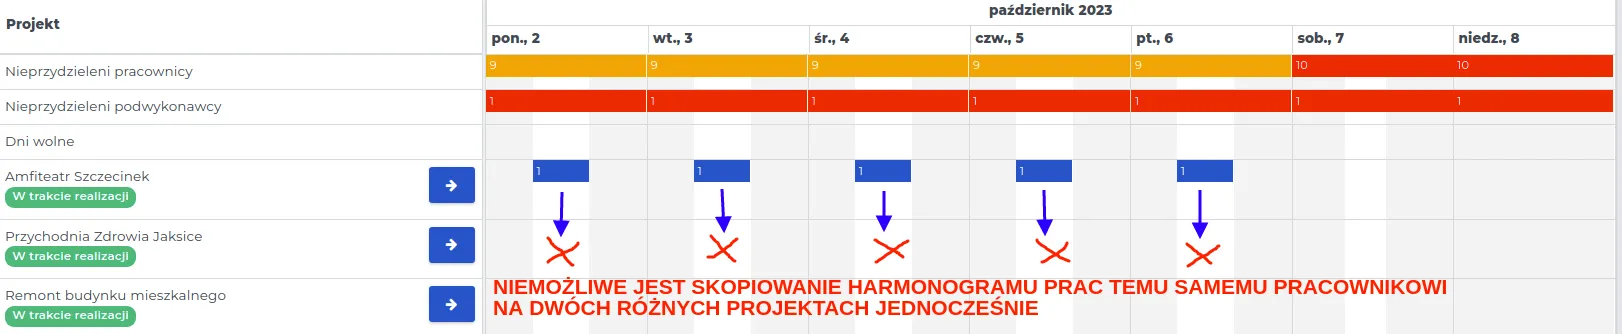
REMEMBER: It is not possible to copy a selected record to create an assignment for the same employee on two different projects at the same working hours.
Method II: By dragging the edge of the event.
- Hover the mouse cursor over the edge of the field marked with a red arrow.
- On the vertical edge of this field, a double-headed arrow symbol (right-left) will appear, indicating the possibility of dragging the cell in the chosen direction.
![]()
- Release the arrow on the day of the planned assignment’s end.
NOTE: Copying assignments created for a given project for the entire workweek of employees is possible by using the mass copying function.
In the case where the scope of work on a given project is to last evenly over several days, employees can be automatically assigned on the work calendar until the end of the week.
REMEMBER: This method of bulk copying is only available for events assigned to a single project.
III. Moving entries on the planner.
To move an entry on the planner, follow these steps:
- Select the work assignment on the planner that you want to move on the schedule.
REMEMBER: You cannot move the schedule of employees if the start of work has been recorded in the system.
-
Grab the assignment with the cursor and drop it in the target location.
-
The entry on the planner will be updated according to the change made.
NOTE: This method allows moving employee assignments not only between days but also between projects.
Employee schedule based on estimation
Section titled “Employee schedule based on estimation”The graphical calendar table on the planner, where we enter employee assignments, clearly shows to what extent the workforce resources should be utilized to ensure continuity of work for each employee. Depending on the order in which the work scopes are set on the project, the selection of employees should also consider their expertise in the chosen field of work.
REMEMBER: When setting work for employees, it is beneficial to create “Work Crews” in the system beforehand. This way, you can be sure that a given crew is knowledgeable in a specific scope of work, and the time spent on their execution should be relatively profitable.
NOTE: Each employee can belong to only one crew.
REMEMBER: An employee assigned to a project in a given work crew cannot be selected for another project at the same time.
Creating a work schedule and assigning employees to a project is done in the following order:
-
Create an estimate for the selected project.
-
Change its status to “In Progress.”
REMEMBER: After changing the status to “In Progress,” further editing of “Work Scopes” will not be possible. Before changing the status, ensure that the entered work scopes are correct.
-
Go to the menu “Contracts → Planner → Project Schedule” and find it on the list using the “Project” tab.
-
Use the blue arrow to open the project preview, where you will see a list of work scopes, consistent with those provided in the estimate.
-
Fill in the “Employee Schedule” as described here, taking into account the estimated number of days provided in the “Work Scopes.”
REMEMBER: The execution of “Work Scopes” should not exceed the “Estimated Completion Date” given in the project estimate.
NOTE: If the given “Work Scopes” do not conflict with each other and can be performed evenly, set the “Work Time Schedule” to a maximum of the longest number of days given in the “Work Scopes.”
REMEMBER: If one type of work is dependent on another (e.g., the screed must dry before laying tiles) and a correct project schedule with dependencies and delays has been created, the system will take this dependency into account when planning subsequent work by informing on the appropriate days the need to assign teams.
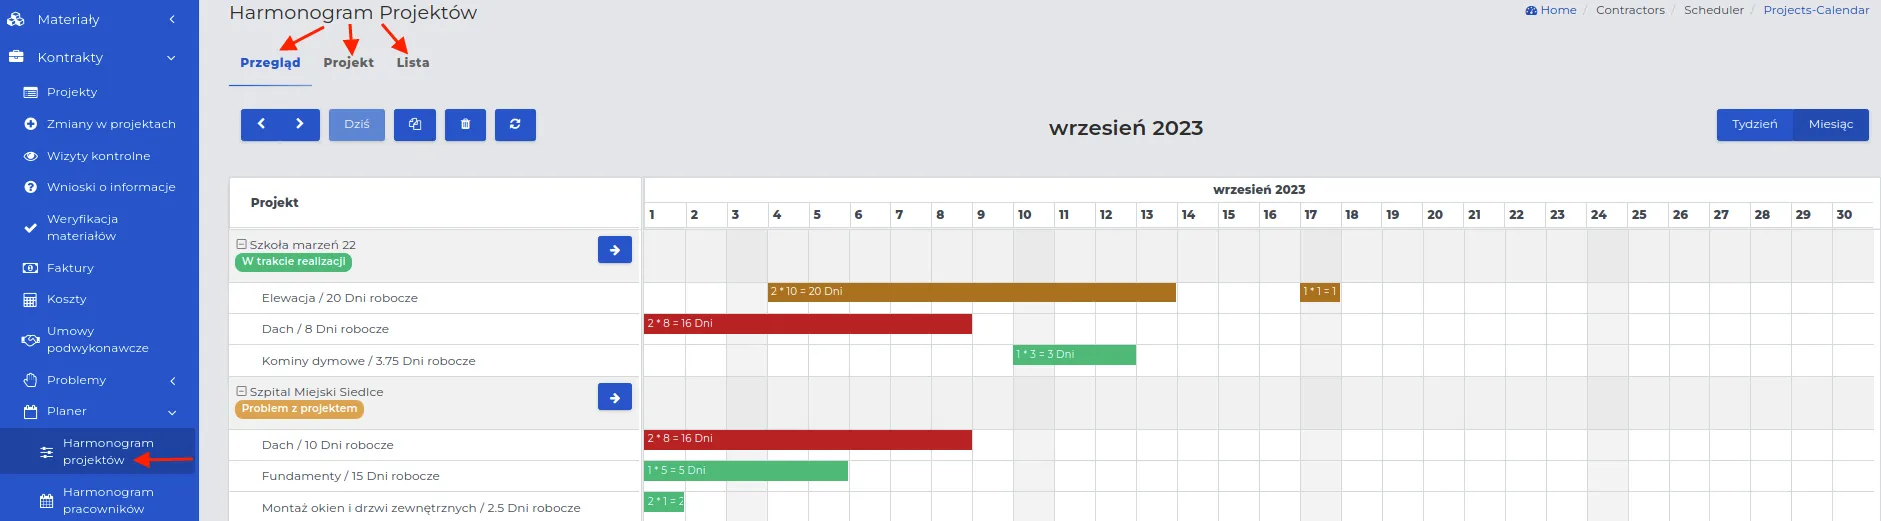
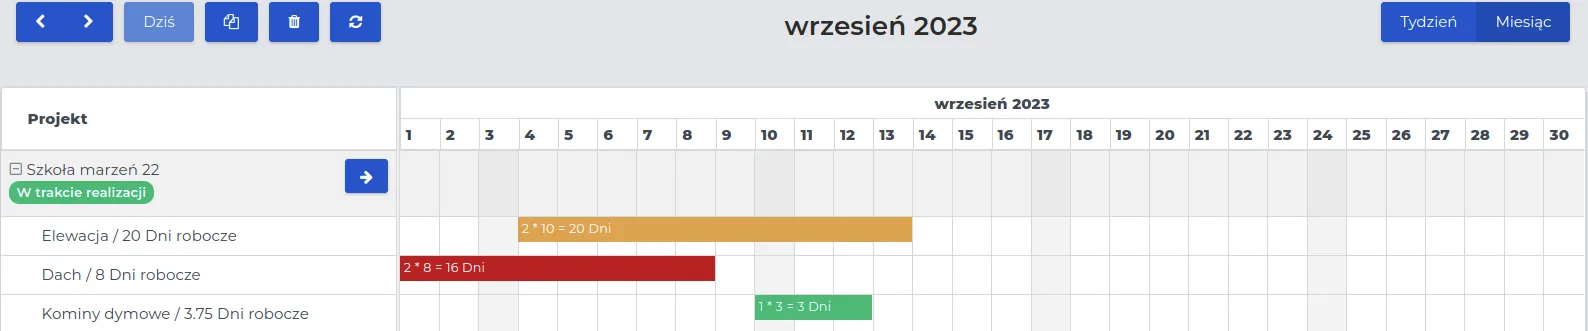
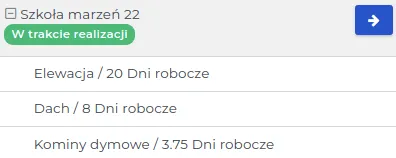
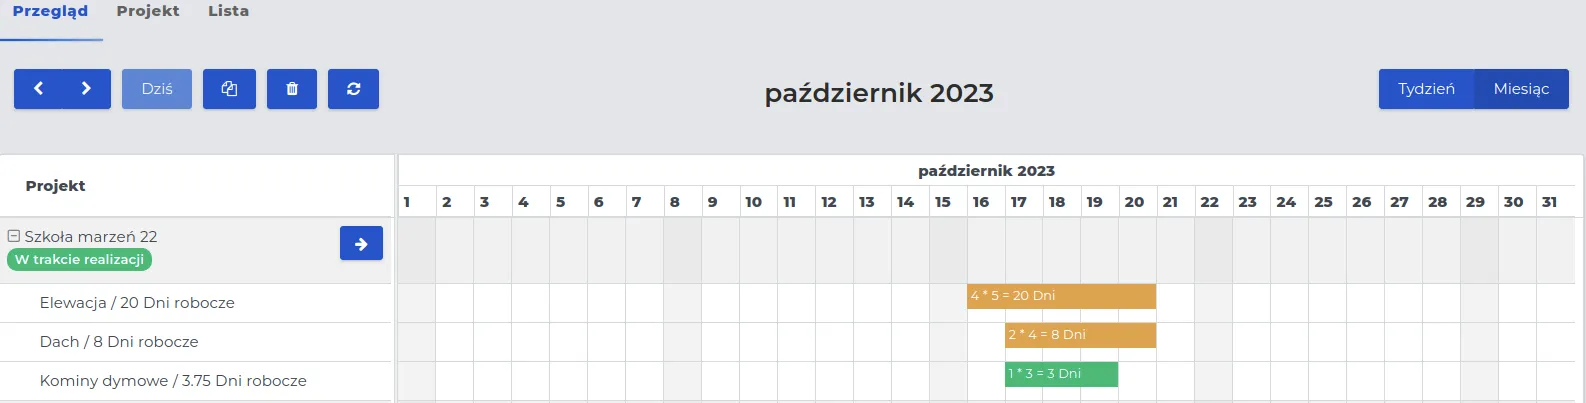
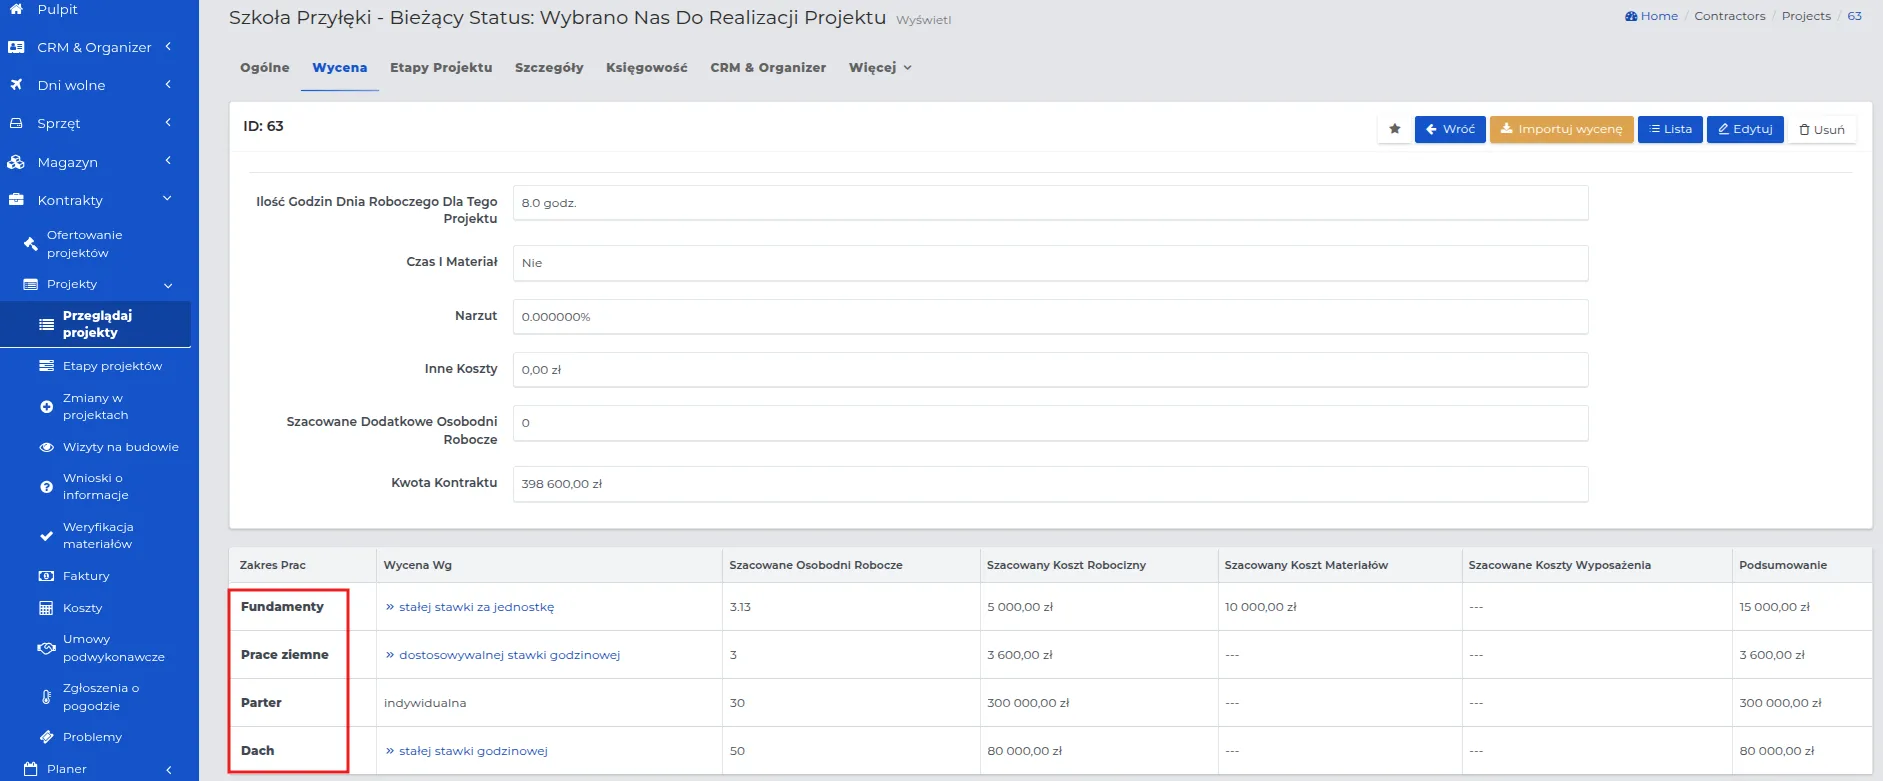
Example: Creating a “Work Schedule” based on the estimate “In Progress.”
The estimate created in the system includes three “Work Scopes,” for which the number of days allocated for execution has been determined, as illustrated in the screenshot below.
To fill in the “Employee Schedule,” follow the sequence:
-
Check the planned project start date in the “Start Date” column, visible next to the project in the “Contracts → Projects” list.
For our example, this will be October 16, 2023.
-
Determine the maximum day for work completion, considering their consistency. Our project should be completed within a maximum of 20 working days (the number of days allocated for the longest work scope “Facade”).
-
Determine the number of employees for each working day:
-
Facade: 20 working days: 4 employees will work for 5 days (from October 16-20, 2023)
-
Roof: 8 working days: 2 employees will work for 4 days (from October 17-20, 2023)
-
- Chimneys: 3.75 working days, 1 worker will work for 3 days (from October 17-19, 2023)
- Open the menu “Contracts → Planner → Work Schedule” and enter the above arrangements in the calendar. We can do this in two ways:
Method I: By holding and releasing the active cursor in the selected time range.
-
For “Facade,” click the cursor on the date October 16, 2023 and hold it until the date October 20, 2023. The selected time range will be light blue.
-
Release the cursor on the date October 20, 2023 and fill in the number of workers in the displayed form, entering: 4.
-
For the remaining “Work Scopes,” proceed in the same way.
Method II: By clicking on the start date of work for a given scope.
-
For “Facade,” click the cursor on the date October 16, 2023 and fill in the form fields: “End Date” by entering October 20, 2023 and “Planned Number of People,” entering: 4.
-
For the remaining “Work Scopes,” fill in the schedule in the same way.
- The created graphical work calendar table will look as follows:
- Go to the section “Contracts → Planner → Employee Schedule.”
REMEMBER: If this is the first project for which we are creating a schedule, the list of unassigned workers and subcontractors above the table will be full and marked with a red background.

- In the “New Assignment” row, click the cursor on the date October 16, 2023 and fill in the form for the first work scope, setting:
-
Work Scope: Facade.
-
Department: Facade/Insulation.
REMEMBER: If you want to assign individual workers from the list, not the entire team, skip the “Department” field.
- Worker: Select and click the cursor on four workers belonging to the “Facade/Insulation” department.
REMEMBER: The time range refers only to the given day on the calendar in which it is entered. We can only set the time range without changing the date on the calendar. Leave the “Planned End of Work” field unchanged.
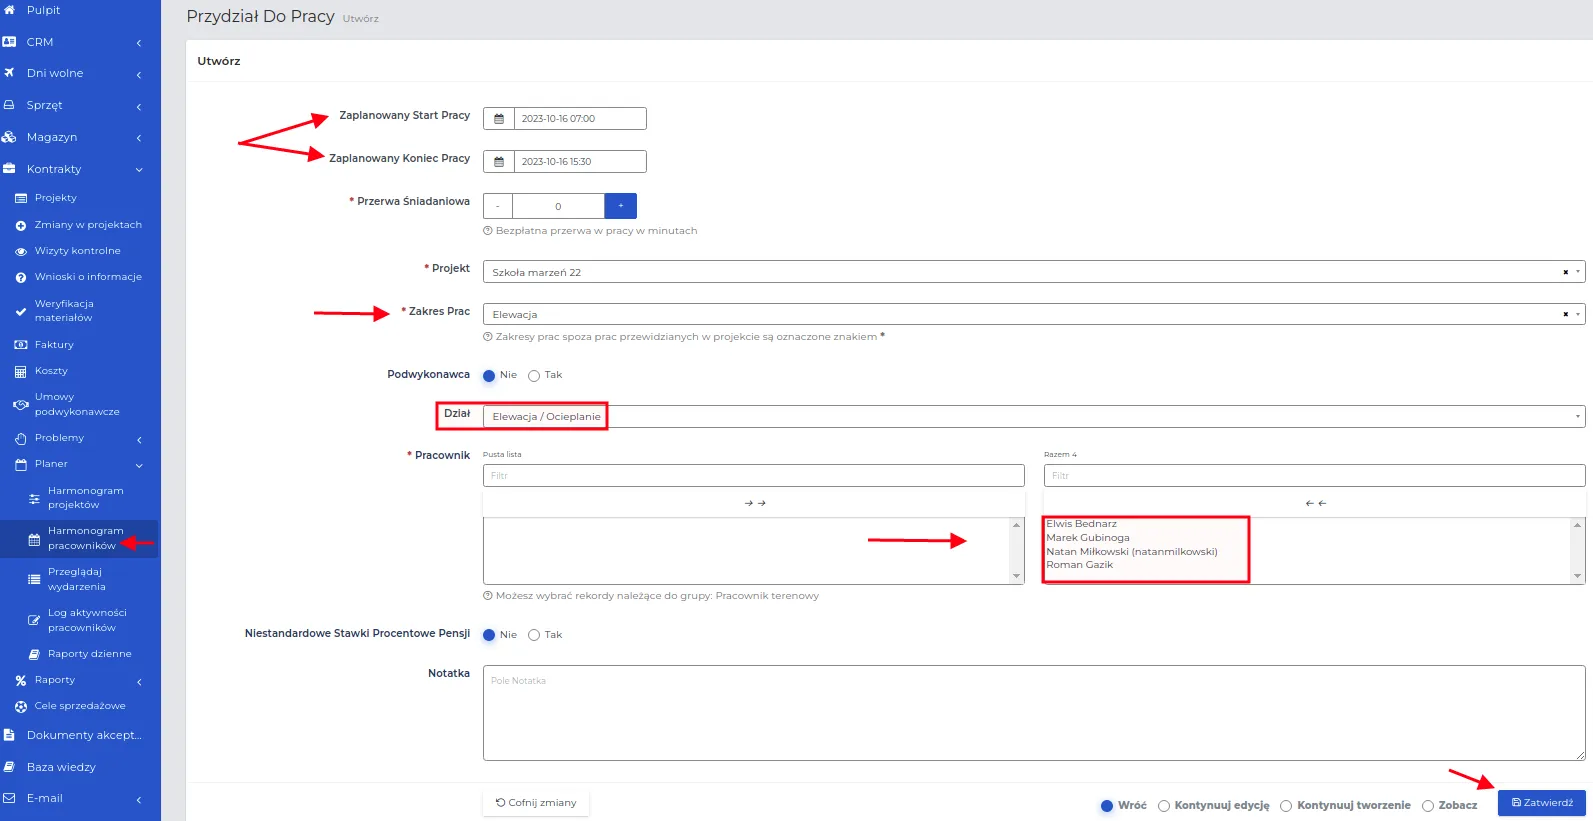
-
Save the form by clicking the “Confirm” button.
-
The created graphical table of the employee calendar for the first “Scope of Work” will look as follows:
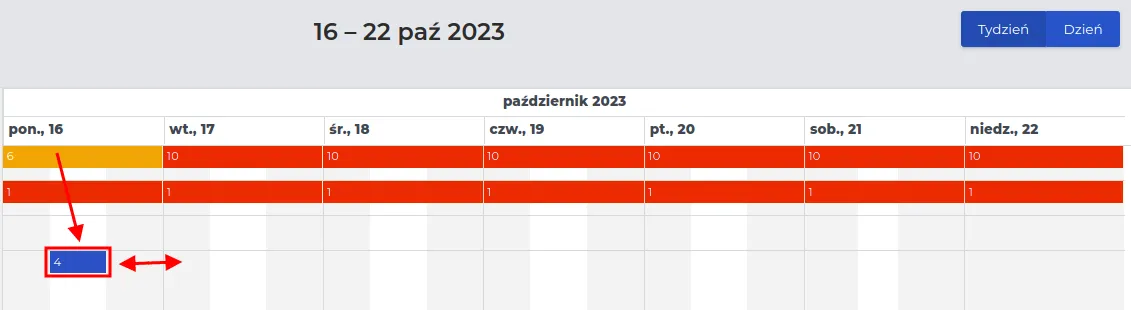
-
Using the “Event Dragging” function on the calendar, set the end date to October 20, 2023.
-
The visible calendar will display the current work assignments for the “Facade” scope. Click the cursor on the date October 17, 2023, which starts the next “Scope of Work” and fill out the form as described in point 7.
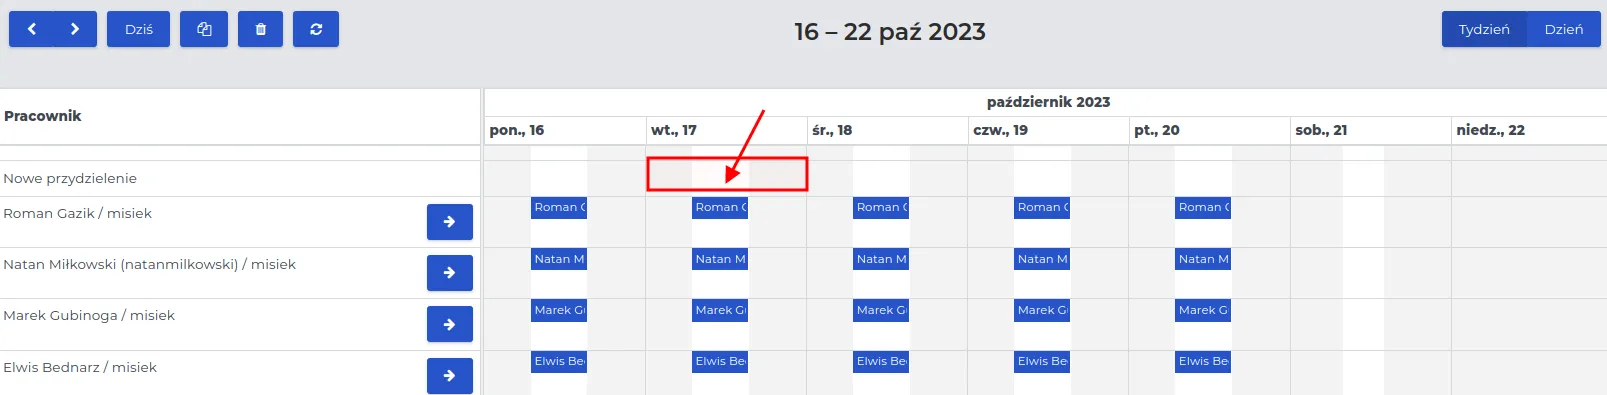
- The entries created for the two “Scopes of Work” on the calendar will look as follows:
-
Drag the entries for the marked employees on the calendar to the “End of Scope of Work” date. For the “Roof,” this will be October 20, 2023.
-
Proceed similarly for the last “Scope of Work - Chimneys,” marking one employee on the calendar on October 17, 2023. After saving, drag their assignment to the end date October 19, 2023.
-
Employees listed on the “Employee Schedule” are arranged in alphabetical order. By the number of days with assignments, we can see which “Scope of Work” they belong to.
Creating a Schedule Divided by Task Types
Section titled “Creating a Schedule Divided by Task Types”Task types in the project schedule allow for better organization of the work sequence and determination of their interdependencies. Thanks to them, the system automatically recognizes which tasks must be completed before starting the next ones. This section simply illustrates how to use the task type function to ensure planning proceeds smoothly and in accordance with the actual work schedule.
Example illustrating the creation of a project schedule using defined task types and their dependencies.
-
For the selected project from the list, enter the estimate conveniently by choosing one of the options described here.
-
In our example, the scope of work includes: Earthworks, Foundations, Ground Floor, Roof.
REMEMBER: After changing the status to “Project in Progress,” you can set the work schedule and see how it looks in practice.
REMEMBER: If the project is to be billed by stages, make the settings in the “Project Stages” tab. Otherwise, the system will classify the entire project as the “Main Stage.”

-
In the menu, select “Contracts → Planner → Project Schedule” and in the “Project” tab, search for the one for which you want to create work assignments.
-
Click on the date in the calendar when the work is to start, e.g., 14.10.2025.

- Fill out the form, paying attention to the fields;
-
Start, end: The time allocated for the given scope of work, e.g., 2 days.
-
Task type name: The type of task for which a dependency between subsequent work stages is created, e.g., earthworks.
REMEMBER: The task type names visible on the list are set by the system administrator. If they need to be changed, contact the administrator.
An example list is shown in the screenshot below.
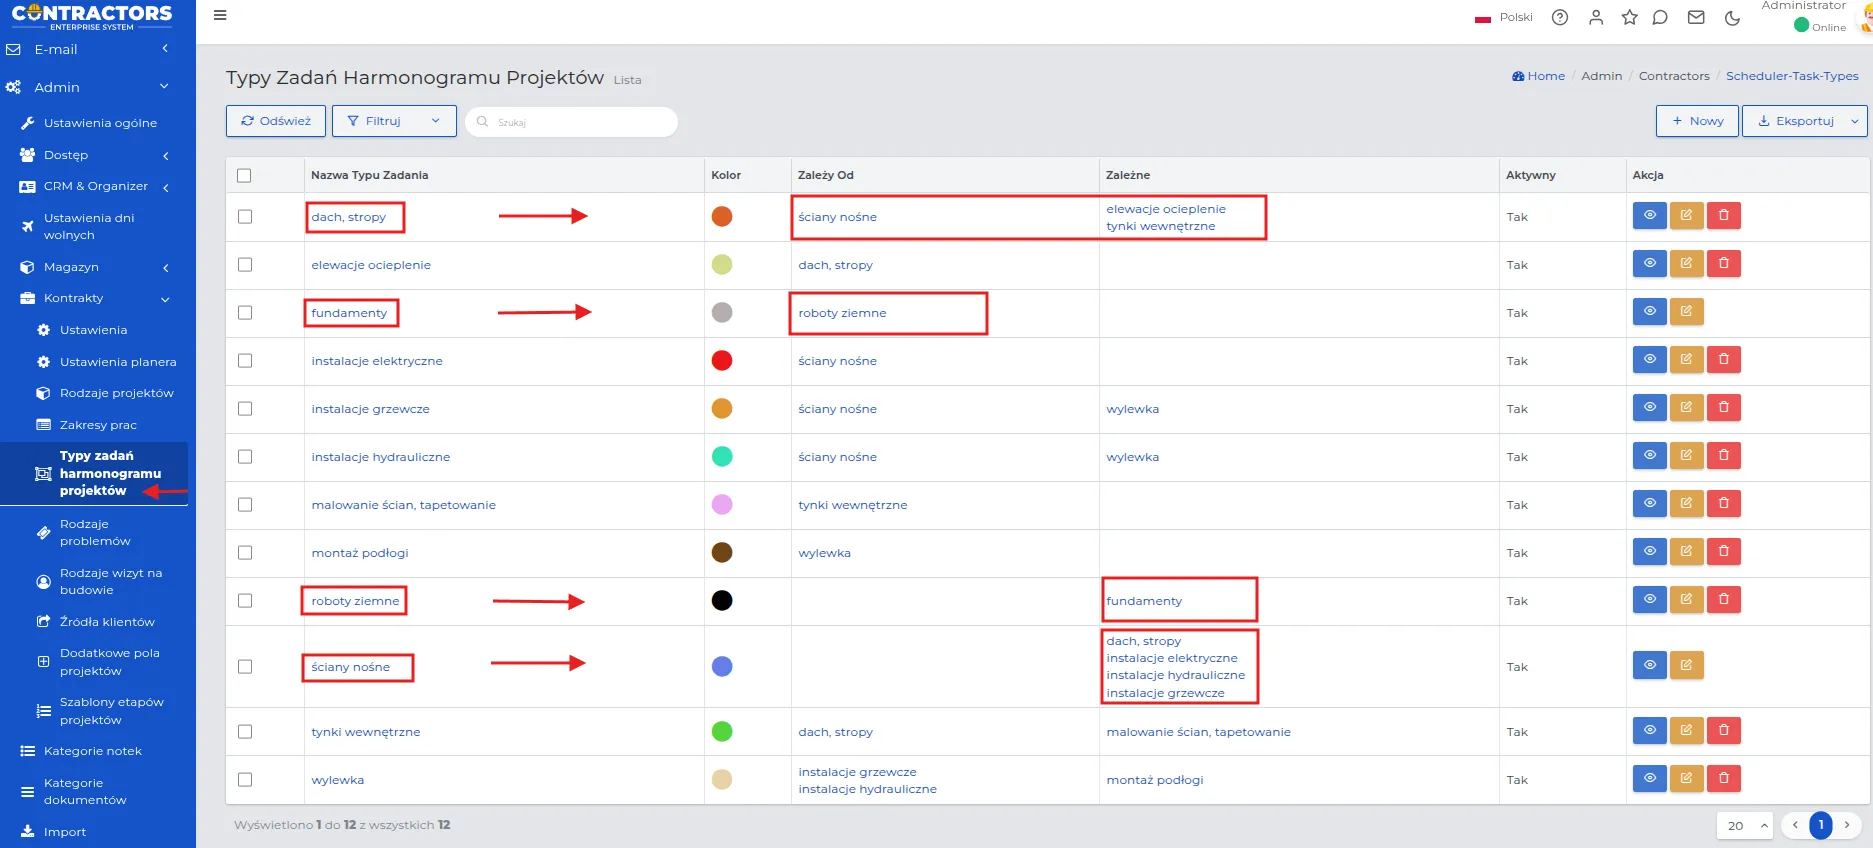
- Delays dependent tasks (days): Specifies the number of days needed to start the next scope of work, e.g., foundations. This means that the foundations cannot start earlier than 1 day after the completion of earthworks.
NOTE: The value of this field can be modified, even if the administrator has set a default value.
-
Stage: Optionally specifies the work stage on the list. In the example, “Main” was selected.
-
Performed by: Specifies whether the work is performed by internal employees or an external company (subcontractor).
-
Planned number of people: The number of workers involved in the given scope of work.
-
Save the changes made by clicking the “Approve” button.
-
In the same way, enter the next scope of work, e.g., Foundations, for which a one-day interval is set after the preceding stage, i.e., earthworks.
-
Start date: 18.10.2025 (the day after the completion of earthworks).
-
Duration: 7 days.
-
End date: 24.10.2025.
-
NOTE: Regardless of the date entered in the calendar, the system will automatically account for a one-day break, leaving a free space in the planner before the start of the next stage.

NOTE: It is best to create a schedule with a one or two-day lead time – this allows for better monitoring of work progress and making adjustments if necessary.
- Complete the planner with the remaining scopes of work, adjusting them to the actual progress.
REMEMBER: You can move the scopes of work on the calendar by grabbing the field with the mouse cursor and dropping it in another place. For scopes of work with set intervals, the rest of the schedule will adjust automatically.
REMEMBER: The system assigns task types to specific stages of the project. This keeps the schedule organized and consistent. If all scopes of work are in one stage, e.g., “Main”, you can freely switch between task types.
NOTE: In projects with multiple stages, tasks from other stages will not be linked to the currently performed work.