Activity Log
The issues described in this section relate to the control and evaluation of employee efficiency. The system records all events related to the activity of field workers or foremen based on their logging into the mobile application.
Job allocation
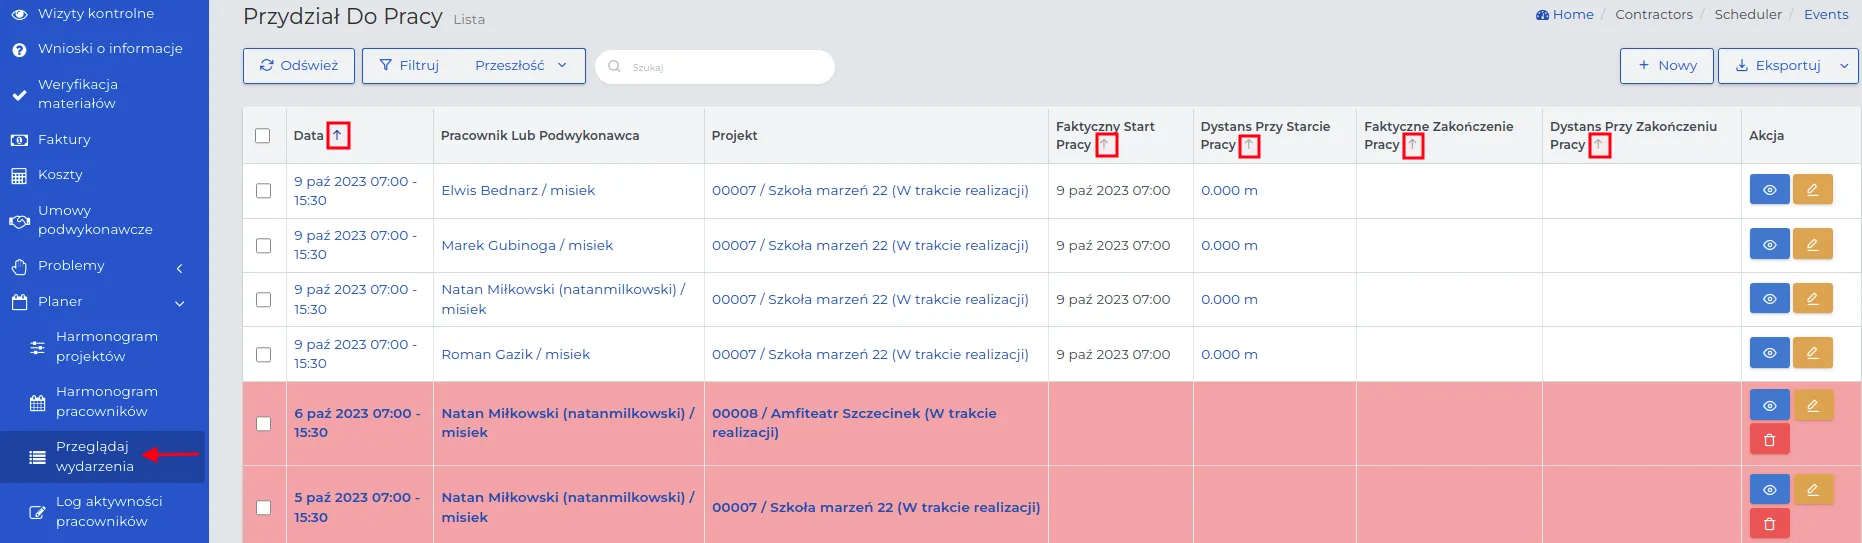
Section titled “Job allocation”In addition to the employee schedule in the form of a calendar, there is a table with job assignments: “Contracts → Planner → Browse events”.
The data in the table includes:
- the date and range of hours during which the employee should be present on the project,
- the name of the employee or subcontractor,
- the name of the project on which the event was recorded,
- the actual start and end time of work,
- the location of logging in at the beginning and end of work, defined as the “distance” from the correct project location - clicking opens a map with the position from which the employee logged into the mobile application.

The information in the “Distance at the start and end of work” column informs superiors about the correctness of the employee’s arrival at the workplace and his departure.
The employee’s phone GPS system automatically locates his current position and sends information to Contractors.es. This verifies the correctness of the employee’s login and logout location from the mobile application.
NOTE: If the employee has forbidden the Contractors.es mobile application access to the phone location retrieval service, an incorrect location may be recorded. Each time it will be the same location and usually it is the Atlantic Ocean west of central Africa (0°00’00.0”N 0°00’00.0”E).
Depending on the administrative settings of the work planner, the employee may receive a notification on his phone in case:
- he leaves the workplace faster or is late for it,
- if his login location to the application will be distant from the project address.
NOTE: Records on the list marked with a red background color indicate an existing irregularity (location or work registration time) for a given entry in the system. Only a user with appropriate permissions has the ability to edit such entries.
REMEMBER: Verifying job assignments is crucial for the correct settlement of an employee’s working time. The system allows you to edit job assignments until they are marked as settled.
NOTE: Field workers receive notifications on mobile devices with a job assignment one day in advance, according to the time set by the administrator.
Filtering, sorting, adding and removing assignments
Section titled “Filtering, sorting, adding and removing assignments”You can filter the table with assignments by employee, as well as:
- Sort by variables contained in column names.
REMEMBER: Sorting by column has been described in more detail here. It only applies to those entries for which the “arrow” next to their name is active.
- Filter on the list by applying a time interval and possible occurring irregularities available in the basic filter or expand the range of variables using the detailed filter.
NOTE: The system automatically generates today’s assignments on the list.
REMEMBER: Detailed filtering allows you to apply multiple variables at once. Thanks to this, the list with the register of job assignments will reject irrelevant records, leaving only those that correspond to a specific search.
- Search for records in columns by their name.
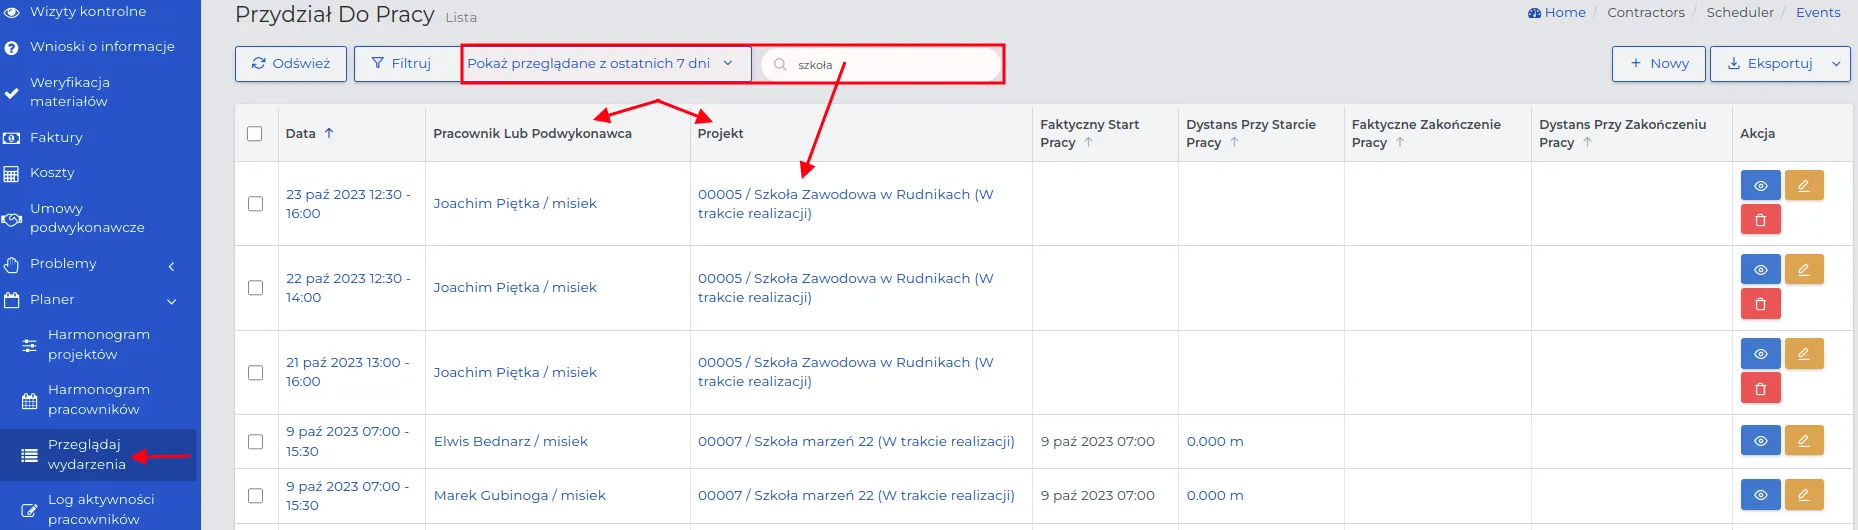
NOTE: Using all search and filtering options at the same time will display the most limited list of records.
REMEMBER: Before each subsequent search, check the currently set filters and make changes in them if necessary.
- Add a new job assignment.
NOTE: You can create new assignments without having to go into the employee schedule calendar.
- Delete unnecessary entries.
NOTE: This should only be done for future entries or those in which the employee has not recorded his presence. The system administrator can recover an entry from the trash.
REMEMBER: You will not delete entries with a retroactive date that have a registered presence at work. To delete such an entry, edit the record and remove the presence, and only then can you delete the record itself.
You can remove job assignments in three ways:
Method I: From the employee’s work schedule.
After finding the unnecessary assignment, click on the blue “Trash” icon and select the date and place to be removed from the list.
NOTE: Each entry must be marked separately for deletion.
Method II: Using the “Trash” action button visible next to the record in the list.
Method III: Using the “batch” method. The description of this method can be found here.
REMEMBER: Use the sorting or filtering function to limit the number of records to be deleted.
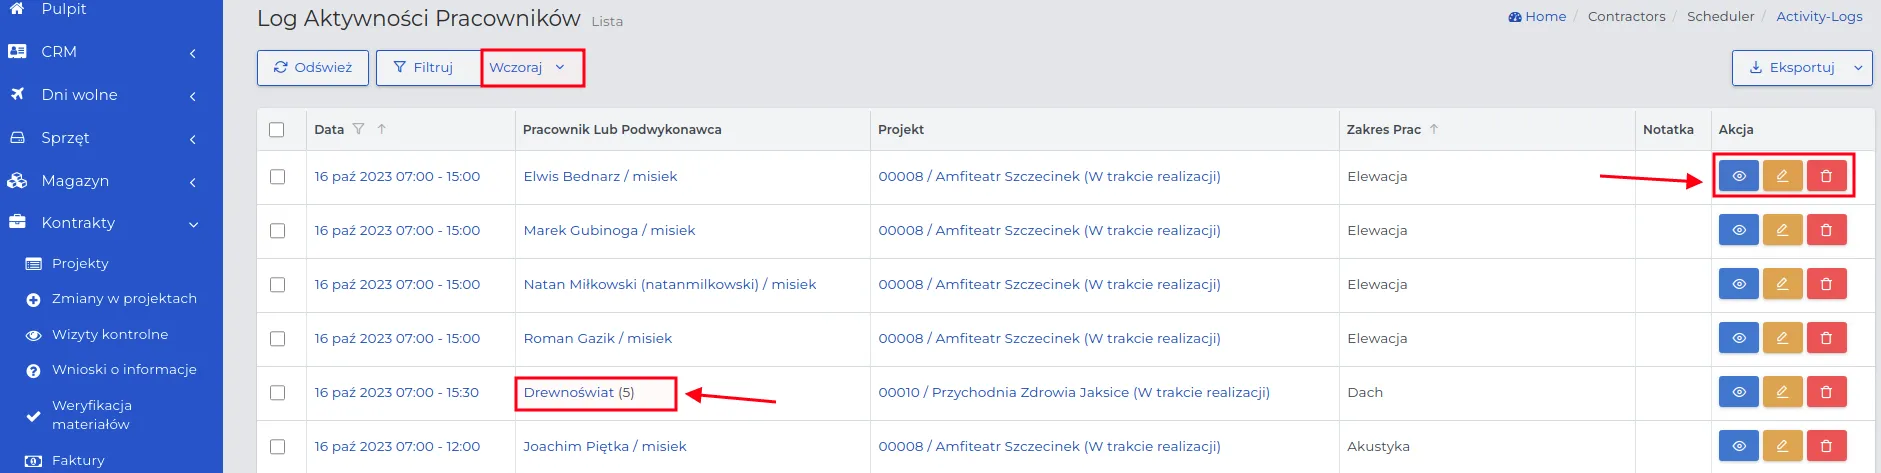
Employee Activity Log
Section titled “Employee Activity Log”The register created in the list in the “Contracts → Planner → Activity Log” menu is updated in real time based on data provided by field workers through the mobile application. In this way, it is possible to continuously account for working time for each record entered in the system.
NOTE: If a field worker or subcontractor does not log into the mobile application with a job assignment, the record will not be filled with data.
REMEMBER: If a subcontractor is added to a specific scope of work, you will find information about the number of his workers who should appear on the project on a given date in parentheses next to his name.
In the preview of the selected record, you will find information about employment conditions such as the minimum scope of work, the established hourly rate, and the value of remuneration calculated based on the registered working time. Additionally, you will see the time range in which the employee was active on the project, recorded by the mobile application.
NOTE: Only authorized system users can make changes to the working hours ranges, which are necessary to settle the employee’s remuneration.
REMEMBER: Changes in remuneration conditions can only be made until the employee’s schedule has been settled and forwarded to accounting.
REMEMBER: By applying a detailed filter, you can search for a specific employee on the list to view their activity.
Reports on work progress
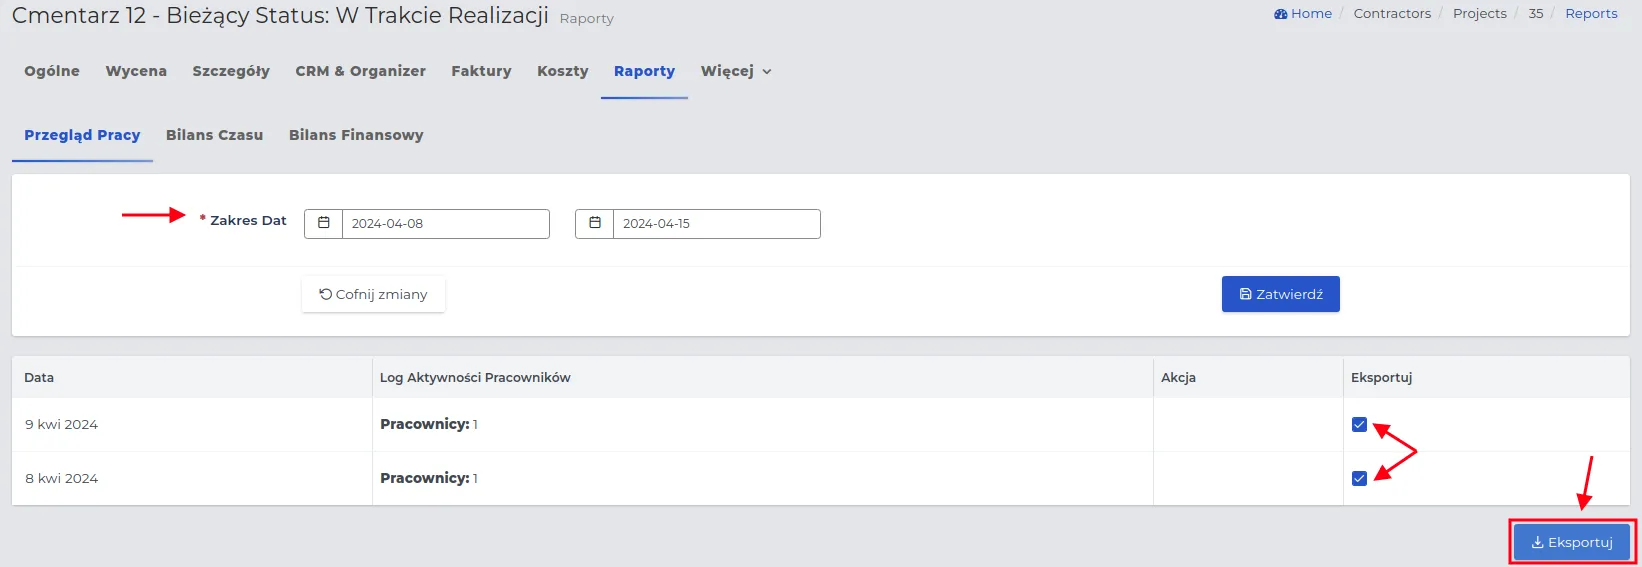
Section titled “Reports on work progress”To prepare a report on work progress, generated based on users logging into the mobile application, proceed in the following order:
-
Go to the project view, then click on the “Reports → Work Overview” tab.
-
In the “Date Range” field, set the time range.
NOTE: The time range can be set to a maximum of 31 days.
- Mark in the “Export” column those dates from the specified time range that the generated report should cover.
REMEMBER: The data downloaded by the system relates to all entries made by the foreman when creating daily reports.
- Click on “Export” and save the file in PDF format, then send it by email or hand it over to the client in printed form.
Daily reports
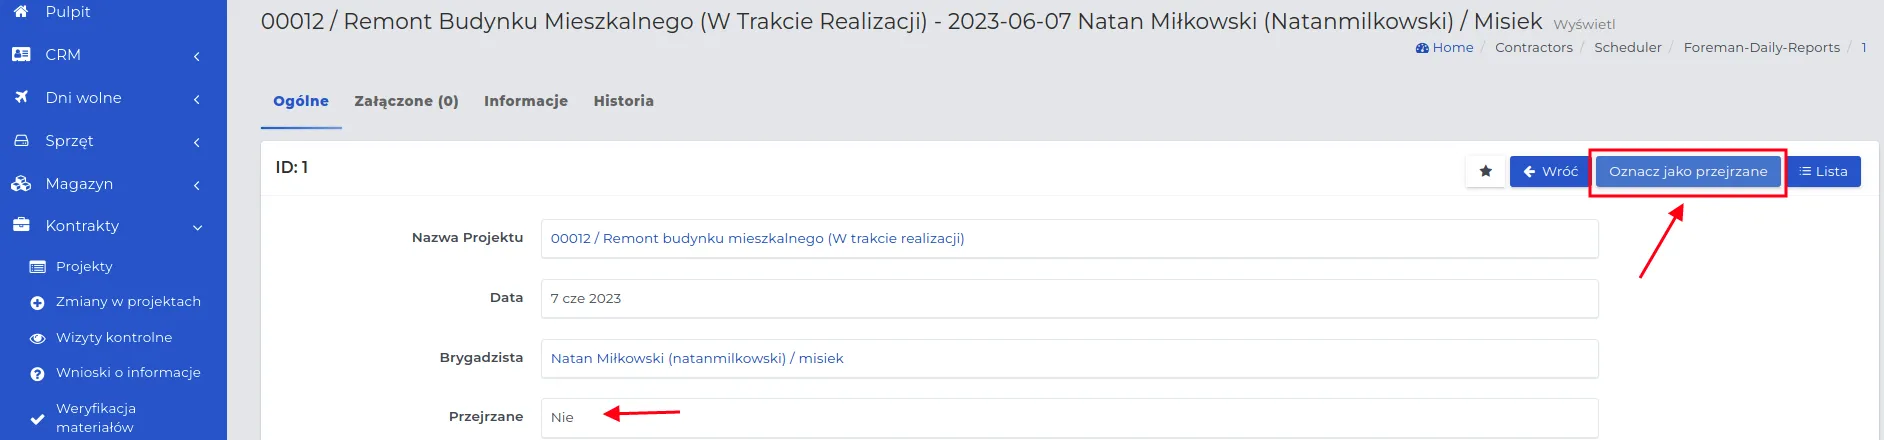
Section titled “Daily reports”The register created on the list in the “Contracts → Planner → Daily reports” menu contains all the progress on the project noted by the foreman.
Daily work progress reports contain important information that allows for the assessment of project progress. The visible data in each project record allows for the assessment of work progress.
In the record preview, you can read the employee’s report filled out and saved in the mobile application. The system will register, in the “Reviewed” column, which system user reviewed the given entry with the report.

NOTE: Daily reports should be reviewed and marked as “reviewed” by the project manager or project manager’s assistant.
REMEMBER: Reopening the same report will not result in it being marked as read by another user. For the system, the first record of reviewing the entry counts. Only the display by another user will be recorded in the history.