Field Worker Panel
After logging into the mobile application, you will be able to use the modules dedicated to you. Here is the list:
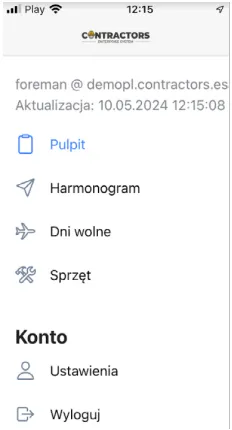
You can slide out the list using the menu in the upper left corner of the screen and slide it back by clicking on it.
REMEMBER: Simply logging into the mobile application does not mean starting work for the day. To have your work time recorded and financially accounted for, you must also log into a specific project.
REMEMBER: To continue recording work after logging out of the application, contact the office to reset the “Actual end of work” field.
Dashboard
Section titled “Dashboard”In this module, only the work plan for today is visible.
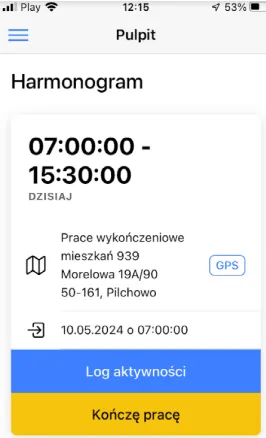
The buttons below the entry serve the following functions:
- Activity Log: Used to record the currently performed scope of work. In the “Note” field, you can add information related to the work being done, e.g., laying 30x30 cm tiles.
REMEMBER: If you perform several scopes of work with different billing rates during the day, use the “Activity Log” button. This way, the billing rate will be considered according to the actual time spent on performing the given work.
- I finish work: Used to report the actual end of work time for the day.
REMEMBER: The application records your current location while performing work. Discrepancies will be visible in the field workers’ time report register.
Schedule
Section titled “Schedule”In the schedule, you will find all planned work, arranged in chronological order.
REMEMBER: Use the GPS navigation available at the work assignment address to easily reach the location.
Recording work time on the project will be possible according to the scheme:
-
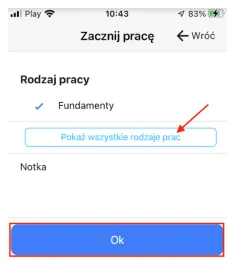
Start work on the project by clicking the “I start work” button.
-
Verify the planned scope of work and confirm it with the “Ok” button or make changes by selecting another option from the drop-down list “Show all types of work.”
The information visible after logging in with a work assignment includes the following data:
-
Hourly range for the workday.
-
Project address.
-
Time of logging into the application.
-
Time of work completion.
-
Time range for the last entered change in the selected work scope.
REMEMBER: If you performed several different work scopes during the workday, a separate entry with dedicated time will be recorded for each of them.
NOTE: To change the work scope, use the “Activity Log” button.
Days Off
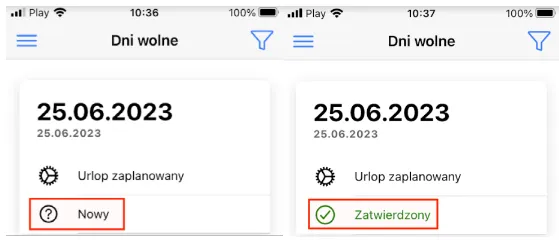
Section titled “Days Off”All leave requests, regardless of their current status, are visible on the “Days Off” list. This allows for easy tracking of used leave and remaining days off.
The buttons visible on the device screen are used for:
-
filtering the list of submitted days off requests,
-
creating a new day off request.

To add a day off request, follow the steps:
-
Select the blue ”+” button at the bottom.
-
Specify the time range on the pull-out calendar, i.e., the start and end date of the planned leave.
-
Choose the “Request Type” from the available options:
-
Planned Leave: The number of days will be deducted from the employee’s available days off.
-
On-Demand Leave: A day off requested urgently, in accordance with the Labor Code provisions.
-
Sickness: Absence due to a medical leave.
-
Unpaid Leave: Only available to employed workers, the number of unpaid days is regulated by the Labor Code, adhering to strict regulations.
- Save the data with the “Ok” button.
REMEMBER: Leave requests must be approved in the web system by individuals with the appropriate permissions.
REMEMBER: A submitted and sent leave request cannot be edited after it has been sent for approval.
The submitted request on the list will be marked as “New.” After the status changes, the update will be visible in the same place.
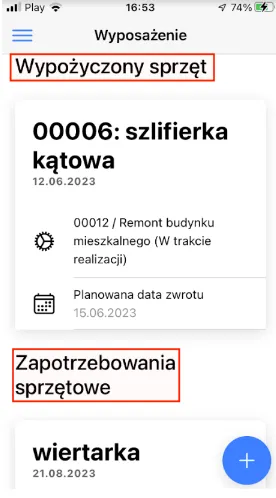
Equipment
Section titled “Equipment”With this module, you can request equipment, defer its return, and arrange for its pickup if the equipment’s size requires it.
NOTE: Requests can only be registered from the current project login location. For other projects, use the web application.
The subgroups visible in this section list pertain to:
-
Currently borrowed and issued equipment from the warehouse, for which you are responsible for returning to the equipment warehouse.
-
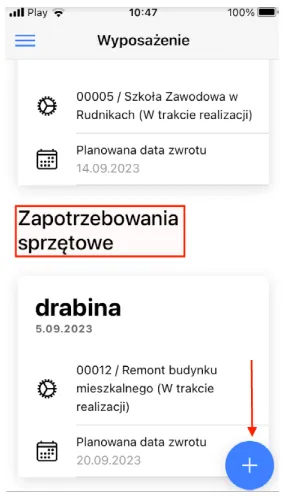
Reported equipment requests awaiting fulfillment by an authorized web system user.
REMEMBER: After changing the “Equipment Request” status, the equipment will automatically appear on the “Borrowed Equipment” list.
To request equipment, follow the steps:
- Scroll the screen view to the “Equipment Requests” group and select the blue ”+” button at the bottom.
-
Fill out the form by providing the name of the required equipment and specify the borrowing and return dates.
-
Save the data using the “Ok” button.
In the preview of each borrowed equipment, you can request its pickup or change its return date by selecting the options shown in the screenshot below.
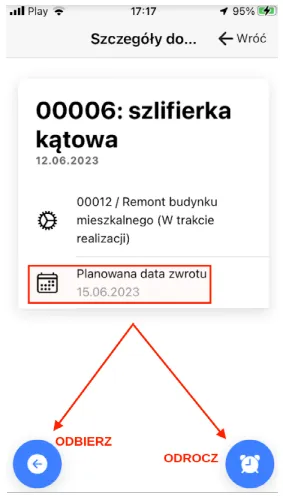
After completing and saving the form, one of the following statuses will appear in place of the “Planned Return Date” status.

REMEMBER: The above statuses can only change if the employee responsible for picking up the equipment or changing its return date in the equipment warehouse records this situation in the web system.
NOTE: If two of the above options are selected one after the other for one type of borrowed equipment, the system will automatically record and retain the latest one (entered last).
Account
Section titled “Account”In this tab, you will find:
- The “Settings” option, which allows you to change the current password for the mobile application.
- The “Logout” function, which allows you to log out of the application.
REMEMBER: The next time you launch the application after logging out, you will need to enter your login details again.