Foreman Panel
After logging into the mobile application, you will be able to use the modules assigned to your user role. Here is a list of these modules:
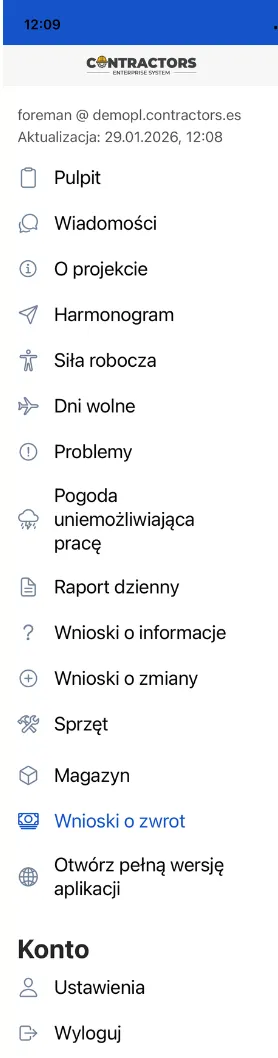
You can slide out the list using the menu in the top left corner of the screen and slide it back by clicking on it again.
Dashboard
Section titled “Dashboard”In this module, only today’s work plan is visible.
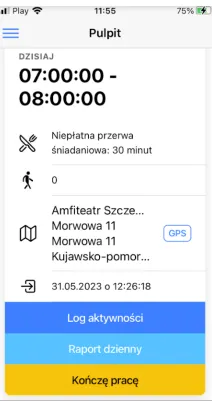
The buttons available below the entry serve the following functions:
- Activity Log: A record of the scope of work being performed at the moment. In the “Note” field, you can add information related to the work being done, e.g., laying 30x30 cm tiles.
REMEMBER: Every change in the scope of work during the day should be noted as a new “Activity Log.” This way, in the report that includes the employee’s scope of work, all performed tasks will be visible with the time allocated to them.
- Daily Report: Information on work progress. It should be recorded at the end of the workday. The scheme for creating a daily report is described in the “Reports” module.
REMEMBER: Creating reports allows you to track the profitability of the project and compare actual progress with assumptions.
- End Work: The actual end of work time for the day.
REMEMBER: Based on this report, your work time is accounted for, which can be verified in the web system only by authorized users.
Messages
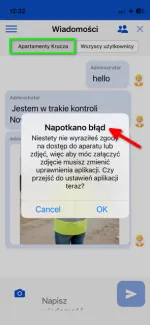
Section titled “Messages”The built-in internal chat allows communication directly from the work site without the need to use external messengers on the phone. All messages are saved, creating a complete history of project communication. In addition to text messages, it is also possible to send photos.
REMEMBER: The visibility of chats in the mobile application depends on the user’s assignment to a given chat, e.g., Krucza Apartments or All users.
NOTE: To be able to send photos, the application must have access to the gallery granted in the phone settings. If access is not granted, this feature will not be available.
About the Project
Section titled “About the Project”This module allows you to view the most important information about the project and the people associated with it. The section includes data on the start and planned end of the project, its status, and contacts for managers, assistant managers, and other foremen.
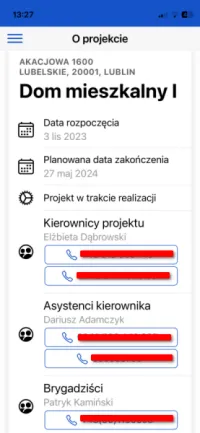
The system allows adding notes related to the project, which will be visible to all employees assigned to the project. The “Create Note” button is used to create a note, and you can optionally select a category: offer, technical, or delivery dates, or leave the field empty.
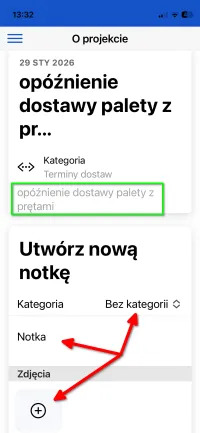
After saving, the note, along with any photo, will appear in the list of entries below the basic project information.
NOTE: Only foremen listed in the project parameters and assigned work on this project have access to this section after logging in to work.
Schedule
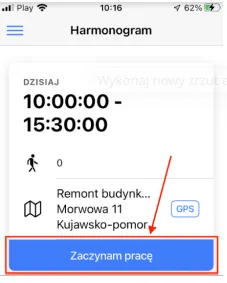
Section titled “Schedule”The schedule includes all planned work in the calendar, arranged in chronological order. The way a given event is presented on the phone screen after starting work is clear and readable.
REMEMBER: Use the GPS navigation available at the work assignment address to easily reach the location.
NOTE: You can only start work for the scope of work scheduled for the current working day.
Recording work time on the project will be possible according to the scheme:
- Start work on the project by clicking the “Start Work” button.
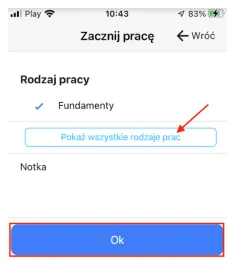
- Verify the planned scope of work and confirm it with the “Ok” button or make changes by selecting another option from the drop-down list “Show all types of work.”
Information visible after logging in with a work assignment includes specific data:
-
Hourly range for the workday.
-
Number of minutes of unpaid lunch break.
-
Workforce allocation.
NOTE: This field is only available when the foreman acts as a subcontractor foreman.
- Construction address.
REMEMBER: The “GPS” icon works with the Google Maps app, allowing it to run in the background.
-
Time of logging into the application.
-
Time frame for the last entered change in the selected scope of work.
REMEMBER: If several different scopes of work are performed during the workday, a separate entry with dedicated time will be recorded for each.
NOTE: To change the scope of work, use the “Activity log” button.
Workforce
Section titled “Workforce”In this module, you will find information about the number of employees assigned to a given project on a specific workday. This way, you can see how many employees should report to the project and how many are actually present.
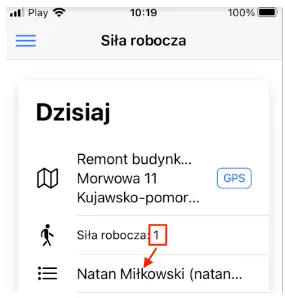
REMEMBER: If a group of employees from our subcontractor is sent to the project, and not from our company, the list will not contain personal data of these employees, only their number.
Days Off
Section titled “Days Off”Submitting requests for days off is possible from anywhere and at any time. All leave requests, regardless of their current status, remain on the “Days Off” list. This allows for easy tracking of used leave and remaining days off.
REMEMBER: If you have not submitted any day off, the “Days Off” module will be empty.
The repeatable buttons serve the function of:
-
filtering requests on the list,
-
creating a new day off request.

To add a day off request, follow the scheme:
-
Select the blue ”+” button at the bottom.
-
Specify the time range on the drop-down calendar, i.e., the start and end date of the planned leave.
-
Choose the “Request Type” from the available options:
-
Planned Leave: The number of days will be deducted from the employee’s available days off.
-
On-Demand Leave: A day off requested suddenly, in accordance with the provisions of the Labor Code.
-
Illness: Absence due to medical leave.
-
Unpaid leave: The number of unpaid days available only to employed workers, regulated by the Labor Code, with strict adherence to regulations.
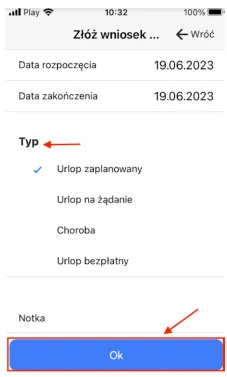
- Save the data with the “Ok” button.
REMEMBER: Submitted leave requests require approval in the web system by authorized personnel.
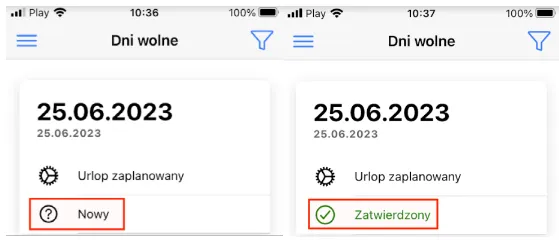
A submitted request on the list will be marked as “New.” After the status changes, the update will be visible in the same place.
REMEMBER: A submitted and sent request for approval cannot be edited.
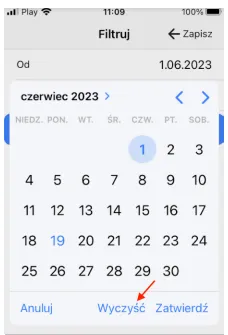
NOTE: Before each subsequent search, you must “clear” the filtering field for requests on the list. The last search settings remain in memory, so without this step, only requests for the last specified time range will be displayed.
Clearing the current filtering settings is done as follows:
-
Select the “filtering” function in the upper right part of the screen.
-
Click on the “From” or “To” date field, then select the “Clear” option under the calendar.
NOTE: If you select a new date range on the calendar and confirm the search, all previous filtering settings will be reset.
Issues
Section titled “Issues”In this module, you can report and view only issues unrelated to weather conditions.
Creating issues on the construction site is done in the following order:
- Use the function to create new entries visible at the bottom of the screen.
- Fill out the displayed form, where the meaning of the fields is identical to those for reports made through the web system.
NOTE: You can attach photos of the issue using the appropriate field for uploading photos. This function is not available in the web system.
- Save the data by selecting the “Ok” button.
REMEMBER: If an issue is recorded in the web system where you are an “Involved Employee,” it will be visible in your mobile application.
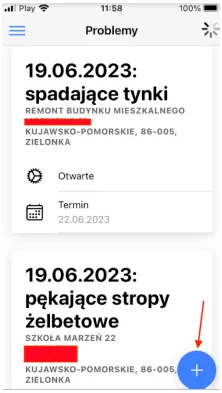
NOTE: The issues on the list are arranged in order according to their resolution deadlines.
To make changes to records with issues, follow the sequence:
-
In the “Issues” module, select the entry you want to modify and click on its name.
-
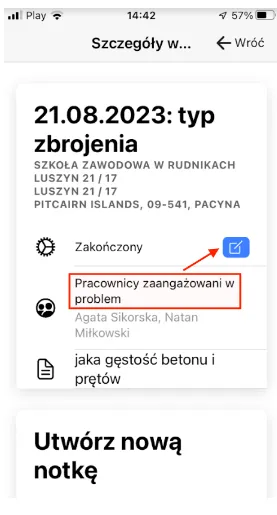
The current information will be displayed on the screen, where you can change the current status, add a note, or attach photos.
NOTE: Changing the status of a reported issue is done by clicking the blue edit icon, marked with a red arrow in the screenshot below. After selecting a new status from the list, save the changes with the “Ok” button.
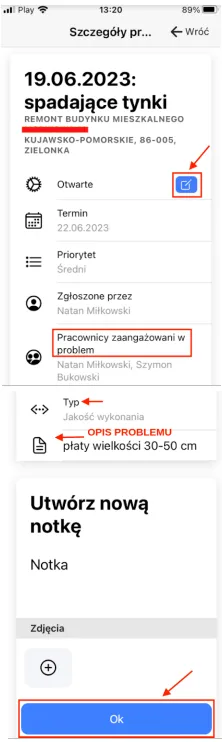
REMEMBER: You cannot edit the entered “Type of issue.” In each subsequently added note for this event, you can specify a new type and scope of work.
- Save the changes using the “Ok” button.
REMEMBER: You can only add issues to the project you are logged into.
NOTE: Reporting an issue via the mobile app does not allow you to add employees involved in the issue. This feature is only available in the web system.
Weather Preventing Work
Section titled “Weather Preventing Work”It may happen that adverse weather conditions prevent the planned work from being carried out on a given day, resulting in a lack of progress in contract execution. The Contractors.es application automatically retrieves weather data from the internet, taking into account the location of the project work.
NOTE: This feature creates a report history that can be useful as explanatory evidence in the event of a change in the project completion date for the Client.
To add a weather-related issue report, follow the sequence:
- Use the record creation function by clicking the blue ”+” at the bottom of the screen.
- Ensure that the values in the automatically filled fields are correct.
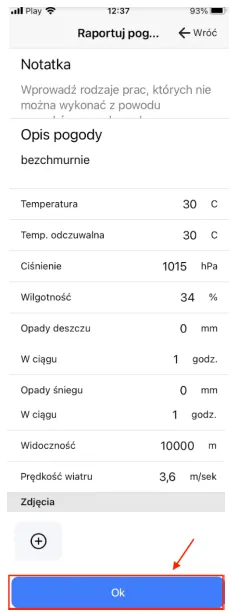
- Optionally add a note or photo and save the data with the “Ok” button.
NOTE: Created and saved reports cannot be edited or deleted.
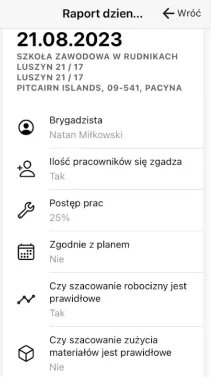
Daily Report
Section titled “Daily Report”Daily progress reporting allows tracking the stage of project implementation. The report includes a breakdown of time and financial balance. Its preview on the list contains information visible in the screenshot below.
NOTE: Daily report entries are visible after the workday ends only in the web system.
REMEMBER: Creating a daily report applies only to the current project. If more than one construction team is working on the same project or their work scopes differ, it is worth creating separate daily reports.
You can enter the daily report into the application as follows:
-
Select the blue ”+” button at the bottom.
-
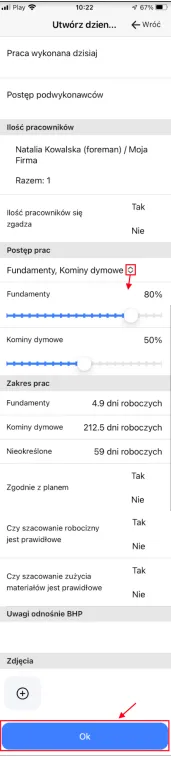
Fill in the data in the form, paying attention to the fields:
-
Work progress: Expand the list of work scopes and use the slider to determine the percentage of their completion.
-
Scope of work: After subtracting the estimated amount of work done from the number of days specified in the planner, the number of days remaining to complete the given scope of work will be displayed.
-
Optionally add comments regarding health and safety or photos.
-
Save the data with the “Ok” button.
REMEMBER: You can add a note to the report using the ‘Create a new note’ field at the bottom of the saved entry.
Requests for Information
Section titled “Requests for Information”In the mobile application, you can use a simplified version of creating requests for information. The request form contains three main elements:
-
Title: Name of the submission, e.g., lift certificate.
-
Description: Question or concern for which you expect an answer.
-
Photos: Optionally, you can attach files with photos.
REMEMBER: A submitted request on the list will have the status “Pending,” and after being verified by a person with the appropriate permissions, its status will change, e.g., to “Completed.”

NOTE: On the “Requests for Information” list, all requests in which the foreman logged into the application was involved, as well as those he created himself, will be visible.
REMEMBER: You can change the name of the request and add a note before changing its status.
Change Requests
Section titled “Change Requests”Project execution may require changes or corrections that can affect the final stage of the ongoing work. The type of request depends on:
- Type: The entity submitting the request. This can be the Client or the Contractor.
- Scope of work: Changes in the scope of work resulting from modifications in the project.
REMEMBER: Accepted change requests will impact the final settlement of the project.
The change request creation form available in the application looks as follows:
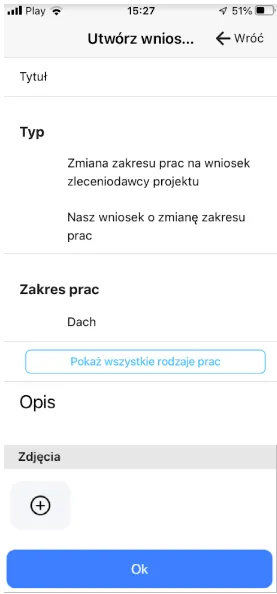
REMEMBER: All submitted change requests in projects are automatically sent to the cost estimator associated with the given project. The cost estimator makes changes, which are then forwarded for the Client’s approval.
REMEMBER: You cannot change the name of the request. After saving it in the application, you will be able to add further notes to it, but only until its status is changed.
Equipment
Section titled “Equipment”In addition to recording material consumption and assigning employees, the Foreman has the ability to:
- Report equipment needs for the current project.
- Postpone equipment return deadlines.
- Receive borrowed equipment from other projects.
NOTE: You can only register equipment needs from the location where you are currently logged into the project. For other projects, use the web application for this purpose.
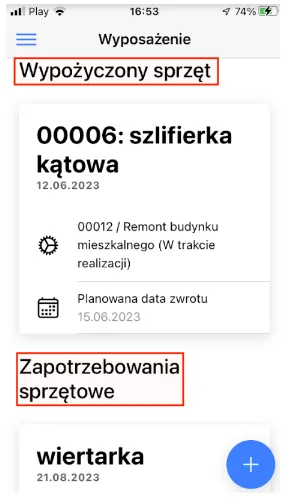
On the equipment list, there are two subgroups available:
- Currently borrowed and issued from the warehouse equipment, for which the return to the equipment warehouse is the responsibility of the logged-in Foreman, regardless of the type of project.
NOTE: The list only includes those devices for which equipment needs requests have been previously submitted and fulfilled by an authorized person using the web application.
- Reported equipment needs awaiting fulfillment by an authorized user of the web system.
NOTE: Upon receiving a field worker’s request regarding the receipt of expected equipment for which the status has been changed, the equipment need can be fulfilled.
REMEMBER: By using the “Equipment” module when planning your workday, it will be easier to manage equipment across different projects. You can pick up, deliver, transport, or return it to the warehouse according to current requests.
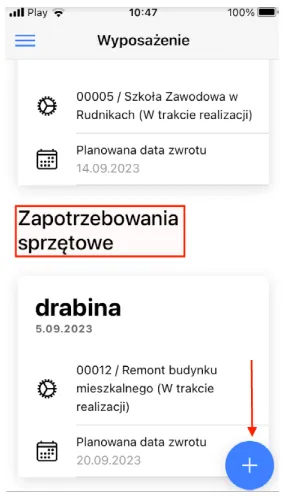
To report equipment needs, follow the steps:
- Scroll the screen view to the “Equipment Needs” group and select the blue ”+” button at the bottom.
-
Fill out the form by providing the name of the required equipment and specify the rental and return dates.
-
Save the data using the “Ok” button.
NOTE: If you want to report equipment needs for a project other than the one you are currently logged into, log out from the current location and log into the selected project, provided you are assigned to it on that day. You can also report needs using the web application, where there are no restrictions.
REMEMBER: After changing the “Equipment Needs” status, the equipment will automatically appear on the “Rented Equipment” list.
In the preview of each rented equipment, you can note its receipt or change the planned return date by making a selection according to the screenshot below.
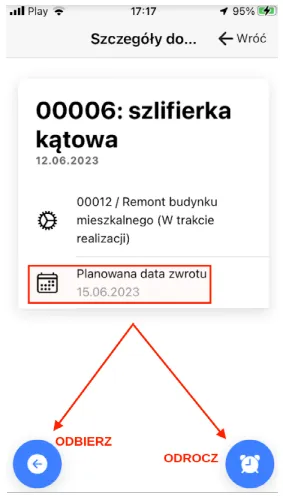
After completing and saving the form, one of the following statuses will appear under the “Planned Return Date” status.

REMEMBER: The above statuses can only change if the employee responsible for receiving the equipment or changing its return date in the equipment warehouse records this situation in the web system.
NOTE: If two of the above options are selected one after the other for one type of rented equipment, the system will automatically record and retain the latest one (entered last).
Warehouse
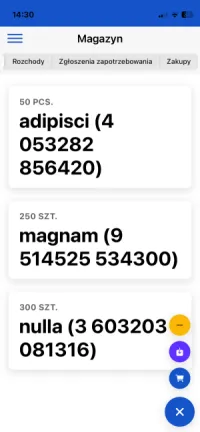
Section titled “Warehouse”In this module, you can track the quantities of materials in the project warehouse, register their consumption, report needs, and enter the delivery of goods that have directly arrived at the construction project being carried out.
REMEMBER: Material issuance for a specific project is only possible when its stock level is positive. If the required goods are not available in the project warehouse, a request for the necessary quantity must be made. This function is only available in the web application.
NOTE: Stock levels for projects are updated exclusively through the web application based on the created estimate.
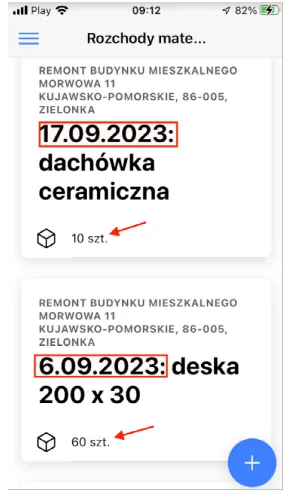
The issuance list shows the dates, names, and quantities of materials used.
You can record the daily issuance of materials according to the following scheme:
-
Go to the “Issuances” module and select the blue ”+” button at the bottom. The current stock levels assigned to the project will be retrieved in the background.
-
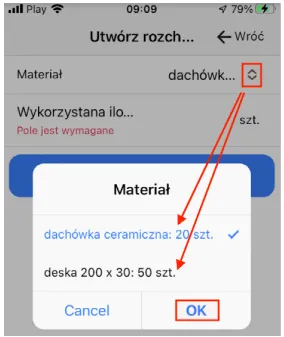
In the “Material” field, use the arrows marked in the screenshot below to expand the list of materials that should be available for the project.
-
Select the type of material you want to record the issuance for and click “Ok”. It will be marked with blue font color.
-
In the “Used Quantity” field, enter the value indicating the current usage and save the selection with the “Ok” button.
NOTE: Records where the quantity of used material has been specified cannot be edited.
REMEMBER: By using the document upload function via the mobile application, you can quickly and easily register delivered goods in the system. This means that materials delivered to the construction site can be used immediately, as the uploaded file is automatically registered in the “Warehouse -> Purchases” menu.
To request material in the application, follow the scheme below:
-
Select the “Material Requests” tab and click the blue ”+” button at the bottom of the screen.
-
Describe the material requirement in simple words – technical names are not necessary.
-
Choose the date in the calendar when the material will be needed.
-
Save the data by clicking the “Ok” button.
The system, using AI mechanisms, assists the warehouse worker in selecting the appropriate materials based on the reported demand. In case of any uncertainties, the details of the demand can be clarified through the project’s internal chat, chat with the foreman, or other communication channels.
REMEMBER: The list of users available in the chat is updated only in the web system. There, you can create a new chat with only one person.
To add a purchase receipt to the application, follow these steps:
-
Select the “Purchases” tab in the warehouse module.
-
Click on the field marked in the screenshot below.
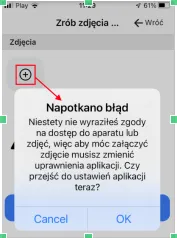
NOTE: If you did not set the application permissions correctly during its installation on the mobile device, an appropriate message will be displayed.
REMEMBER: Without permission to access photos from your phone, this feature will be unavailable.
- Optionally adjust the settings and add photos of the document.
NOTE: If the document has multiple pages, upload them all at once and organize them by numbering.
- Save the data using the “Ok” button.
Expense Reimbursement Requests
Section titled “Expense Reimbursement Requests”During the execution of work, additional expenses may occur. These can include the costs of purchasing small materials necessary on the construction site, such as sandpaper, a hammer, or a screwdriver, as well as fees related to parking a company vehicle in a paid parking lot or passing through a toll road section.
The module allows for the recording of minor expenses incurred by employees in connection with the project execution. Registered requests are forwarded to the accounting department for further verification and settlement.
To add an expense reimbursement request, follow these steps:
-
Go to the “Expense Reimbursement Requests” module in the application menu.
-
At the bottom of the screen, click the blue ”+” button.
-
Fill in the form fields and, if necessary, add a photo of the receipt or invoice.
-
Save the data using the “Ok” button.
NOTE: Each request should pertain to only one receipt or invoice. Do not sum amounts from multiple documents.
REMEMBER: Every status change made by the employee responsible for settlements is visible in the application.
Open the full version of the application
Section titled “Open the full version of the application”This module allows you to access the web version of the system, where the logged-in user can view more system records according to the assigned permissions. Returning to the mobile version is possible by closing the webpage window in the upper right corner of the screen.
REMEMBER: Access to records in the full version of the application depends on the permissions granted in the system.
Account
Section titled “Account”In this tab, you will find:
- The “Settings” option, which allows you to change the current password for accessing the mobile application.
- The “Logout” function, which allows you to log out of the application.
REMEMBER: When you start the application again after logging out, you will need to enter your login details again.